
|
|
|
|
|
|
||
|
|
||
|
|
 29th April 2016, 19:52
|
#1 |
|
This is my second home
1979 Capri 1.6L, 1982 Capri 1.6L, 2016 Dacia Stepway Join Date: Jun 2009
Location: Dorset
Posts: 8,596
Thanks: 3,496
Thanked 3,397 Times in 2,218 Posts
|
I bought two of those unbranded deckless 2DIN units from China (7010B) one for my ZT, and one for SWMBO MPV.
Models are: 7010B, 7012B and 7018B, available from ebay, Amazon, Alibaba, Aliexpress and other China wholesale sites for as little as £34.00. Non GPS Models. UK Seller. 7080B £39.99 + £7.99 P&P 7" Screen - 6cm depth. Non GPS Models. China Seller. 7010B £33.39 7" Screen - 6cm depth as pictured below. 7012B £35.59 7" Screen - 12cm Depth. Some sellers sell this model as a 6cm depth). 7018B £45.50 + £3.99 P&P 7" Screen - 6cm Depth. UK Seller. 7023B £40.45 7" Screen - 6cm Depth - Updated Version. 7651D £41.75 6.5" Screen - 6CM Depth - Controls on either side. GPS Model China Seller. 7021G £56.04 7" Screen - 6cm Depth. GPS Model UK Seller. 7021G £58.00 7" Screen - 6cm Depth. Android & GPS Model UK Seller. RK701 £74.04 + £15.99 P&P 7" Screen - 6cm Depth. Superb little units for the cheap money paid, I cant believe how good the sound is from these things (4x60W).  I didn't know the standard MG Rover speakers had that much power to give, incredible bass, more volume than I know what to do with. I didn't know the standard MG Rover speakers had that much power to give, incredible bass, more volume than I know what to do with. The unit only measures 6cm in depth, super slim, fits in nicely. But! I had to shave around the opening on the black CT23RO01 fascia, I used a Stanley knife and tidied up with sanding gently around the edge, worked a treat.  Due to the unit being so slim and very lightweight, I only needed to use two 4" metal corner braces to secure the unit to the fascia, fits in nice and snug. Things you will need to get you going... 1: CT23RO01 Rover 75/MG ZT Fascia Plate. CT23RO01 Rover 75 1999 - 2005 Double Din Car Stereo Radio Fascia. The fascia has an opening of 172mm, the 2DIN measures 178mm. You will need to shave 3mm from either side, and maybe 1.5mm from along the top. 2: PC2-05-4 Rover 75/MG ZT ISO Loom from 1999 on. PC2-05-4 Rover 25 45 75 ISO Stereo Head Unit Harness Adaptor Wiring Loom Lead. This Rover loom does not come with the 'PINK' reaview camera wire or the 'ORANGE/BLACK steering wheel control wire, so you will have to manually insert these two wires yourself (this can be done by either using the supplied original ISO loom that came with the 2DIN unit, or you can purchase a donor ISO loom for a few pounds (link below). 3: Male to Female ISO Loom (Donor) if needed. You can buy a Standard ISO Loom, you can then unclip 2x wires from it and use on the PC2-05-4 ISO harness, this is for the rearview camera, and the second wire is for the steering wheel controls. 4: PC5-27 ISO Plug to DIN Aerial Antenna Adaptor. PC5-27 ISO Plug to DIN Aerial Antenna Adaptor For Car Radios. 5: If you want, you can use the original ISO loom that comes with the 2DIN unit, but the wires are bare at one end (same with all aftermarket stereos). You can cut and connect to the cars harness using bullet connectors. I myself would rather plug and play and incorporate the 'PINK' reaview camera wire, and the 'ORANGE/BLACK steering Wheel Control wire. You can always use the ISO loom that came with the 2DIN unit as the donor loom, use the 'PINK' rearview camera wire, and the ORANGE/BLACK SWC wire. 6: 2x 4" Metal corner braces to secure the unit to the fascia plate, or use another idea you may have, some have used a hot melt glue gun. 7: Couple of 5mm or 10mm M4 bolts to attached the metal corner brackets to the unit using the threaded holes. If using 10mm bolts you may want to use a nut as a spacer. 8: Micro SD/TF Memory Card or/and a USB Memory Stick/Flash Drive of your choice, these units use upto a 32GB card/stick. These can be purchased from ebay, Amazon, Ebuyer, Argos, Currys etc for as little as £7.00. 9: If you want to install a rearview camera, HERE are some options and the one that I chose. Here are some pics, if only you could hear the sound, its incredible 100 times better than the standard Philips Harmony.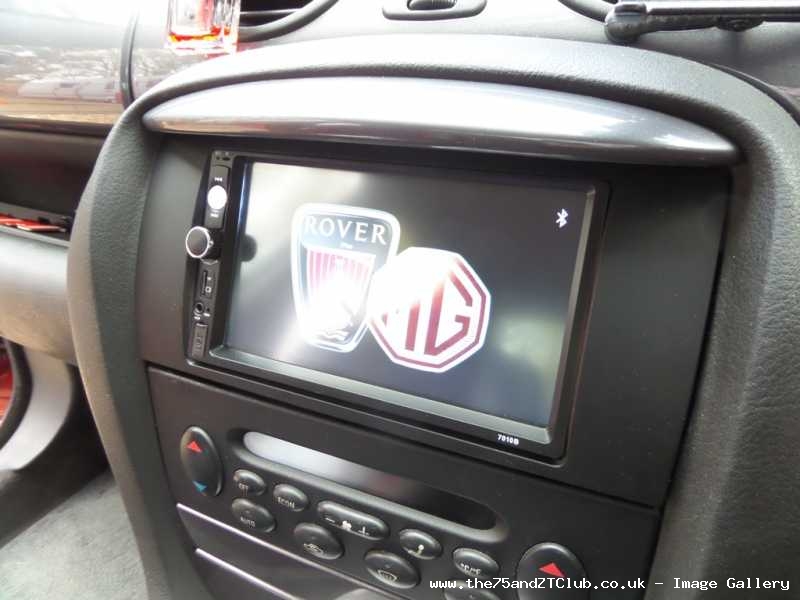   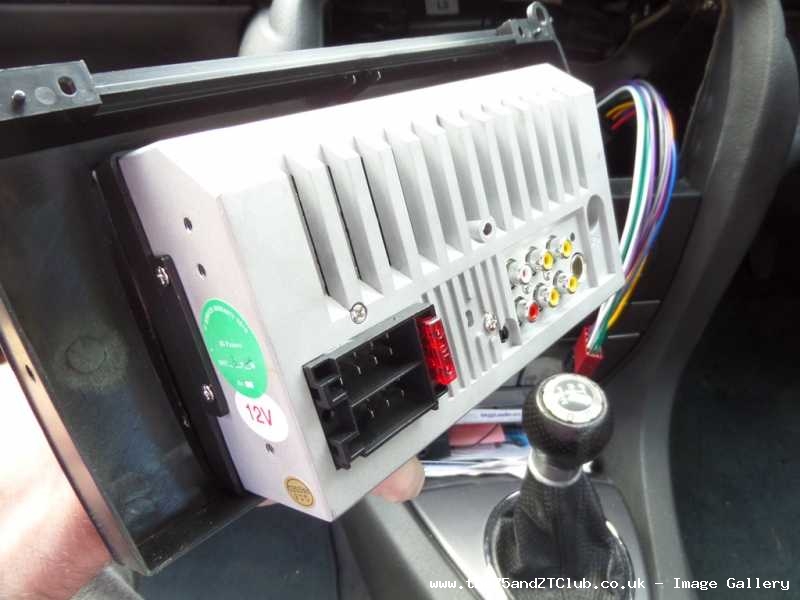  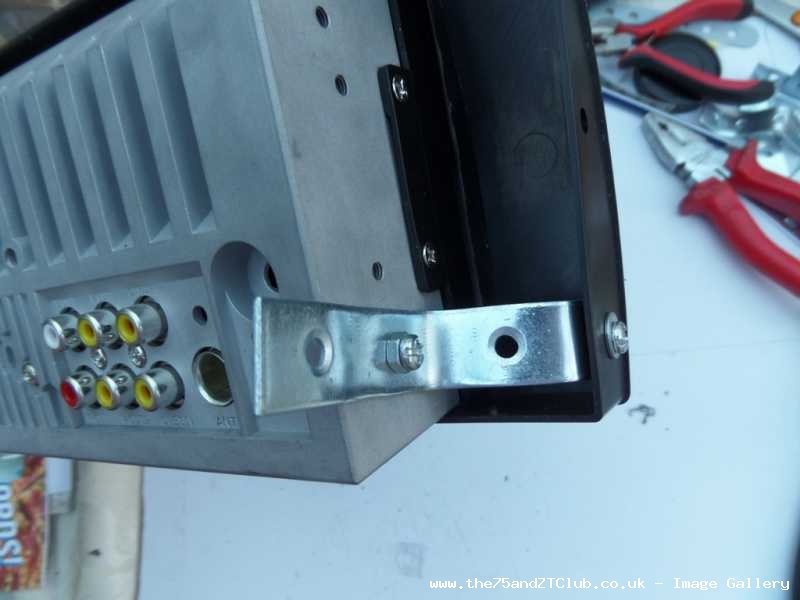  UPDATE! SWC... Thanks to Trevor for being the first to connect the steering wheel controls, POST #103. Last edited by Dallas; 5th October 2016 at 16:26.. |

|

|
|
29th April 2016, 21:42
|
#2 |
|
Loves to post

Rover 75 Saloon Join Date: Apr 2015
Location: Stockton - On - Tees
Posts: 367
Thanks: 55
Thanked 119 Times in 88 Posts
|
When you say cheap, do you have a price / link for them?
Blackrose |
|
|
|
|
30th April 2016, 06:58
|
#3 | |
|
This is my second home
1979 Capri 1.6L, 1982 Capri 1.6L, 2016 Dacia Stepway Join Date: Jun 2009
Location: Dorset
Posts: 8,596
Thanks: 3,496
Thanked 3,397 Times in 2,218 Posts
|
Quote:
I have this little gem to wire up, a rear camera with a metal chrome housing. It should fit up under the rear boot trim, I also bought a rear bumper camera, so not sure as yet which type to fit. |
|
|
|
|
|
1st May 2016, 20:41
|
#4 |
|
Banned
rover 75 saloon Join Date: Oct 2015
Location: workington
Posts: 1,890
Thanks: 385
Thanked 449 Times in 279 Posts
|
how much are those,look pretty good tbh,do they have nav etc
|
|
|
|
|
1st May 2016, 21:19
|
#5 | |
|
Loves to post
Rover 75 saloon Join Date: Jun 2015
Location: Kirkcaldy
Posts: 265
Thanks: 65
Thanked 48 Times in 41 Posts
|
Quote:
|
|
|
|
|
|
1st May 2016, 21:43
|
#6 | |
|
Loves to post
Rover 75 saloon Join Date: Jun 2015
Location: Kirkcaldy
Posts: 265
Thanks: 65
Thanked 48 Times in 41 Posts
|
Quote:
|
|
|
|
|
|
2nd May 2016, 17:57
|
#7 |
|
Avid contributor
Rover 75 saloon. Join Date: Feb 2016
Location: S.E. London
Posts: 116
Thanks: 67
Thanked 31 Times in 22 Posts
|
Any link to where you can get these?
Does it have nav?
__________________
[SIGPIC][/SIGPIC] Now gone: 2000 Rover 75 CDT. Manual. Tahiti blue (JRJ). Mods: EGR delete. Synergy 2E. In-line Thermostat. Electric, heated black leather seats. Chrome Skullcaps. Black steering wheel. 18" MG ZT 11 spoke wheels. Plenum spy-hole. In-dash Sat-Nav. Mesh grill.
Repairs: Rad fan. Clutch/flywheel. Exhaust. Rear light seals. Front bushes & ARB links. Springs. A/C regas. Alternator regulator. Window 'B' post trim. Future: Remote boot release. Front end drop, 160 remap..!? |
|
|
|
|
22nd May 2016, 16:58
|
#8 | |
|
Avid contributor
Rover 75 Conny SE Starlight Silver Join Date: Dec 2014
Location: Coventry
Posts: 107
Thanks: 59
Thanked 24 Times in 17 Posts
|
Quote:
Hi Sorry for being a pain but could you tell me what size screws you used to fix the brackets to the unit and did you trim enough off the fascia to enable the unit to slip all the way through?? Many Thanks Col |
|
|
|
|
|
22nd May 2016, 19:16
|
#9 |
|
This is my second home
Hyundai i10 998cc Join Date: Mar 2012
Location: Kilmarnock
Posts: 6,602
Thanks: 2,088
Thanked 2,298 Times in 1,349 Posts
|
Hi.
I didn't use brackets as the through bolts I think would be likely to be tight on the surround and make the facia a poor fit to the dash. Once you have removed the excess material from the facia and the head unit fits snugly into the facia I'd suggest you use a hot melt gun and bond the head unit to the facia at the join from the rear. This is how I have done it. The head unit is quite light and hot melt applied each side, around the top and under the unit and between the lower edge of the facia will give the unit as much strength as you will ever need. To remove the unit a quick spray with solvent will soften the hot melt without effecting the plastic.  Notice the facia is a nice fit around the dash,
__________________
Cheers from Trevor  MM0KJJ Last edited by murphyv310; 22nd May 2016 at 19:19.. |
|
|
|
|
22nd May 2016, 19:23
|
#10 | ||
|
This is my second home
1979 Capri 1.6L, 1982 Capri 1.6L, 2016 Dacia Stepway Join Date: Jun 2009
Location: Dorset
Posts: 8,596
Thanks: 3,496
Thanked 3,397 Times in 2,218 Posts
|
Quote:
The 2din front-face has a small lip, I shaved enough from around the newly bought dash fascia so the 2din unit only pushes in from behind, the 2din lip stops at the fascia opening. Quote:
Last edited by Dallas; 22nd May 2016 at 19:27.. |
||
|
|
|
 |
|
|


 Hybrid Mode
