
|
|
|
|
|
|
||
|
|
||
 14th February 2012, 21:02
|
#91 |
|
This is my second home
01 75 tourer cdt,1973 Rover 3500S,,1974 Rover 3500 Auto,1998 216 SE Coupe, 1968 Morris Minor 1000 Join Date: Jul 2010
Location: bangor/down
Posts: 4,839
Thanks: 62
Thanked 184 Times in 158 Posts
|
These look very good.Nice mod
__________________
Regards Neale [SIGPIC][/SIGPIC] 121st 75 Tourer to be made 15th 75 Tourer CDT Club SE to be made 36th 75 Tourer in Zircon Silver Metallic to be made Membership No 903 I was one of the 541 
|

|

|
|
14th February 2012, 21:09
|
#92 | |
|
This is my second home
Rover 75 1.8 Connoisseur SE and a Ford S-Max Titanium Join Date: Jan 2012
Location: Huntingdon
Posts: 3,756
Thanks: 70
Thanked 31 Times in 27 Posts
|
Quote:
 I'm pleased with how they turned out I'm pleased with how they turned out
__________________
Mods so far: Plenums, bonnet release mod, handbrake compensator (arctic), rear parking sensors, coolant level sensor (Vindaloo), DRL's, Fan resistor upgrade ( Jules), Marmite lighting, Auto dimming rear view mirror, twin horns, fog lights, real walnut dash, walnut gear knob, Sean DD unit with DVB-T, message centre ipk, electric sun blind, auto opening boot lid, walnut steering wheel, electric seats Link to my Auto Boot Lift Mod http://www.the75andztclub.co.uk/foru...d.php?t=114273 |
|
|
|
|
|
14th February 2012, 21:37
|
#93 |
|
Avid contributor
MG ZT 385 SE Join Date: Feb 2009
Location: North Yorkshire
Posts: 236
Thanks: 22
Thanked 3 Times in 3 Posts
|
I fitted these a year ago and they come on with the ignition.

__________________
Bainzi MG ZT 385 SE Starlight Silver. Reg 29 Sep 04 Vin No 496 `Roush Supercharger Fitted 07 Feb 11¬ `Do ... or do not, There is no Try` |
|
|
|
|
15th February 2012, 19:16
|
#94 |
|
This is my second home
Rover 75 1.8 Connoisseur SE and a Ford S-Max Titanium Join Date: Jan 2012
Location: Huntingdon
Posts: 3,756
Thanks: 70
Thanked 31 Times in 27 Posts
|
Very Nice
__________________
Mods so far: Plenums, bonnet release mod, handbrake compensator (arctic), rear parking sensors, coolant level sensor (Vindaloo), DRL's, Fan resistor upgrade ( Jules), Marmite lighting, Auto dimming rear view mirror, twin horns, fog lights, real walnut dash, walnut gear knob, Sean DD unit with DVB-T, message centre ipk, electric sun blind, auto opening boot lid, walnut steering wheel, electric seats Link to my Auto Boot Lift Mod http://www.the75andztclub.co.uk/foru...d.php?t=114273 |
|
|
|
|
15th February 2012, 20:54
|
#95 |
|
Give to Learn

Freelander 2 Join Date: Aug 2010
Location: West Midlands
Posts: 18,795
Thanks: 1,155
Thanked 6,407 Times in 3,874 Posts
|
Ordered mine yesterday so feel an how to coming on over the next few days or next week
if not at least a few photos  Arctic. Arctic.
__________________
Arctic Givology Learn to Give Everything is Achievable  ad altiora tendo. Check out our Nano meet dates http://www.midlandsnanomeets.co.uk/ http://www.the75andztclub.co.uk/index.php?thepage=howto " You do the work , we supply the expertise " |
|
|
|
|
15th February 2012, 21:05
|
#96 | |
|
This is my second home
Rover 75 1.8 Connoisseur SE and a Ford S-Max Titanium Join Date: Jan 2012
Location: Huntingdon
Posts: 3,756
Thanks: 70
Thanked 31 Times in 27 Posts
|
Quote:
I'll put some more close up photos on at the weekend. I have been thinking about fitting them in from the front as I have thought of an easy bracket to make for that ( patent applied for), but then again I like the way the rebate in the bumper looks with the lights sitting behind
__________________
Mods so far: Plenums, bonnet release mod, handbrake compensator (arctic), rear parking sensors, coolant level sensor (Vindaloo), DRL's, Fan resistor upgrade ( Jules), Marmite lighting, Auto dimming rear view mirror, twin horns, fog lights, real walnut dash, walnut gear knob, Sean DD unit with DVB-T, message centre ipk, electric sun blind, auto opening boot lid, walnut steering wheel, electric seats Link to my Auto Boot Lift Mod http://www.the75andztclub.co.uk/foru...d.php?t=114273 |
|
|
|
|
|
15th February 2012, 21:48
|
#97 |
|
This is my second home
Small....Far away Join Date: Feb 2010
Location: Norwich
Posts: 9,473
Thanks: 2,707
Thanked 2,060 Times in 1,194 Posts
|
They look totally awesome Steve

__________________
~Karma will help or hinder you. Therefore look positive for this day~ |
|
|
|
|
25th February 2012, 17:36
|
#98 |
|
This is my second home
Small....Far away Join Date: Feb 2010
Location: Norwich
Posts: 9,473
Thanks: 2,707
Thanked 2,060 Times in 1,194 Posts
|
So thanks to Steve I now have Daytime Running Lights, and BBM for starting the thread with Begiorlegi photoshop and those who contributed.
After seeing Steve's car POST#75, and where he bought the components from POST#77, I just had to have some. Steve kindly came over and did the work for me, whilst I made coffee and took pictures  i bought the LED's from POST#77 http://cgi.ebay.co.uk/ws/eBayISAPI.d...#ht_3128wt_982 The auto dimming relays DRLR2's from the same page, dim's the LED's when you turn on your lights. The ones I bought were DRLR3's which do not do this. Instead they turn off and on with the flash of the corresponding indicators instead. LED's off when lights are turned on  http://www.ebay.co.uk/itm/2307390010...84.m1439.l2649 http://www.ebay.co.uk/itm/2307390010...84.m1439.l2649 After removing the bumper the the inlays under the spotlights were cut out with a Stanly and the plastic fasteners chiseled off. Fig1-3 Fig1  Fig2  Fig3  The LED's were screwed to two right angle brackets each side then bolted to the underside of the bumper, by drilling holes and using spacers so they sat at the right level for the cut out holes. Fig 4-7 Fig4  Fig5  Fig6  Fig7  Fig8 shows the wiring instructions that comes with the DRLR3 unit. I will let Steve tell you more about that as it was a bit of a job finding the right car wires to connect DRLR3's wires too. We both have the similar year cars but the wiring colours were different in my car than they were to his. Fig8  The results.... Ignition off.  Ignition on 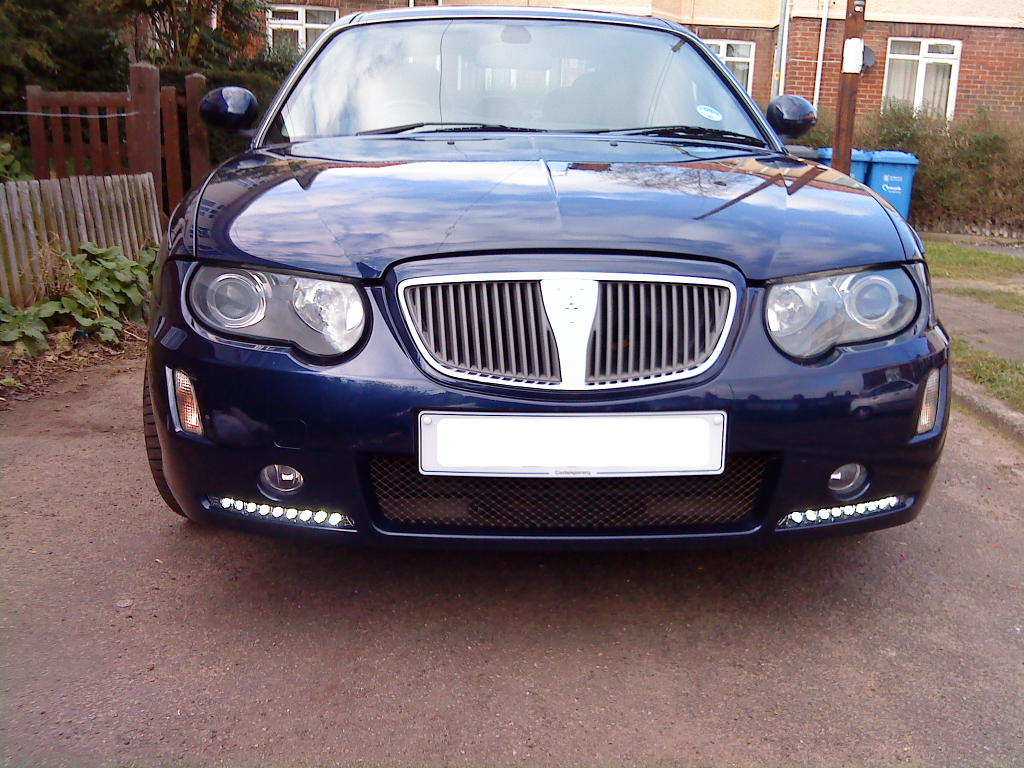  Indicator on LED off with sequence  Lights on  There apparenty an option of wiring in a dimmer for the LED's while the lights are on (watch out Steve ) possibily a DRLR3 wired in conjunction with a DRLR2, but all in all I am well chuffed  Ps I bought some 3D style number plates (Demonplates) for the new look.
__________________
~Karma will help or hinder you. Therefore look positive for this day~ Last edited by Jay; 18th March 2012 at 10:29.. |
|
|
|
|
25th February 2012, 18:20
|
#99 |
|
This is my second home
Rover 75 1.8 Connoisseur SE and a Ford S-Max Titanium Join Date: Jan 2012
Location: Huntingdon
Posts: 3,756
Thanks: 70
Thanked 31 Times in 27 Posts
|
Jay, it was very nice meeting you mate and I'm glad you like the new lights
, even if it did take a little bit longer trying to find the elusive light green wireThe step by step pictures look great and you have done a brilliant job of explaining them and including the wiring diagram too Just to explain a little more about the wiring: The led strips come with a red and a black wire on each. The wires aren't very long so these have to be extended using some 0.75mm red and black cable. The cables need to be long enough to feed up under the NSF headlight to the fuse box. The RED cable from the NSF led's needs to be crimped to the YELLOW cable of the DRLR3 relay. The RED cable from the OSF led's needs to be crimped to the WHITE cable of the DRLR3 relay. The BLACK cables from both of the led's needs to have a ring crimp attached and this needs connected to an earth point on front of car.( there is one just behind the grille). The BLACK cable on the DRLR3 relay needs connecting to earth at the same point as above. The RED cable on the DRLR3 relay needs to be crimped to an ignition switched supply. ( this is where the confusion happened  . On my car it was a light green cable under the fuse box. On jays car it was a YELLOW/ BLUE cable fed from the R4 relay in fuse box). . On my car it was a light green cable under the fuse box. On jays car it was a YELLOW/ BLUE cable fed from the R4 relay in fuse box).The GREY cable on the DRLR3 relay needs to be crimped to RED/ ORANGE cable supplying the headlight unit. The ORANGE cable on the DRLR3 relay needs to be extended and crimped to GREEN/WHITE cable behind the NSF indicator. The BLUE cable on the DRLR3 relay needs to be extended and crimped to GREEN/RED cable behind the OSF indicator. All cables in the bumper itself were neatly clipped into the oem clips along the bottom inside edge of bumper. The DRLR3 relay has a couple of bits of 3M tape on its side so this can be stuck onto the side of the fuse box. The front bumper was then lifted back into position, led's tested, and bumper bolted up tight. Close bonnet, switch on ignition, and Voila! Stand back and admire new led's Hope between the 2 of us we have covered everything. Thanks again for keeping the coffees coming and glad it was a nice sunny day to boot
__________________
Mods so far: Plenums, bonnet release mod, handbrake compensator (arctic), rear parking sensors, coolant level sensor (Vindaloo), DRL's, Fan resistor upgrade ( Jules), Marmite lighting, Auto dimming rear view mirror, twin horns, fog lights, real walnut dash, walnut gear knob, Sean DD unit with DVB-T, message centre ipk, electric sun blind, auto opening boot lid, walnut steering wheel, electric seats Link to my Auto Boot Lift Mod http://www.the75andztclub.co.uk/foru...d.php?t=114273 |
|
|
|
|
25th February 2012, 18:26
|
#100 |
|
Banned
MG ZT V6 190+ Join Date: Sep 2008
Location: Leeds
Posts: 33,223
Thanks: 41
Thanked 1,614 Times in 1,416 Posts
|
A good picture,they look like original equipment..The bumper with the fogs gives a different effect.
 |
|
|
|
 |
|
|


 Linear Mode

