
|
|
|
|
|
|
||
|
|
||
 30th November 2019, 09:21
|
#11 | |
|
Posted a thing or two
Rover 75 Saloon Join Date: Apr 2019
Location: Under the car
Posts: 1,840
Thanks: 210
Thanked 244 Times in 221 Posts
|
Quote:
|
|

|

|
|
30th November 2019, 09:32
|
#12 | ||
|
Give to Learn

Freelander 2 Join Date: Aug 2010
Location: West Midlands
Posts: 18,806
Thanks: 1,155
Thanked 6,407 Times in 3,874 Posts
|
Quote:
 couple of pics below of original exhaust & the new one I purchased from Germany. couple of pics below of original exhaust & the new one I purchased from Germany.PS photo's of first coat & the paint  several coats will be added over the next few days, it is not going to be fitted for at least a couple of months. several coats will be added over the next few days, it is not going to be fitted for at least a couple of months.
__________________
Arctic Givology Learn to Give Everything is Achievable  ad altiora tendo. Check out our Nano meet dates http://www.midlandsnanomeets.co.uk/ http://www.the75andztclub.co.uk/index.php?thepage=howto " You do the work , we supply the expertise " Last edited by Arctic; 30th November 2019 at 09:48.. |
||
|
|
|
|
30th November 2019, 09:40
|
#13 |
|
Posted a thing or two
Rover 75 Connie SE Tourer Triumph Street Triple R Join Date: Aug 2009
Location: Bletchley, Milton Keynes
Posts: 1,163
Thanks: 75
Thanked 91 Times in 65 Posts
|
I just bought a can from Halfrauds! VHT in Black. About a tenner a can. I rubbed the original paint off and cleaned down with IPA then shoot on at least 5 coats and leave to cure. Overnight if poss. Then carefully mount exhaust
to car and repaint any scratches acquired on the way. The heat of the working engine will cure it more.
__________________
Real walnut interior. Original refurbished Forked Spokes 16 with Michelin Primacy 4 rubber, Pioneer AVH-Z9200DAB double din Wi Fi phone integration. Retrofitted twin front horns. 160 re-map. Revotec fan. Silicone intercooler hoses and O ring replacement. Top hose thermostat. New walnut and smokestone steering wheel with cruise upgrade. Brembo Brakes. Ceramic coated rear Exhaust. L/engine mount, Hydramount, Bosch MAF. Focal Access Drivers and Focal Amp. |
|
|
|
|
30th November 2019, 11:00
|
#14 |
|
This is my second home

Roverless + 1.7D Sportage Join Date: Aug 2014
Location: East Norfolk
Posts: 7,080
Thanks: 729
Thanked 2,021 Times in 1,449 Posts
|
I used to always drill a small hole at the lowest point of my exhaust boxes (cars and commercials). I used to pop a self tapping bolt in the hole at MOT time (with a blob of exhaust sealant) and remove again after.
 To watch water running out after a short run showed how useful it was. To watch water running out after a short run showed how useful it was.
__________________
Oil in my veins! |
|
|
|
|
30th November 2019, 14:44
|
#15 |
|
Give to Learn
Freelander 2 Join Date: Aug 2010
Location: West Midlands
Posts: 18,806
Thanks: 1,155
Thanked 6,407 Times in 3,874 Posts
|
Added a couple more coats of gold paint today, only when the brandy ball was throwing out a little warmth
 1 1 2 2 3 3
__________________
Arctic Givology Learn to Give Everything is Achievable ad altiora tendo. Check out our Nano meet dates http://www.midlandsnanomeets.co.uk/ http://www.the75andztclub.co.uk/index.php?thepage=howto " You do the work , we supply the expertise " |
|
|
|
|
30th November 2019, 15:44
|
#16 | |
|
This is my second home
Rover 75 cdt club + Rover 2.5 KV6 Conni SE Join Date: May 2008
Location: Birmingham
Posts: 11,433
Thanks: 6,587
Thanked 2,262 Times in 1,729 Posts
|
Quote:
__________________
Great Barr, Birmingham. Last edited by bl52krz; 30th November 2019 at 15:54.. Reason: Should have read down further posts re Decco style. |
|
|
|
|
|
30th November 2019, 20:47
|
#17 | ||
|
Give to Learn
Freelander 2 Join Date: Aug 2010
Location: West Midlands
Posts: 18,806
Thanks: 1,155
Thanked 6,407 Times in 3,874 Posts
|
Quote:
Yes good paint straight on to surface after cleaning it with carb cleaner & allowed to dry, I build up very thin layers, over a period of time, also it's very quick drying paint. John yes we have covered up quite a few of our plants from the frost
__________________
Arctic Givology Learn to Give Everything is Achievable ad altiora tendo. Check out our Nano meet dates http://www.midlandsnanomeets.co.uk/ http://www.the75andztclub.co.uk/index.php?thepage=howto " You do the work , we supply the expertise " |
||
|
|
|
|
30th November 2019, 23:27
|
#18 | |||
|
Posted a thing or two
Rover 75 Saloon Join Date: Apr 2019
Location: Under the car
Posts: 1,840
Thanks: 210
Thanked 244 Times in 221 Posts
|
Quote:
Of course the problem with doing this now is it'll be virtually impossible to get the centre section & back box on the car without ripping the new paint to bits. I should have painted the bits back in August/September.  When I cut the old factory back box off I stood it on end and a stack of water drained out. I cut the centre section off on Friday, stood that on end and the same thing happened again. Maybe it's time for a wee hole in the new one. Quote:
Quote:
|
|||
|
|
|
|
1st December 2019, 07:18
|
#19 | |
|
Give to Learn
Freelander 2 Join Date: Aug 2010
Location: West Midlands
Posts: 18,806
Thanks: 1,155
Thanked 6,407 Times in 3,874 Posts
|
[QUOTE]
Quote:
Hi Simon. I have used this paint on both my MGZT, My FL2 and the tourer, and it's not peeled or burnt off, it's been on the FL2 since 2017 and is still like the day I sprayed it on. MGZT would be the same if I still had it I think, & the tourer I have now which pictures I have put up earlier had a very thin coat just to tidy it up due to the outer skin peeling & it's going to be changed with the exhaust I am painting now.
__________________
Arctic Givology Learn to Give Everything is Achievable ad altiora tendo. Check out our Nano meet dates http://www.midlandsnanomeets.co.uk/ http://www.the75andztclub.co.uk/index.php?thepage=howto " You do the work , we supply the expertise " |
|
|
|
|
|
6th December 2019, 08:04
|
#20 | |
|
Posted a thing or two
Rover 75 Saloon Join Date: Apr 2019
Location: Under the car
Posts: 1,840
Thanks: 210
Thanked 244 Times in 221 Posts
|
Quote:
 £2.55 per can plus delivery = £10.20 + £3.80 = £15. So that works out at £3.75 per 400ml per can.   Paint goes on nice and smooth - this is after six coats. The can says allow 15-20 mins between coats but I played safe and allowed 30 mins. 2.57 cans (ish) did six coats on both the intermediate section and the back box. It only remains to be seen how good it is in action. Btw, the colour really is what it says on the tin - Silver Matt. The colour of the plastic can lid is darker than the paint itself. Below: I converted my trusty subframe dolly into an exhaust dolly, complete with built-in 'Exhaust Revolver Tool' to make painting easier (a lot easier). The dolly actually consists of two sub-dollies connected by a long plank of wood (multiple planks required for subframe duty!). The sub-dolly at the other end has two upright posts which are positioned just in front of the sharp turn in the pipe. The pipe straight is then plonked between the posts and the whole thing can be rotated with one hand while you spray with the other. Once the paint has cured, the whole thing slides under the car with ease - then you just add blocks to lift the exhaust to the correct height, so that it lines up with the cut-off front section (which is still on the car). If I had three sub-dollies I could probably put an entire exhaust system on in one go, unassisted. The rubbers hangers will be the tricky bit. 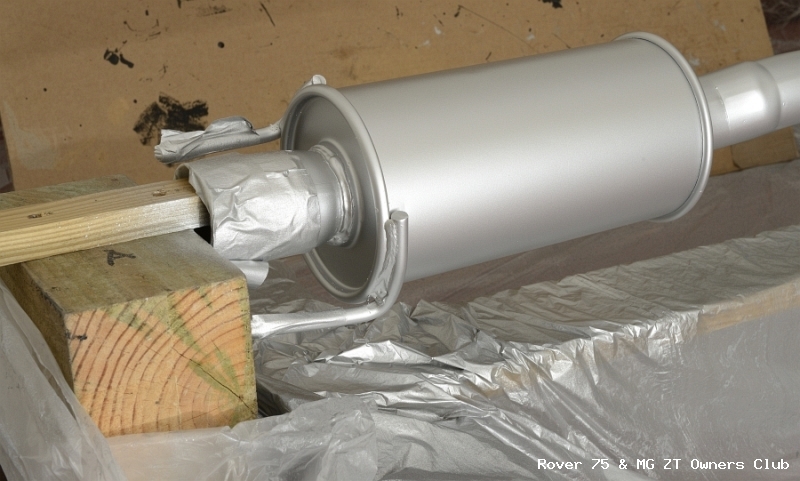   |
|
|
|
|
 |
| Thread Tools | |
| Display Modes | |
|
|


 Linear Mode

