
|
|
|
|
|
|
||
|
|
||
|
|||||||
|
|
 |
|
|
Thread Tools | Display Modes |
 17th April 2015, 11:38
|
#1 |
|
This is my second home
1979 Capri 1.6L, 1982 Capri 1.6L, 2016 Dacia Stepway Join Date: Jun 2009
Location: Dorset
Posts: 8,596
Thanks: 3,496
Thanked 3,397 Times in 2,218 Posts
|
Spinning boot barrel mod/fix by using just 1x screw.
No replacement parts needed. One day my key would just turn around in the boot barrel without actually opening the boot. The cause of this problem is due to the alloy metal end piece within the barrel breaks in two places. There is a large black plastic triangle piece that has two plastic lugs which slot into the alloy section, the two plastic lugs also break. This then causes the key barrel to just keep turning without unlocking the boot, this is due to the broken lugs not able to turn the triangle piece section that triggers the micro switch to unlock the boot catch. IF YOU CANNOT SOURCE A REPLACEMENT LOCK. THEN THIS HOW TO WILL SHOW YOU HOW TO FIX YOUR MECHANISM BY USING JUST 1x METAL SCREW. YOU DONT EVEN HAVE TO TAKE YOUR BARREL & MECHANISM OUT FROM THE BOOT. ALL CAN BE PERFORMED WITH THE BARREL/MECHANISM STILL IN SITU (still fitted to boot). 1: Removed the boot door-card by popping out the black plastic fixers. You will see the boot barrel mechanism top right of boot.  2: Pop out the metal striker bar from the red clip that is attached to the large plastic triangle end piece. 3: With a small flat headed screwdriver carefully removed the cir-clip and carefully lift the black plastic triangle end piece downwards (you may find the metal alloy broken pieces and the black plastic lugs will just fall out). 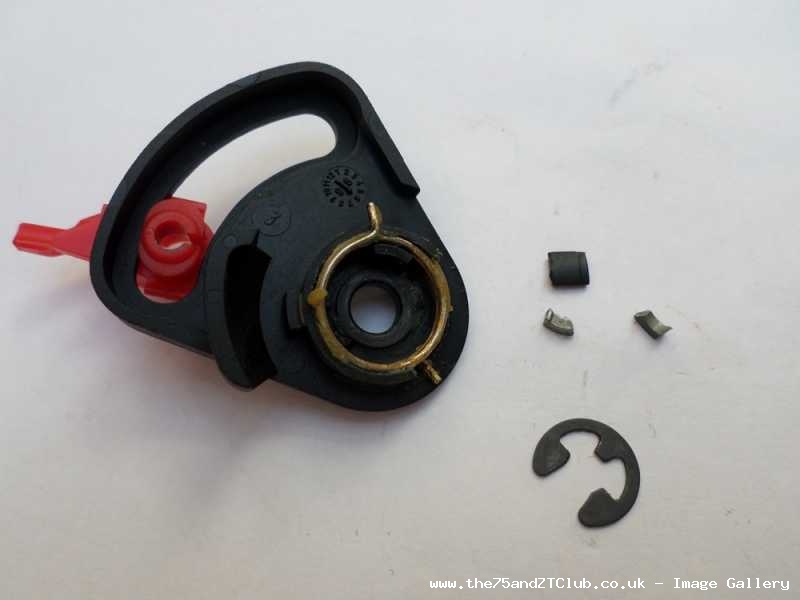 4: The metal alloy end piece will stay in its position, you will not have to disturb this section at all.  5: Remove the spring from the black plastic triangle piece and inspect the two lugs. You will most probably find one or both plastic lugs have broken off, this is why your key barrel just spins (you will just see a footprint where the lugs were attached). 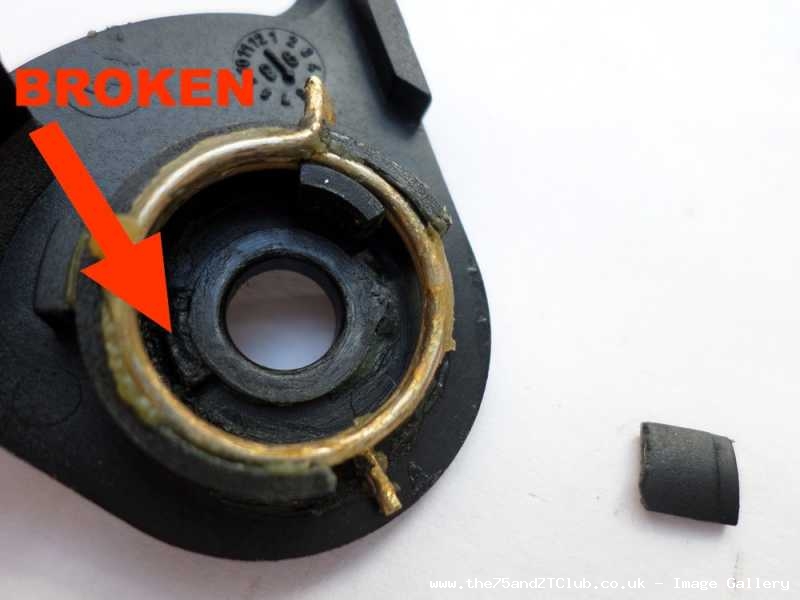 6: Drill one hole exactly to the centre on each lug footprint, use a small precision drill bit. Please Note: Only one hole will be used, this is because I found the cir-clip would cover the other hole, even when adjusting the cir-clip over to one-side).  7: The screws must not be to long, no longer that the black collar moulding (you can just see the tips of each screw).  8: Only one screw will be needed. Remove both screws from the black plastic triangle piece.  9: Now refit the spring back into the black plastic triangle piece, making sure you hook both ends of the spring over the plastic edge moulding. 10: You can now reassemble the black plastic triangle piece back onto the barrel lock mechanism in the boot. Just offer-up the triangle piece over the barrel centre pin and line up the ends of the spring to the lower gaps in the metal alloy end piece (the piece that has broken where the plastic lugs would normally slot in). Everything just slots in carefully, once all in place you can refit the cir-clip. 11: You will find the cir-clip will cover one hole, you can rotate the cir-clip but one hole will always be covered. So choose a hole that suits you and screw in the small screw. The screw is now in position where originally one of the black plastic lugs would normally be, this screw will now act as one of the lugs as a stopper to turn the triangle piece to strike the micro switch when the key is turned.  12: Job done.  Disclaimer: You are responsible for any work or modifications carried out on your car and you undertake any such work at your own risk. The 75 and ZT Owners Club nor the original author of this How-To can be held liable for anything that may happen as a result of you following this How-To. Last edited by Dragrad; 17th April 2015 at 21:22.. Reason: Disclaimer added. |

|

|
|
17th April 2015, 12:00
|
#2 |
|
same car since 2005

2001 Rover 75 2.0 v6 Connoisseur Saloon Join Date: Nov 2006
Location: Ellesmere Port , Cheshire
Posts: 3,818
Thanks: 379
Thanked 549 Times in 466 Posts
|
Well done
Perhaps this should go in the how-to section , if there is a nice Mod on duty 
__________________
 Who said it was simples ? Who said it was simples ?
|
|
|
|
|
17th April 2015, 12:07
|
#3 |
|
Avid contributor
rover 75 saloon Join Date: Feb 2012
Location: NW London-Colindale
Posts: 221
Thanks: 108
Thanked 41 Times in 35 Posts
|
If u could please tell us what screws did u use... what size that'l be much appreciated...
|
|
|
|
|
17th April 2015, 13:49
|
#4 | |
|
This is my second home
1979 Capri 1.6L, 1982 Capri 1.6L, 2016 Dacia Stepway Join Date: Jun 2009
Location: Dorset
Posts: 8,596
Thanks: 3,496
Thanked 3,397 Times in 2,218 Posts
|
Quote:
|
|
|
|
|
|
17th April 2015, 13:51
|
#5 |
|
Avid contributor
rover 75 saloon Join Date: Feb 2012
Location: NW London-Colindale
Posts: 221
Thanks: 108
Thanked 41 Times in 35 Posts
|
My son is about to get a new toy....
Thank you |
|
|
|
|
17th April 2015, 14:01
|
#6 | |
|
This is my second home
1979 Capri 1.6L, 1982 Capri 1.6L, 2016 Dacia Stepway Join Date: Jun 2009
Location: Dorset
Posts: 8,596
Thanks: 3,496
Thanked 3,397 Times in 2,218 Posts
|
Quote:
luv it... made me laugh.  |
|
|
|
|
|
17th April 2015, 16:17
|
#7 |
|
Gets stuck in
2002. Rover 75 saloon club se. 1.8 vvc. Moonstone green. Join Date: Jul 2014
Location: Dunno...Sat nav broke..! Somewhere in Yorks.
Posts: 988
Thanks: 296
Thanked 233 Times in 160 Posts
|
Great how-to and nice clear pics.
Nice little fix that Dallas and something i have done before on many an item. It always impresses me to see when someone has thought of a way of fixing something and making it better than it was before, instead of buying a whole new part and throwing the old one away. You are a man after my own heart..Well done matey.  Last edited by OddSox; 17th April 2015 at 16:19.. |
|
|
|
|
17th April 2015, 19:37
|
#8 |
|
This is my second home
1979 Capri 1.6L, 1982 Capri 1.6L, 2016 Dacia Stepway Join Date: Jun 2009
Location: Dorset
Posts: 8,596
Thanks: 3,496
Thanked 3,397 Times in 2,218 Posts
|
Thanks oddsox
The idea came to me this morning, the job itself only took 10 or so minutes. It actually took me longer taking the pics and doing the write up. |
|
|
|
|
17th April 2015, 21:18
|
#9 | |
|
This is my second home
None * DROWNED Join Date: Aug 2007
Location: Cardigan
Posts: 33,339
Thanks: 1,257
Thanked 1,664 Times in 1,081 Posts
|
Quote:
Now in the How To's for posterity 
__________________
Andrew Ich Dien Problem solving is... lateral thinking SEARCH FIRST ...ASK LATER... Last edited by Dragrad; 17th April 2015 at 21:22.. |
|
|
|
|
|
10th May 2015, 21:53
|
#10 |
|
This is my second home
Black V8 Ztt 260SE Join Date: Feb 2009
Location: Birmingham
Posts: 3,833
Thanks: 391
Thanked 242 Times in 195 Posts
|
Members carried out this repair at the nano this week. thanks for the info saved the member day thanks for a very useful how too
__________________
[SIGPIC][/SIGPIC]  member 621http://forums.75-zt.com/images/smilies/oldman.gif member 621http://forums.75-zt.com/images/smilies/oldman.gifwww.midlandsnanomeets.co.uk |
|
|
|
|
|
|


 Linear Mode

