
|
|
|
|
|
|
||
|
|
||
 24th June 2009, 22:08
|
#11 | |
|
Gets stuck in
Rover 75 CDT & V6 saloons in Wedgwood Join Date: Feb 2007
Location: North Norfolk
Posts: 782
Thanks: 2
Thanked 4 Times in 3 Posts
|
Quote:
__________________
http://www.the75andztclub.co.uk/foru...7ef19087b7.gif |
|

|

|
|
24th June 2009, 23:07
|
#12 |
|
Owners Club Director

Rover 75 Conn SE V6 / MG ZT 260 SE V8 / MG ZT 180 SE V6 Join Date: Feb 2007
Location: Southampton
Posts: 20,968
Thanks: 645
Thanked 6,851 Times in 2,537 Posts
|
Hi Robert, don't worry about removing the Knobs, as Stocktake says the control switch spindle is a white D shaped column, and the under side of the rotary rubber knob has a similar D shaped cavity that it slides into.
It will only fit when the flat edge of the D shapes are lined up, then it's just a push home affair. I replaced my menu knob a while back (the original one's rubber top surface had started to come away from the rounded flat base of the knob, thus excess play when turning the knob and lots of rubber squeeking noise. If it helps, I have a spare knob knocking about, and could photograph the underside if you like. But there really shouldn't be an issue with removal / replacement. BTW both the Mark I, Mark II & Mark III units all have the same knob design. |
|
|
|
|
25th June 2009, 06:57
|
#13 | |
|
Vis Whiz

Rover 75 2.5 auto Saloon Join Date: Jun 2007
Location: LEEDS
Posts: 20,607
Thanks: 2,057
Thanked 3,056 Times in 1,621 Posts
|
Quote:
Hi Robert, sorry to confuse you (and me) my sat nav unit in the boot is Mk3. The head unit I have is exactly the same as yours  mine is a 1999 model mine is a 1999 model
__________________
Dave...  Lost a few stones and a Gall Bladder and part of a bile duct and all of my dignity in the suppository incident
|
|
|
|
|
|
25th June 2009, 09:06
|
#14 | |
|
Gets stuck in
Rover 75 CDT & V6 saloons in Wedgwood Join Date: Feb 2007
Location: North Norfolk
Posts: 782
Thanks: 2
Thanked 4 Times in 3 Posts
|
Quote:
 My son says he also remembers that with the knob removed, the push/toggle effect didn't work at all. In fact, I recall that just touching the metal spindle (red in my sketch) with your finger, sent the Sat Nav a bit random and haywire! If my sketch is correct, I'm still a bit baffled as to how you get the rubber lip or skirt tucked back under the white disc (yellow in my sketch), notwithstanding the need to line up the D section. My main dealer could not refit on the other vehicle and that was in 2002 I think. Does the edge of the rubber knob when it's underneath actually act as a kind of spring for the push/toggle action? The car is only 10 yrs old next month and only done 116k (see her in the calendar next month) and really I would have expected better!  . Robert . Robert
__________________
http://www.the75andztclub.co.uk/foru...7ef19087b7.gif Last edited by Bartonrover; 25th June 2009 at 09:10.. |
|
|
|
|
|
25th June 2009, 19:40
|
#15 |
|
Owners Club Director
Rover 75 Conn SE V6 / MG ZT 260 SE V8 / MG ZT 180 SE V6 Join Date: Feb 2007
Location: Southampton
Posts: 20,968
Thanks: 645
Thanked 6,851 Times in 2,537 Posts
|
Here you go Robert, as promised:
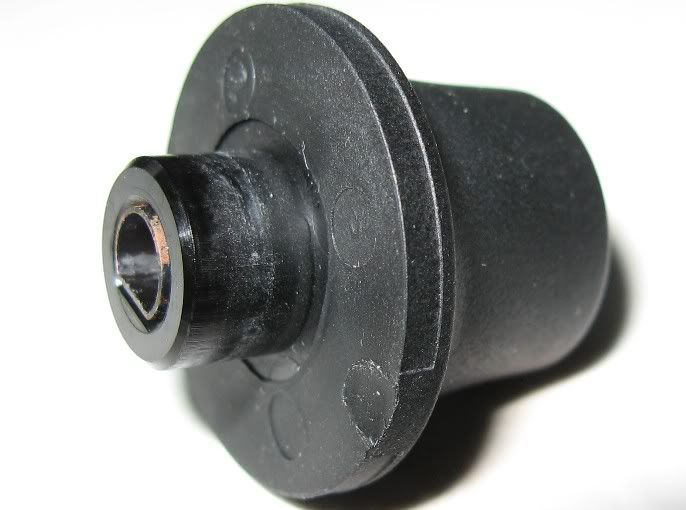 and here is the original faulty menu knob I had (on the left) which came away from the plastic base - preventing correct operation. 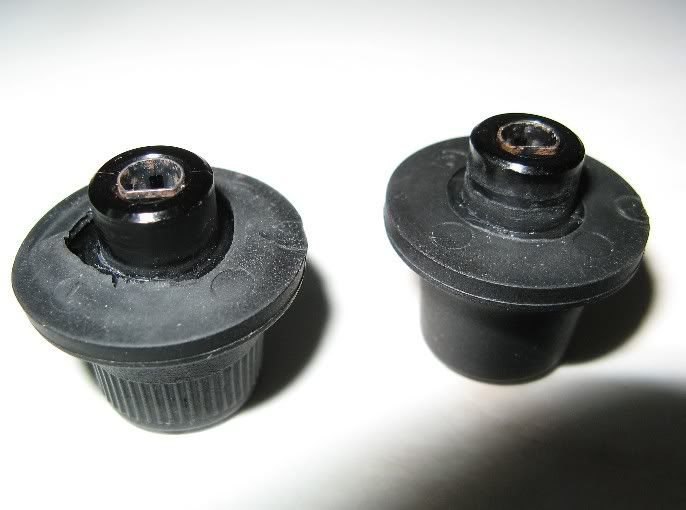 Hope that helps convince you. BTW for those that want to know, Smooth knob = YID100080PUY (Volume) Ridged Knob = YID100030PUY (Menu) |
|
|
|
|
25th June 2009, 20:51
|
#16 |
|
This is my second home

75 Join Date: Nov 2006
Location: Leeds
Posts: 8,432
Thanks: 176
Thanked 907 Times in 716 Posts
|
Maybe this could help..
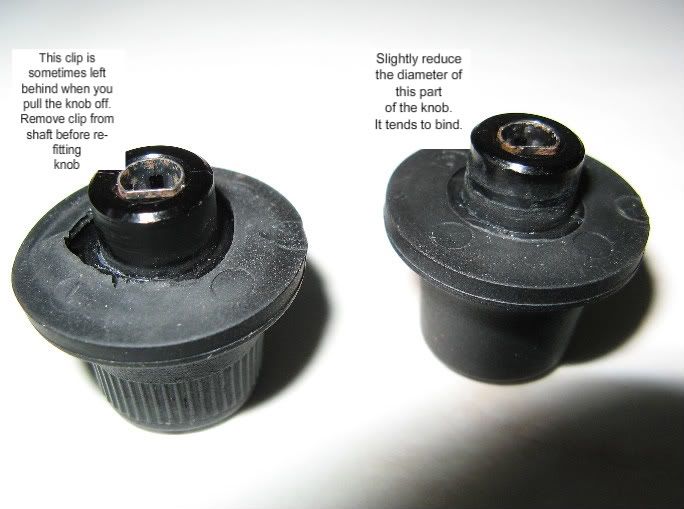 Dave T |
|
|
|
|
25th June 2009, 22:25
|
#17 |
|
Gets stuck in
Rover 75 CDT & V6 saloons in Wedgwood Join Date: Feb 2007
Location: North Norfolk
Posts: 782
Thanks: 2
Thanked 4 Times in 3 Posts
|
Stocktake, Reebs & Duotone - thank you all so much. Reebs -I had not even noted the two knobs were different (a few years ago I was enjoying my 21st birthday and suddenly I'm pushing 60 and the joys of failing eyesight!). Duo - I think you have cracked it - previously the sleeve must have been left on the spindle and I had fought to replace just the soft piece of rubber. And my main dealer couldn't work it out either. Good job lemons like me can't get banned from here for just being a lemon! Will remove the knob over the weekend - watch this space!
__________________
http://www.the75andztclub.co.uk/foru...7ef19087b7.gif |
|
|
|
|
25th June 2009, 22:27
|
#18 |
|
Gets stuck in
Rover 75 CDT & V6 saloons in Wedgwood Join Date: Feb 2007
Location: North Norfolk
Posts: 782
Thanks: 2
Thanked 4 Times in 3 Posts
|
Oh - and you can all take tomorrow off!
__________________
http://www.the75andztclub.co.uk/foru...7ef19087b7.gif |
|
|
|
|
25th June 2009, 22:29
|
#19 |
|
*
Rover 75 FaceLift Tourer CDTi 170BHP Auto ConnSE 2005 Model Starlight Silver Join Date: Nov 2006
Location: Abergele
Posts: 28,735
Thanks: 0
Thanked 6 Times in 5 Posts
|
Glad you are getting somewhere now.
PM sent. |
|
|
|
|
7th July 2009, 19:04
|
#20 |
|
Gets stuck in
Rover 75 CDT & V6 saloons in Wedgwood Join Date: Feb 2007
Location: North Norfolk
Posts: 782
Thanks: 2
Thanked 4 Times in 3 Posts
|
As a postscript to this thread I am adding the following.
Removal of Hi Line unit from Dash – Opening up of unit for repair or replacement Disclaimer: You are responsible for any work or modifications carried out on your car and you undertake any such work at your own risk. Neither The 75 and ZT Owners Club nor the original author of these notes can be held liable for anything that may happen as a result of you following these notes.. This is not so much a “how to” as a “what I did”. I am no techy and not qualified to write a “how to” – moreover much of what is here will no doubt be found in other threads – though I did search. This all began with a faulty menu knob which just became so loose that it was inoperable. Thanks to Reebs, Stocktake, Duotone and John Dot Com for help (and kind offers to assist). I decided to take photos as I went along for my own benefit and thought it a shame to waste them – though I won’t mind if the Mods decide much of this is better covered elsewhere and delete them! The photos may help to anyone who has never opened up the Sat Nav cassette unit and needs to undertake some basic maintenance or replace a component. For those who play with equipment like this in their sleep, I realise much here will be a big yawn – but some of us rarely go beyond changing a light bulb. Talking of which, this entire exercise was much simpler and less frustrating than changing a headlamp bulb on a 75. If you can use a screwdriver, you can perform this task. It is perhaps worth mentioning that my problems really started when I pulled off the rubber menu knob on another 75, several years ago, expecting to find a simple “D” spindle left in the unit and which I now know is what I should indeed have found. Instead, the hard inner collar of the knob was left on the spindle – and I didn’t realise that! As a result I spent a fruitless hour trying to replace the soft rubber knob over the spindle and collar (doh!) before giving up and handing over to my main dealer. The real problem was that with the collar in place but without the rubber knob, the menu control was inoperable. (My embarrassment is tempered by the fact that my main dealer took nearly a fortnight to effect a remedy!). All that was needed was for the collar to be retrieved from the spindle, pushed back into the knob and then the entire assembly pushed back onto the spindle again – less than a minute’s work I reckon. (Being scared of rubber knob removal is a huge blight on risk and innovation). Removal of Hi Line unit from Dash (Time c 15 minutes – a helper is not essential but makes life easier) 1. Unclip plastic cover under “eyebrow” feature and unscrew the two screws to remove the eyebrow itself.  2. Unscrew the self tapping screws (one in each top corner of the console). They are inset – a torch may help you see them if your eyesight is anything like mine. You are unlikely to lose these when extracting them but beware they can easily fall down inside when reassembling. (If they do they will probably fall down inside the console and can be retrieved by gently pulling the plastic trim at the bottom of the console away from the carpet of the footwell.  2a. My unit then just wiggled free without too much effort and I was able to pull it forward, still attached by its two looms. However there appear to be retaining clips which may need to be released. Study photo 13 (in the next post) as well as photo 2a. By inserting a small flat blade through the access hole it would seem that by engaging and turning anti-clockwise the small wheel to which the clips are connected by control wire, the clips are disengaged.  3. Release of the unit is then a simple matter of releasing the two wiring looms – one blue and one white which are held secure by black stirrup-like clips. (As a bonus - I discovered two quality control check labels here which gave the date of manufacture - ot at least the date the components were installed - 7th June 1999!)  4. Do not try to unclip or remove these clips – once you have depressed the restraining white plastic upstand they just pivot round, rather like the latch on a centre opening gate loops over the other gate and as they do so, the plug is lifted up and out of its socket. The unit can then be carried to the kitchen table. 
__________________
http://www.the75andztclub.co.uk/foru...7ef19087b7.gif Last edited by Bartonrover; 7th July 2009 at 19:20.. |
|
|
|
 |
|
|


 Linear Mode

