
|
|
|
|
|
|
||
|
|
||
 5th October 2012, 12:33
|
#11 | |
|
Ex 75 Owner
75 Tourerless Join Date: Jul 2010
Location: Manchester
Posts: 2,147
Thanks: 60
Thanked 156 Times in 93 Posts
|
Quote:
__________________
Beyoncé's Green Light Used More Rubber 355188 of 355194 |
|

|

|
|
5th October 2012, 12:36
|
#12 | |
|
Loves to post

Rover 75 Tourer Join Date: Jun 2009
Location: Nr Telford, Shropshire
Posts: 377
Thanks: 6
Thanked 15 Times in 15 Posts
|
Quote:
 |
|
|
|
|
|
5th October 2012, 14:12
|
#13 | |
|
This is my second home

Rover 75 CDTi Connoisseur SE & MG ZT Saloon 190 Join Date: Jun 2007
Location: Coven
Posts: 12,530
Thanks: 526
Thanked 1,877 Times in 885 Posts
|
Quote:

__________________
www.midlandsnanomeets.co.uk Robs Car Gallery Coven near Wolverhampton WV9 2000 Cowley Built Rover 75 2.0 V6 Club SE/ Atlantic Blue/ Sandstone/Walnut (daily driver) 2003 Land Rover Freelander 1 TD4 HSE Helsinki Blue/Black Leather (swmbo daily driver) |
|
|
|
|
|
5th October 2012, 14:28
|
#14 | |
|
Banned
Join Date: Apr 2008
Posts: 237
Thanks: 0
Thanked 1 Time in 1 Post
|
Quote:
Strange though after last nights downpour - dry as a bone. It seems to be long periods of rain when car is left standing for a few weeks...  |
|
|
|
|
|
5th October 2012, 16:52
|
#15 | |
|
I really should get out more.......
Mercedes C Class CDI estate (2003) Join Date: Sep 2012
Location: Gradina
Posts: 2,652
Thanks: 62
Thanked 137 Times in 119 Posts
|
Quote:
 but she sure does have water where it should not be. Have just got to find/figure out where it's coming from, correction where it's getting in but she sure does have water where it should not be. Have just got to find/figure out where it's coming from, correction where it's getting in  before some wags says the Sky before some wags says the Sky  . .
__________________
Classic SE CDT sadly lost in a severe collision. |
|
|
|
|
|
5th October 2012, 21:28
|
#16 | |
|
This is my second home
ZTT, Contemp Saloon, Duotone Tourer Join Date: May 2012
Location: Llandeilo
Posts: 4,192
Thanks: 290
Thanked 387 Times in 333 Posts
|
Quote:
|
|
|
|
|
|
5th October 2012, 21:37
|
#17 |
|
Give to Learn

Freelander 2 Join Date: Aug 2010
Location: West Midlands
Posts: 18,821
Thanks: 1,155
Thanked 6,407 Times in 3,874 Posts
|
The tubes should be in place on all models from 99 through to the time of closure, if not there i have heard that some dealer removed the tubes
why i dont know maybe thinking its the best bet other than ECU damage if missing i would suggest replacing. I am in the process of adding to this thread the spyhole mod, and the plenum leaf collector with pics as always so they are all in one place on a thread to save new members searching from one post or thread to another. The first chance i get i will try and get a camera down the plenum chamber with the tube removed and see what lies below  Arctic. Arctic.
__________________
Arctic Givology Learn to Give Everything is Achievable  ad altiora tendo. Check out our Nano meet dates http://www.midlandsnanomeets.co.uk/ http://www.the75andztclub.co.uk/index.php?thepage=howto " You do the work , we supply the expertise " Last edited by Arctic; 6th October 2012 at 00:07.. |
|
|
|
|
5th October 2012, 21:49
|
#18 |
|
Banned
MG ZT V6 190+ Join Date: Sep 2008
Location: Leeds
Posts: 33,223
Thanks: 41
Thanked 1,614 Times in 1,416 Posts
|
Here's a picture of the Plenum guard which is supplied by Jules.
 |
|
|
|
|
6th October 2012, 00:41
|
#19 |
|
Give to Learn
Freelander 2 Join Date: Aug 2010
Location: West Midlands
Posts: 18,821
Thanks: 1,155
Thanked 6,407 Times in 3,874 Posts
|
To help stop leaves and debris from getting into the plenum below you can use this gutter netting very cheap and does the job wonderful brought from pound shop,lidil and Aldi.
One roll will do eight cars so if you are going to any meets a worth while mod to do takes about 20 mins to do both sides you will need sissors four cable ties one gutter grip and a rule. Fig 1 1 1Cut two pieces of the wire 15" long Fig 2  2 2Next cut down lengthways and 2.5" in from the edge by 5" both pieces of wire Fig 3/4  3 3 4 4Next trim the corner of both pieces of the netting you can do the while fitting it to the car to get a more acurate cut i am able to do it because i have a template Fig 5/6 5 5 6 6All the parts ready for fitting to the car over the wing plenum tubes near and offsides Fig 7  7 7To fit remove the front and rear scuttle clips as in the plenum photo shoot at the start of the thread, this will help when you feed the netting under the scuttle to seal the appeture/gap over the tubes, if you did not cut the corner before you can cut it to shape now Fig 8  8 8Once you have cut to shape and held the nett in place by the bolts holding the bonnet hinge and the gutter clip near side passenger drill two 5mm holes for the cable ties Fig 9  9 9Cable ties attached Fig 10  10 10A little nick in the nett so the tube can be rodded Fig 11  11 11Neat finished job all for £1 or £2.49 the most and 20 mins of your time at home or a meet Fig 12-14  12 12 13 13 14 14This is real easy and well worth doing Arctic. .
__________________
Arctic Givology Learn to Give Everything is Achievable ad altiora tendo. Check out our Nano meet dates http://www.midlandsnanomeets.co.uk/ http://www.the75andztclub.co.uk/index.php?thepage=howto " You do the work , we supply the expertise " |
|
|
|
|
6th October 2012, 01:27
|
#20 |
|
Give to Learn
Freelander 2 Join Date: Aug 2010
Location: West Midlands
Posts: 18,821
Thanks: 1,155
Thanked 6,407 Times in 3,874 Posts
|
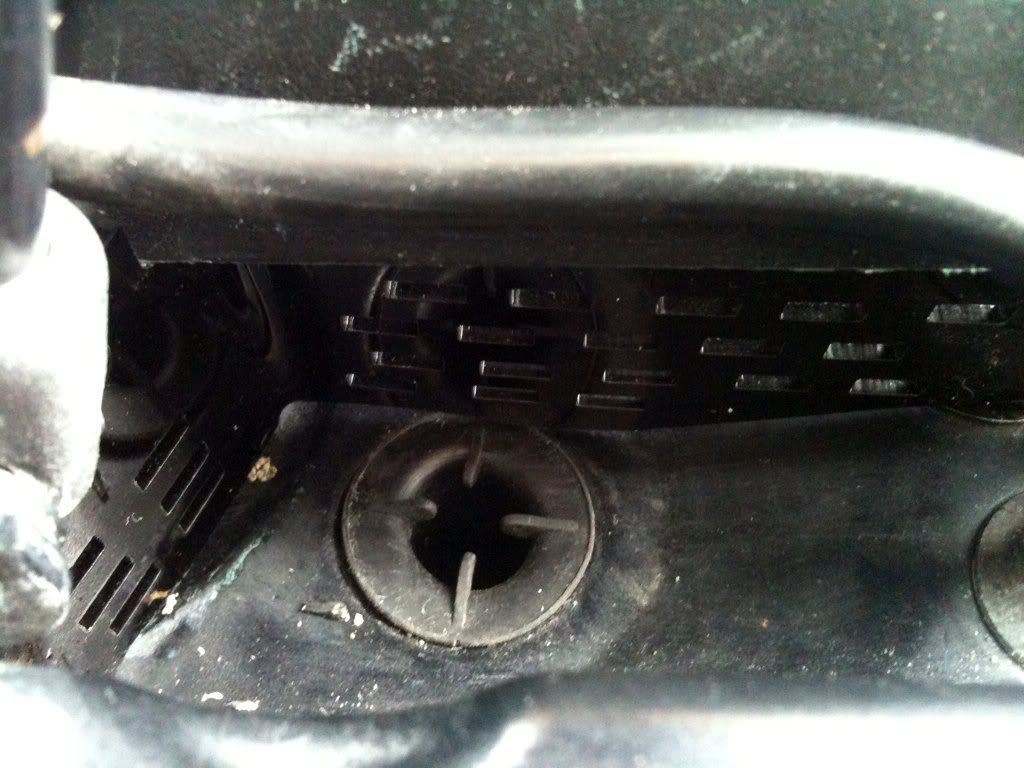
[QUOTE=Arctic;1109189]Plenums we hear so much about them and the reason why is very clear below in the photo's that follow.
And even more important this time of year with the Autum leaf fall etc. Yesterday a member of the club Mike came to have his handbrake mod fitted, as i always do i checked the plenum's after asking if he had checked them it turned out he had only brought the car Sunday so the car was very new to him, he had looked at the plenums from the drivers side and could see some water and he also heard the sloshing sound when driving. The results can be seen below so come on gents lets keep on top of these plenums do the spyhole mod and its only takes 2 minutes to check for water once applied. Pic 1 water at least 3" deep  1 1Below is how to do the spyhole mod you will need a rule pencil 25mm drill bit and a 25mm rubber bung Fig 1  1 1With the scuttle shield panel removed measure 97mm and 180mm from the points in the photo below Fig 2/3  2 2 3 3Width to center point of the auger 3a/3b  3a 3a b bHere you can see my template which i use at meets so i can easly turn over a good volume of trays in a few minutes Fig 4  4 4With the panel marked out and your drill ready with its 25mm bit we/you can now drill the spyhole Fig 5  5 5When you drill the scuttle tray makes sure you have support under the tray at all times Fig 6  6 6 7 7 8 8 9 9 10 10Once drilled trim the hole to make it neat for the rubber bung to fit nice Fig 11  11 11Spyhole mod done and ready for use Fig 12/  12 12This shows the plumbers spring pipe bender Fig 13/14  13 13 14 14If you intend to use the plumbers spring look for a 10mm or 15mm a boot lace and a tube mine was from an old wendy house but any 15mm tube will do 12" to 15" long Fig 15  15 15Also grind or file the end of the spring to remove the curl so it is smooth and will easly go into the tube Fig 16  16 16Spring being used in situ Fig 17  17 17Hope this helps the new members and remember check the plenums regular Arctic.
__________________
Arctic Givology Learn to Give Everything is Achievable ad altiora tendo. Check out our Nano meet dates http://www.midlandsnanomeets.co.uk/ http://www.the75andztclub.co.uk/index.php?thepage=howto " You do the work , we supply the expertise " Last edited by Arctic; 6th March 2014 at 14:33.. |
|
|
|
 |
|
|


 Linear Mode

