
|
|
|
|
|
|
||
|
|
||
 3rd March 2020, 09:12
|
#21 | |
|
Gets stuck in
Rover 75 CDT Club Tourer Join Date: Apr 2007
Location: Norwich
Posts: 712
Thanks: 98
Thanked 47 Times in 24 Posts
|
Quote:
|
|

|

|
|
3rd March 2020, 19:25
|
#22 | |
|
This is my second home
R75 Saloon. Join Date: Feb 2009
Location: France/or Devon.
Posts: 14,003
Thanks: 3,851
Thanked 2,167 Times in 1,816 Posts
|
Quote:
The terrifying bit is when you get hold of each side of the bumper and give it a good tug.---  First time 25 minutes. The second time 15.---  Do Not try and remove the bib screws on the lower edge of the bumper, leave them well alone and undo the 4 under tray screws instead. 9 x cross head screws across the top of the slam panel. 2 x 10 mm screws in the leading edge of the wheel arch. 2 x self tappers on the return edge of the wheel arch liner. 4 x 1/4 turn fixings on the under tray. 6 x self tappers on the two triangular brake ducts. A sharp tug on each side to unclip the bumper from the wing. Then unplug the indicator - fog light loom on the nearside chassis leg. Unclip the power wash hose (if fitted) on the off side. _________________ Best with help to lower it to the ground or put something soft on the ground just under and in front of the bumper. Last edited by COLVERT; 3rd March 2020 at 19:29.. |
|
|
|
|
|
4th March 2020, 11:51
|
#23 | |
|
This is my second home
Rover75 and Mreg Corsa. Join Date: Nov 2006
Location: Sumweer onat mote o'dust (Sagin)
Posts: 21,753
Thanks: 341
Thanked 3,660 Times in 2,924 Posts
|
Quote:
You have the lower ring in the wrong 'groove'. The correct location is on the very end of the plastic elbow seen in this image from Jules' How To. 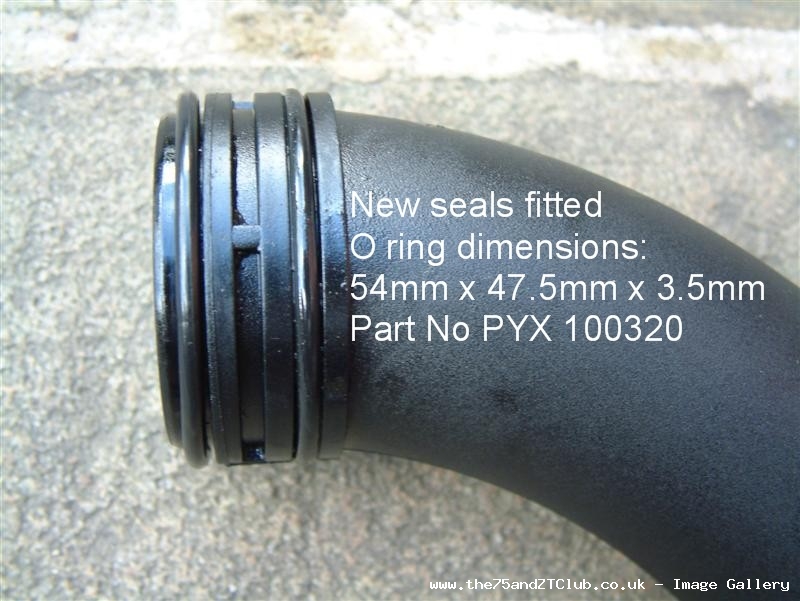 It's a pretty poor design, assuming MGR always intended using two rings (which I personally doubt). The end/lower ring really should have an additional retaining wall to prevent it dropping off. Many OEM rings end up in the bottom of the intercooler for this reason. Jules' suggestion for reinforcing the elbow-intercooler joint is here: https://the75andztclub.co.uk/forum/s...ad.php?t=21258 TC |
|
|
|
|
|
4th March 2020, 13:41
|
#24 |
|
Gets stuck in
Rover 75 CDT Club Tourer Join Date: Apr 2007
Location: Norwich
Posts: 712
Thanks: 98
Thanked 47 Times in 24 Posts
|
Thanks, yes, I figured that out after looking it rather more closely. Nice, clear pic there. In my case it was the end/lower ring which was mislocated.
I've taken everything apart and put it back together again, and pushed the bend in as hard as I can, but still didn't really get a tell-tale clunk, which is frustrating. Still, I cannot feel the upper O-ring so it must be pushed within the intercooler, there is no sense of movement, nothing happens when I pull up on the bend reasonably firmly (but not so firmly as to pull it out), and the fixing on the bracket lines up with the fixing point on the radiator, so I assume it is in fact properly in place. As to holding it in place, I've had to come up with a makeshift solution. I was able to insert the bolt, but there was no way I could get a nut into the back of the mounting bracket. So what I've done is used a wide cable tie over the top of the bolt, so the bolt is resisting any up and down motion, but being prevented (I hope) from wiggling itself loose by the cable tie. Might try Jules' idea if this doesn't work. Hopefully a test drive later! |
|
|
|
|
4th March 2020, 13:52
|
#25 | ||
|
Give to Learn

Freelander 2 Join Date: Aug 2010
Location: West Midlands
Posts: 18,716
Thanks: 1,155
Thanked 6,407 Times in 3,874 Posts
|
Quote:
 1 1 2 2This is/was my three Viton O-rings modification on the bend , the little bridges are removed to allow the centre O-ring to fit perfectly.  3 3
__________________
Arctic Givology Learn to Give Everything is Achievable  ad altiora tendo. Check out our Nano meet dates http://www.midlandsnanomeets.co.uk/ http://www.the75andztclub.co.uk/index.php?thepage=howto " You do the work , we supply the expertise " |
||
|
|
|
|
4th March 2020, 13:57
|
#26 | |
|
Gets stuck in
Rover 75 CDT Club Tourer Join Date: Apr 2007
Location: Norwich
Posts: 712
Thanks: 98
Thanked 47 Times in 24 Posts
|
Quote:
|
|
|
|
|
|
4th March 2020, 14:04
|
#27 | ||
|
Give to Learn
Freelander 2 Join Date: Aug 2010
Location: West Midlands
Posts: 18,716
Thanks: 1,155
Thanked 6,407 Times in 3,874 Posts
|
Quote:

__________________
Arctic Givology Learn to Give Everything is Achievable ad altiora tendo. Check out our Nano meet dates http://www.midlandsnanomeets.co.uk/ http://www.the75andztclub.co.uk/index.php?thepage=howto " You do the work , we supply the expertise " |
||
|
|
|
|
4th March 2020, 16:35
|
#28 |
|
Gets stuck in
Rover 75 CDT Club Tourer Join Date: Apr 2007
Location: Norwich
Posts: 712
Thanks: 98
Thanked 47 Times in 24 Posts
|
Sure, but how? I can only access that fixing bracket from the engine side - I can't reach down the front and hold the nut in place. Maybe there's some tool I don't have which could help me with this? Guess I may just have to take that bumper off...
Last edited by Johnny2R; 4th March 2020 at 17:11.. |
|
|
|
|
4th March 2020, 19:22
|
#29 | ||
|
Give to Learn
Freelander 2 Join Date: Aug 2010
Location: West Midlands
Posts: 18,716
Thanks: 1,155
Thanked 6,407 Times in 3,874 Posts
|
Quote:
I know you may not want to do this again but you can fit the 10mm nut by removing the intercooler hose and bend. To help with more access remove the 8mm bolt holding the header tank in place.  1 1Lift it off the two lugs holding it to the rad.  2 2Lower it down onto the coolant pipes.  3 3Undo the hose to the EGR.  4 4Undo the bolt in your case the cable tie.  5 5Pull out the hose with the bend attached.  6 6You now should have enough room to insert the 10mm nut in its recess on the bracket to help or aid you pop a little bit of blue tack on the nut or in the recess.  7 7Once you have it in place you can then refit the bend on it's own with out the hose attached, pushing down firmly making sure the fixing lug is the right side of the bracket, you should hear a thud as it seats home properly.  8 8Now fit the bolt which holds the bend. 9The intercooler hose can now be fitted to the bend & EGR turn the clip around on the hose so a long screw driver can be used at an angle to tighten it, removing the light protective cover will help also.  10 10Hopefully this should get you sorted out once and for all
__________________
Arctic Givology Learn to Give Everything is Achievable ad altiora tendo. Check out our Nano meet dates http://www.midlandsnanomeets.co.uk/ http://www.the75andztclub.co.uk/index.php?thepage=howto " You do the work , we supply the expertise " |
||
|
|
|
|
4th March 2020, 21:51
|
#30 | |
|
This is my second home
R75 Saloon. Join Date: Feb 2009
Location: France/or Devon.
Posts: 14,003
Thanks: 3,851
Thanked 2,167 Times in 1,816 Posts
|
Quote:
Well I've given you some detailed info earlier on in case you missed it.----  Thata way.---Lol. Thata way.---Lol. |
|
|
|
|
 |
|
|


 Linear Mode

