
|
|
|
|
|
|
||
|
|
||
 11th August 2019, 13:58
|
#21 | |
|
MG ZT Join Date: Jan 2011
Location: Newcastle Upon Tyne
Posts: 20,151
Thanks: 3,565
Thanked 10,837 Times in 5,718 Posts
|
Quote:
 |
|

|

|
|
11th August 2019, 14:39
|
#22 | |
|
Posted a thing or two
Rover 75 Saloon Join Date: Apr 2019
Location: Under the car
Posts: 1,840
Thanks: 210
Thanked 244 Times in 221 Posts
|
Quote:
 Tbh, I can't see much/any difference between these two: https://www.rustins.ltd/bonda/our-pr...da-rust-primer- https://www.u-pol.com/uk/en-uk/produ...r#.XVAn-meB5RC |
|
|
|
|
|
11th August 2019, 15:15
|
#23 | |
|
MG ZT Join Date: Jan 2011
Location: Newcastle Upon Tyne
Posts: 20,151
Thanks: 3,565
Thanked 10,837 Times in 5,718 Posts
|
Quote:
I've used both paints in the past, and the Bonda primer is far superior in performance. Brian |
|
|
|
|
|
12th August 2019, 06:22
|
#24 | |
|
Posted a thing or two
Rover 75 Saloon Join Date: Apr 2019
Location: Under the car
Posts: 1,840
Thanks: 210
Thanked 244 Times in 221 Posts
|
Quote:
 You used Bonda Primer on the arms - did you use it on the subframe too? The U-POL Z182 I've bought was intended just as primer for the OSR jacking point. I was going to use POR-15 Rust Preventive Paint on the new subframe and arms straight after they've been sandblasted, then add two coats of POR15 Top Coat. Is that a bad idea? (See steps 3 & 4 here) Next question is how did you get the paint onto the inside sections of the arms and subframe? Last edited by Blink; 12th August 2019 at 07:15.. |
|
|
|
|
|
13th August 2019, 07:05
|
#25 | |
|
MG ZT Join Date: Jan 2011
Location: Newcastle Upon Tyne
Posts: 20,151
Thanks: 3,565
Thanked 10,837 Times in 5,718 Posts
|
Quote:
The subframe was slightly more difficult.... ..... and required the use of a fair few odd shaped brushes to achieve the desired coverage. I painted first in Bonda primer, then grey anti rust paint (not primer, outdoor railing type paint) and then four coats of chassis black. The differing colours were to ensure I covered every surface completely, and prior to the final fit, 1 litre of cavity wax sprayed inside the box sections with a shutz gun with lance extension, after allowing both to warm thoroughly in the sun to ensure maximum penetration into the internal seams through capillary action. There are no shortcuts to doing the job properly, and the finished items should hopefully outlast the service life car they're fitted to. Brian |
|
|
|
|
|
13th August 2019, 13:06
|
#26 |
|
Posted a thing or two
Rover 75 Saloon Join Date: Apr 2019
Location: Under the car
Posts: 1,840
Thanks: 210
Thanked 244 Times in 221 Posts
|
Crikey, that's a lot of work Brian. It looks like it'll do the job though.
Good idea to swill paint around inside the upper arms - I think I'll do the same. Here's a reference pic of the arms for Chris (OP) - 3 holes to blank off. Note the scary face & horns on the one on the right.  The problem with the subframe is it has internal sections that can't be sandblasted and can't be reached with a paint brush either - i.e. most of the two long arms. I'm not even sure if swilling paint around inside them would work because of the sheer size of this thing.  Here's a pic of the underside (i.e. the side facing the road). The long arms have two vent holes on the topside but they're very small.  Then there's the question of what to do with the trailing arms. Again, they probably can't be sandblasted inside (?) - and swilling paint in there will be extremely tricky because those big holes in the tubular section probably can't be blanked of very effectively.  Hmm. Last edited by Blink; 13th August 2019 at 14:44.. |
|
|
|
|
26th August 2019, 10:24
|
#27 | |
|
Posted a thing or two
Rover 75 Saloon Join Date: Apr 2019
Location: Under the car
Posts: 1,840
Thanks: 210
Thanked 244 Times in 221 Posts
|
Quote:
Paint can be poured in through the two larger holes marked 'P' but it'll run out of the points arrowed blue as soon as it's swilled about by tilting/twisting/turning the frame in all directions. None of these holes can be taped off effectively because they're all weird angles/shapes. Did you find a solution to this problem or did you not even try to paint inside the long arms? 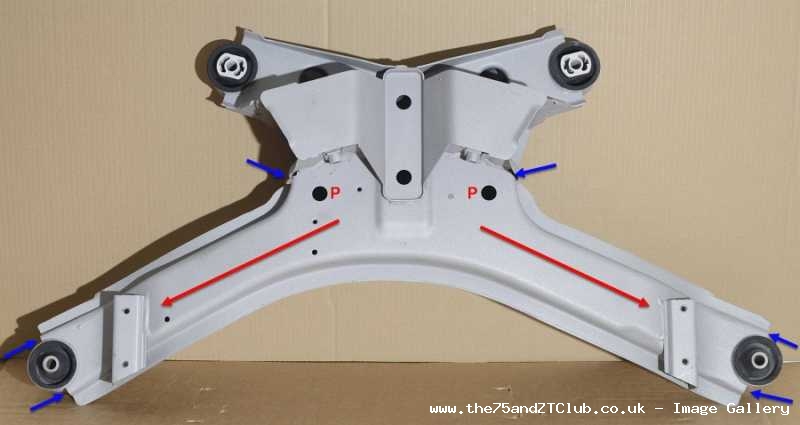  |
|
|
|
|
|
26th August 2019, 16:30
|
#28 | |
|
MG ZT Join Date: Jan 2011
Location: Newcastle Upon Tyne
Posts: 20,151
Thanks: 3,565
Thanked 10,837 Times in 5,718 Posts
|
Quote:
It can't be any worse than leaving things untreated however Brian |
|
|
|
|
|
26th August 2019, 22:09
|
#29 | |
|
Posted a thing or two
Rover 75 Saloon Join Date: Apr 2019
Location: Under the car
Posts: 1,840
Thanks: 210
Thanked 244 Times in 221 Posts
|
Quote:
I think I'll just do what you did and unleash an entire can of wax through the P holes (Dynax S50).PS. As far as I can see with my trusty torch, the factory didn't paint inside either. |
|
|
|
|
|
27th August 2019, 09:42
|
#30 |
|
This is my second home

Roverless + 1.7D Sportage Join Date: Aug 2014
Location: East Norfolk
Posts: 7,050
Thanks: 729
Thanked 2,021 Times in 1,449 Posts
|
The 360 degree lances, supplied with some of the Bilt Hamner products work well when sprayed in through the holes. I did mine, left them to harden, then looked in with an LED endoscope and everything was coated, right into the nooks and crannies. I repeat the coatings each year, inside and out, prior to MOT.
__________________
Oil in my veins! |
|
|
|
 |
|
|


 Linear Mode

