
|
|
|
|
|
|
||
|
|
||
 14th August 2019, 12:10
|
#1 |
|
Posted a thing or two
Rover 75 Saloon Join Date: Apr 2019
Location: Under the car
Posts: 1,840
Thanks: 210
Thanked 244 Times in 221 Posts
|
The rear wheel arch liners are held in place by 1 screw and 4 plastic nuts (#11 here). The nuts screw on to captive studs - 3 of them come off easily but the 4th (in the position arrowed below) doesn't because the stud spins with the nut.
The other end of the stud (it might be a bolt) is hidden and can't be reached to stop it spinning.  Has anyone found a solution to this problem? 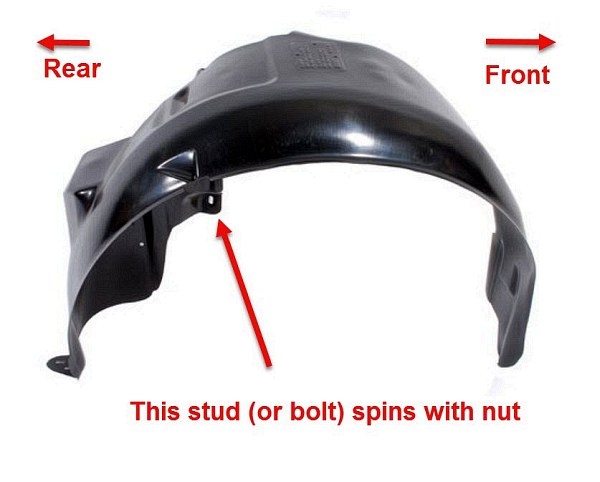 I read a post by someone with the same problem last week, now I can't find it again. Plan A - be patient and wait for ideas. Plan B - rip the liner off by force.  |

|

|
|
14th August 2019, 15:46
|
#2 | |
|
Posted a thing or two
Rover 75 Saloon Join Date: Apr 2019
Location: Under the car
Posts: 1,840
Thanks: 210
Thanked 244 Times in 221 Posts
|
Quote:
 Stupid design by a stupid designer.  |
|
|
|
|
|
14th August 2019, 16:27
|
#3 |
|
Avid contributor
MG ZT-T Join Date: Feb 2019
Location: Stockport
Posts: 134
Thanks: 56
Thanked 22 Times in 20 Posts
|
I've no particular experience of this but try..............
1.insert a thin bladed flat screwdriver between the nut and the liner and push in hard to press it against the bolt.This might hold the bolt just enough to turn the nut. 2.Split the nut by cutting into it with a Dremel (other small rotary tools are available) 3.Grind the nut away with a grindstone in your drill 4. if the end of the bolt is proud of the nut, cut a slot in it so you can hold it with a screwdriver. 5. if not, drill into the end of the bolt and hope the "bite" of the drill bit will hold against the spanner. Last edited by chicochapman; 14th August 2019 at 16:30.. Reason: clarification |
|
|
|
|
15th August 2019, 11:11
|
#4 | |
|
Posted a thing or two
Rover 75 Saloon Join Date: Apr 2019
Location: Under the car
Posts: 1,840
Thanks: 210
Thanked 244 Times in 221 Posts
|
Quote:
1. Doesn't work - the stud spins no matter how hard you lever against it with the screwdriver (I tried both sides of the liner). Trim tools don't work either. The thread is (was) so rusted it's practically vanished. 2. I don't have a Dremel. I tried a mini hacksaw blade instead and couldn't do it. 3. I couldn't get the drill in the right position because this stud is in a recessed corner of the liner. 4 & 5. No chance with these - the end of the stud is far too rusted and is more like a point than a flat surface. This other end of this stud is impossible to get to - I think it's sandwiched between two sheets of metal. Even if I had managed to get the nut off the stud would still be spinning. |
|
|
|
|
|
15th August 2019, 13:09
|
#5 |
|
Precise
Rover 75 Tourer 2.5KV6 Connoisseur SE Join Date: Mar 2013
Location: Fleet
Posts: 2,952
Thanks: 630
Thanked 617 Times in 480 Posts
|
Looking at the body panel illustrations in RAVE, it would appear that there is only a single skin around the rear wheel arch area.
Have you tried looking at the inside of the boot behind the area of interest? |
|
|
|
|
15th August 2019, 14:41
|
#6 | |
|
Posted a thing or two
Rover 75 Saloon Join Date: Apr 2019
Location: Under the car
Posts: 1,840
Thanks: 210
Thanked 244 Times in 221 Posts
|
Quote:
You need to take the liner off to get a good view of the stud position - not that you can do that because the stupid thing will start spinning! If they'd protected the thread with a domed plastic nut it might have been alright - but they didn't.  |
|
|
|
|
|
15th August 2019, 15:21
|
#7 |
|
Precise
Rover 75 Tourer 2.5KV6 Connoisseur SE Join Date: Mar 2013
Location: Fleet
Posts: 2,952
Thanks: 630
Thanked 617 Times in 480 Posts
|
Hot soldering iron or side cutters and remove nut?
Super glue/epoxy in attempt fix stud to metal from inside of wheel arch? Last edited by KWIL; 15th August 2019 at 15:42.. |
|
|
|
|
15th August 2019, 17:30
|
#8 |
|
Posted a thing or two
Rover 75 Saloon Join Date: Apr 2019
Location: Under the car
Posts: 1,840
Thanks: 210
Thanked 244 Times in 221 Posts
|
A hot soldering iron might have got the nut off (I didn't think of that) but the thread on the stud was too shot anyway. I'll photograph the offcut later and post a pic here. Even if the thread was ok there's no way it'll glue back on and stay there.
I tried side cutters (big ones) and they barely scratched it. Those nuts are made of tough stuff. Last edited by Blink; 15th August 2019 at 17:33.. |
|
|
|
|
16th August 2019, 13:31
|
#9 | |
|
Posted a thing or two
Rover 75 Saloon Join Date: Apr 2019
Location: Under the car
Posts: 1,840
Thanks: 210
Thanked 244 Times in 221 Posts
|
Quote:
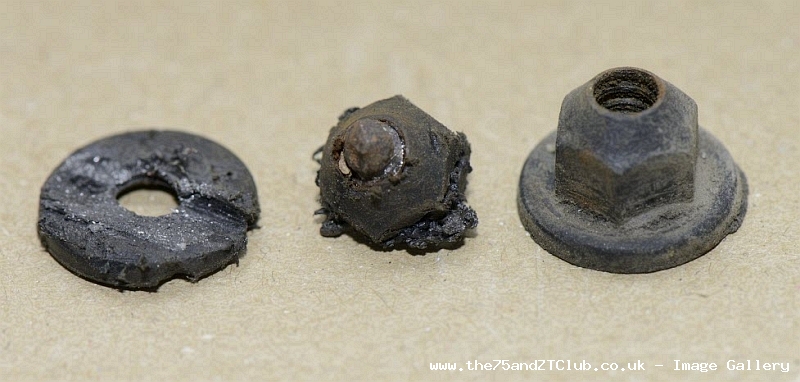 Here's the offending stud (what's left of it after the oscillating multi-tool). I've got no idea what that other thing to the right is, unless it's a spacer to stop the liner flapping against the metalwork. Liner is off here, obviously.  This is a wider shot to show the position of the stupid stud. The fuel line guard cover thing is off - and the same thing happened with some of those nuts! 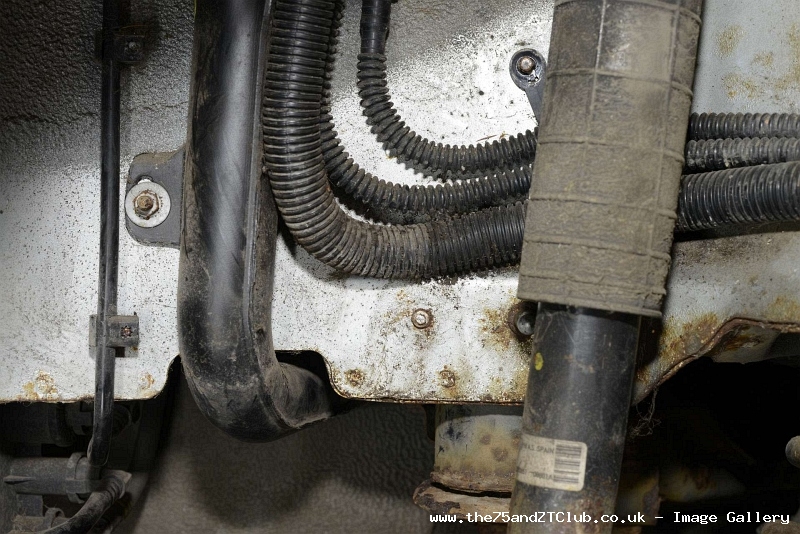  |
|
|
|
|
|
16th August 2019, 13:41
|
#10 |
|
Give to Learn

Freelander 2 Join Date: Aug 2010
Location: West Midlands
Posts: 18,699
Thanks: 1,155
Thanked 6,407 Times in 3,874 Posts
|
Double check what's behind the wheel arch in that area, drill out the snapped stud fixing add rive nut then use bolts to fix after, if you prefer a nut instead use a bit of all thread in the rive fixing.
__________________
Arctic Givology Learn to Give Everything is Achievable  ad altiora tendo. Check out our Nano meet dates http://www.midlandsnanomeets.co.uk/ http://www.the75andztclub.co.uk/index.php?thepage=howto " You do the work , we supply the expertise " |
|
|
|
 |
|
|


 Linear Mode

