
|
|
|
|
|
|
||
|
|
||
 25th January 2016, 20:24
|
#91 | |
|
This is my second home
1979 Capri 1.6L, 1982 Capri 1.6L, 2016 Dacia Stepway Join Date: Jun 2009
Location: Dorset
Posts: 8,595
Thanks: 3,496
Thanked 3,397 Times in 2,218 Posts
|
Quote:
 I see what you mean, could even be my ZT. I see what you mean, could even be my ZT.  |
|

|

|
|
7th February 2016, 23:31
|
#92 |
|
Posted a thing or two
MG ZT 190 + and MKIV Supra Join Date: Jan 2009
Location: Plymouth
Posts: 1,551
Thanks: 224
Thanked 493 Times in 359 Posts
|
I haven't posted for a bit but I have been beavering in the background
 Next job up was to strip off the front end of the car Which is not as scary as it would seem Firstly its off with the bumper. I always place them on a sheet so I dont scratch them. The bumpers are held on with 9 x fastenings across the top through to the slam panel, 2 x screws (one each side) on each inner wheel arch cover that go up into the wing, 2 x screws (one each side) through the arch liner to the bumper (these are often left off is soemoen has removed a bumper previously) and the line of screws and Zeus fastenings underneath. The fastenings across the top 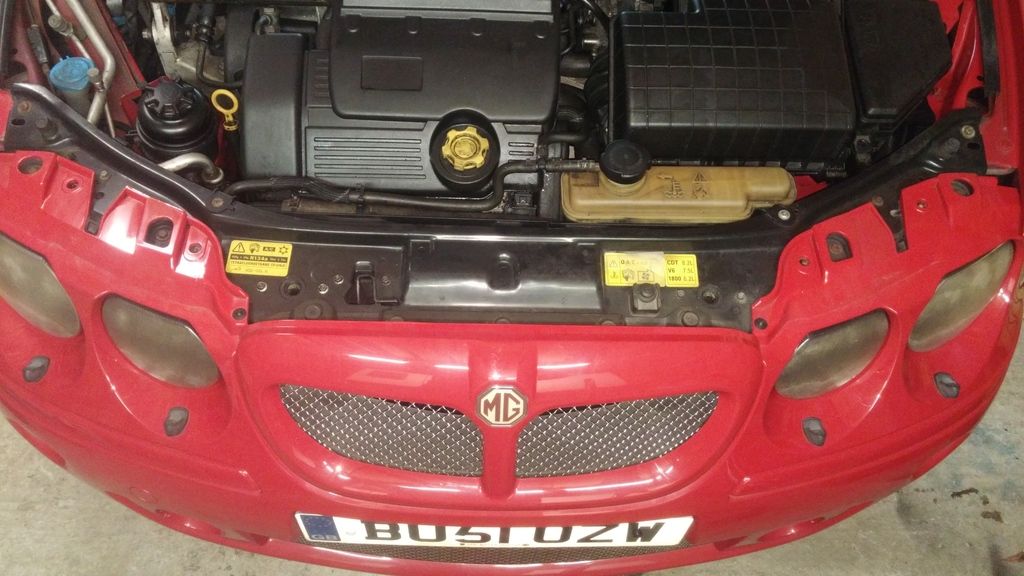 The screw through the liner onto thee bumper. This also shows the additional section on the arch liners used for the ZT 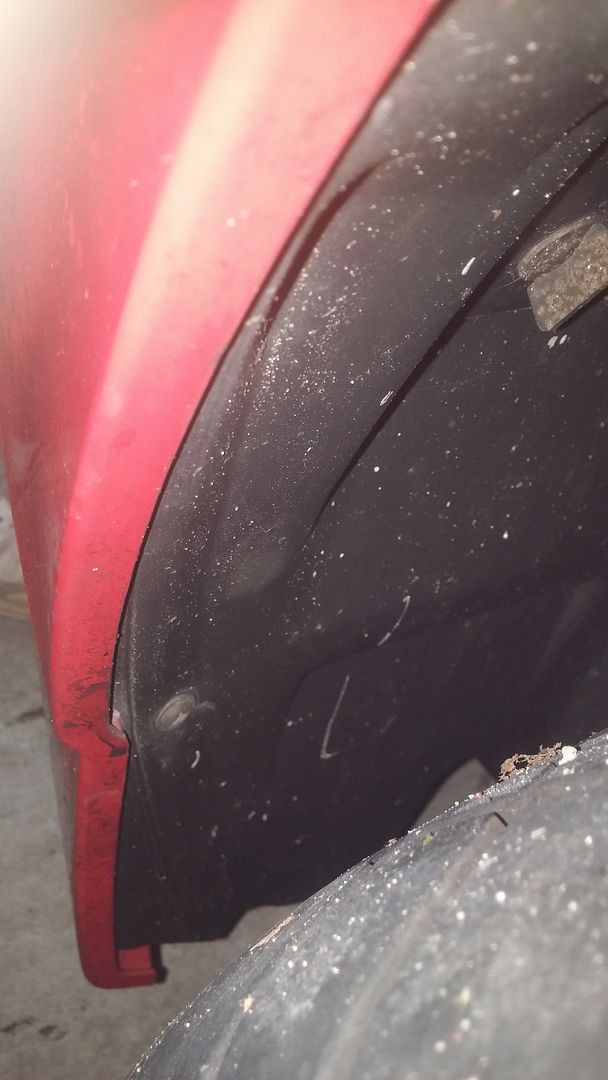 Once all the fastenings are off the bumpers are held on snap clips on both wings. I tend to mask the wing before removing so I dont scratch the wings. These need a sharp pull to brake their grip. 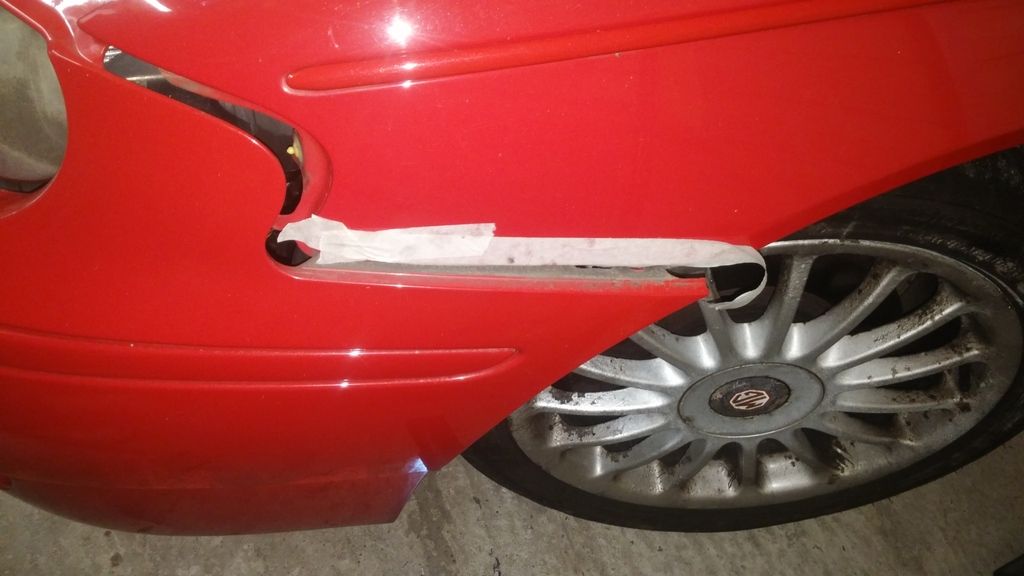 The bumper is then removed and Like I said I always put it on a dust sheet. 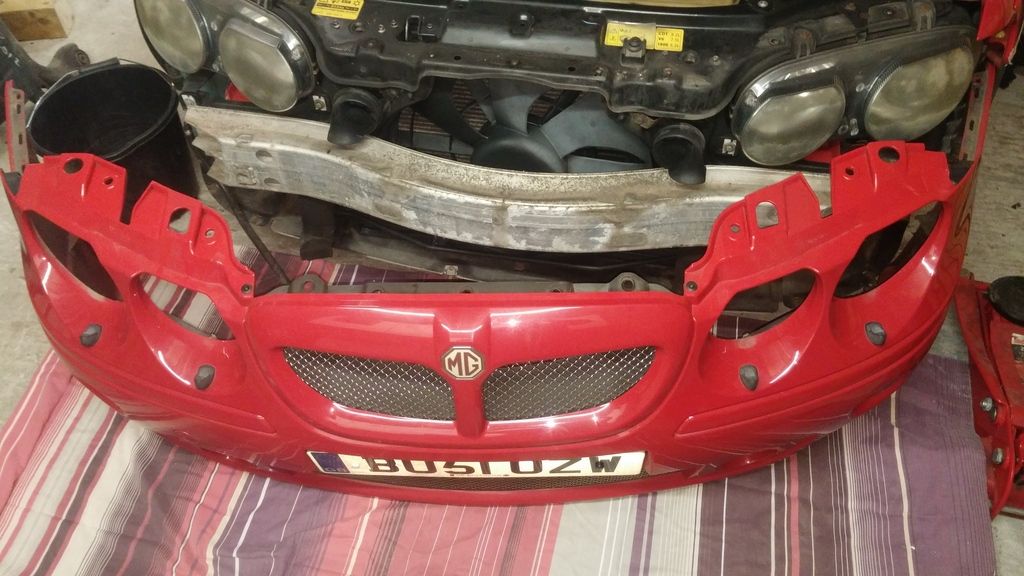 At thsi point the bumper loom is still connected on the passenger side and on mine the headlamp washer system is still connected to the second pump. Omce disconnected the bumper is lifted clear.  Next off is the lights. 4 x M6 bolts holding these in place 2 on top and 2 underneath and the loom to each light is disconnected 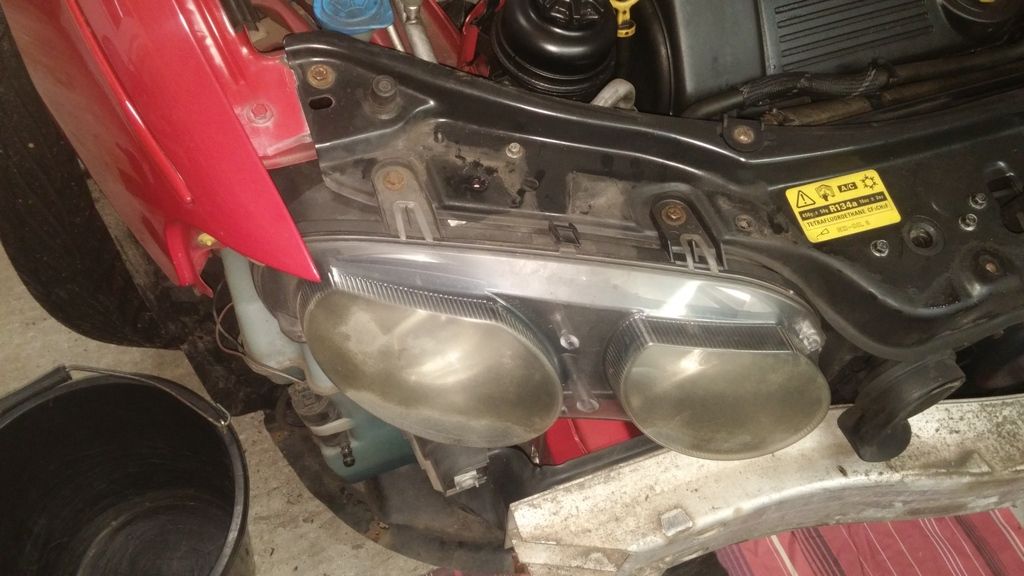 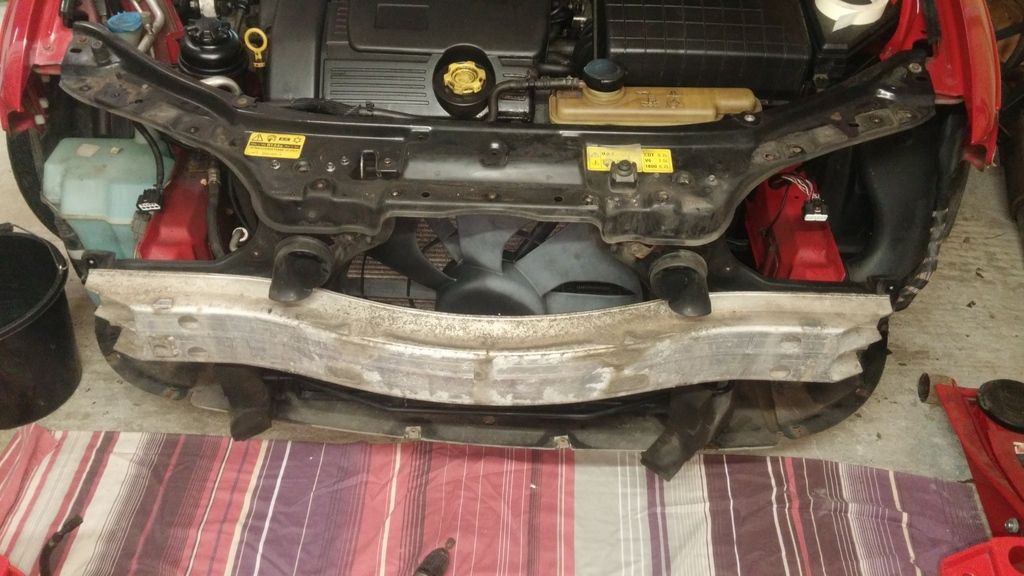 Next off is the crash beam. Held on with 8 bolts and 2 x nuts. 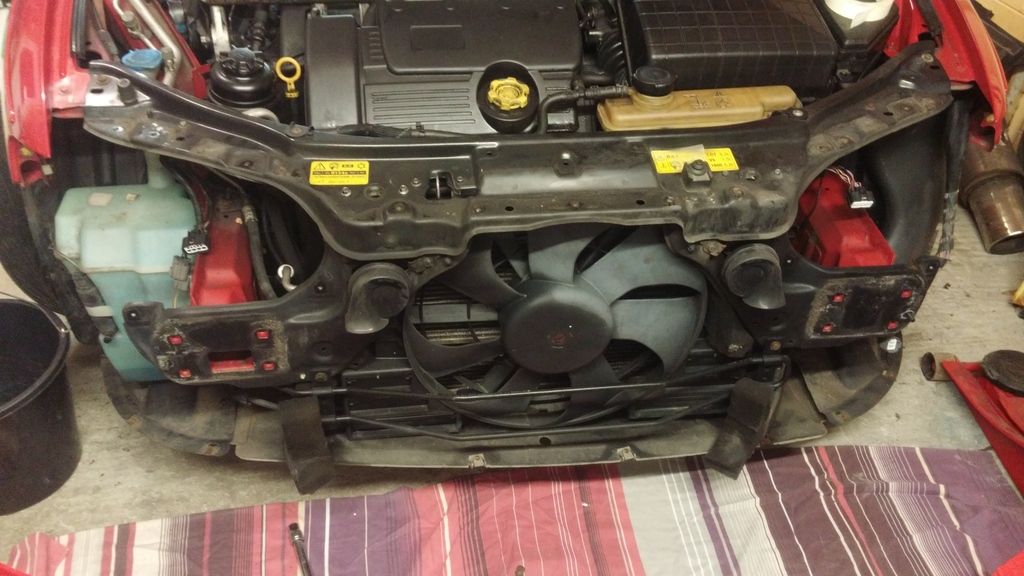 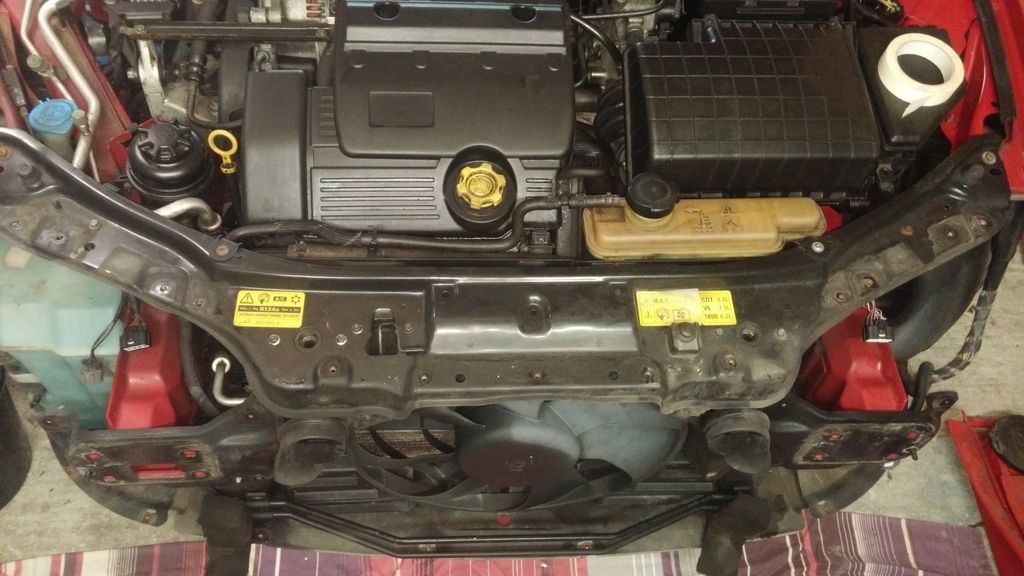 You can now see the fan and the whole of the slam panel. More tomorrow as it late
__________________
Jon C Living the dream  MK IV VVTI Tiptronic TT Toyota Supra MG ZT 190+
BornTuesday, 10th July 2001 @ 09:01:10 259th ZT to run off the production line, out of 18,894 252nd ZT 190 + to be made out of 4,023 101st ZT in Solar Red (code: CEU) to be made out of 1,888 Last edited by jonc3725; 20th August 2017 at 20:46.. |
|
|
|
|
8th February 2016, 00:36
|
#93 |
|
This is my second home
ZT 260 SE Twilight and 10 other 75 ZT's :O Join Date: Jan 2007
Location: Conwy NORTH WALES
Posts: 11,094
Thanks: 512
Thanked 1,116 Times in 763 Posts
|
Good time to test your cooling fan is working on all speeds John
 http://www.the75andztclub.co.uk/foru...9&goto=newpost
__________________
[SIGPIC][/SIGPIC] Newbies do now!! 1. Plenum drains..all 3 or 4 year dependent 2. Cooling fan..All speeds functioning 3. Bonnet cable divider block |
|
|
|
|
8th February 2016, 20:35
|
#94 |
|
Posted a thing or two
MG ZT 190 + and MKIV Supra Join Date: Jan 2009
Location: Plymouth
Posts: 1,551
Thanks: 224
Thanked 493 Times in 359 Posts
|
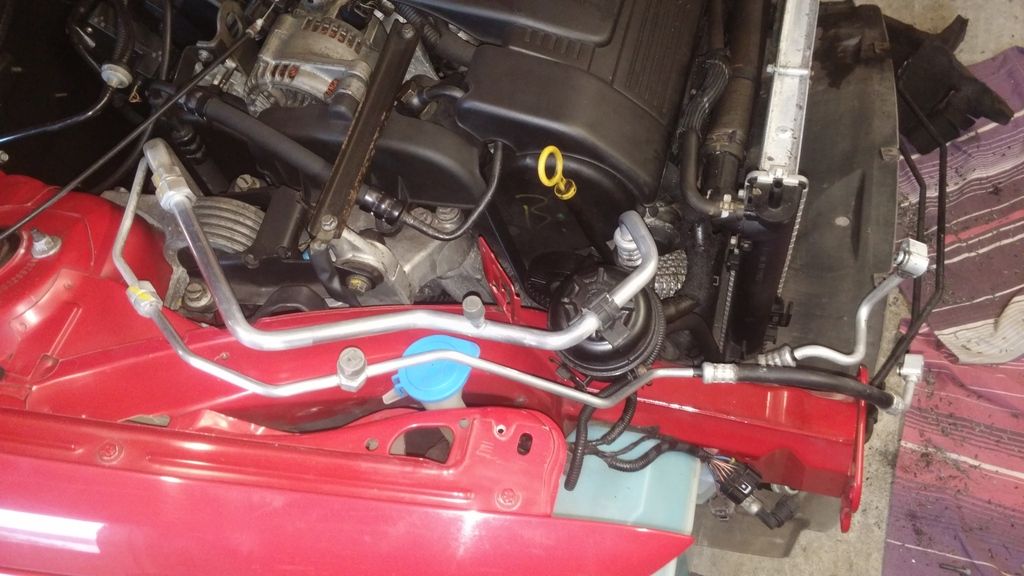
Next up was taking off the slam panel. Firstly I unbolted the power steering cooler (Held on by 2x M6 bolts to the bottom of the panel). Disconnect the bonnet catches which I did by unbolting the latches from the panel but it would be better disconnecting at the joiner. Disconnect the plug outboard of the passenger side front beam. All that needed undoing then was the 2xM6 bolts on the wings and the star drive bolts on the straps for the radiator grill.
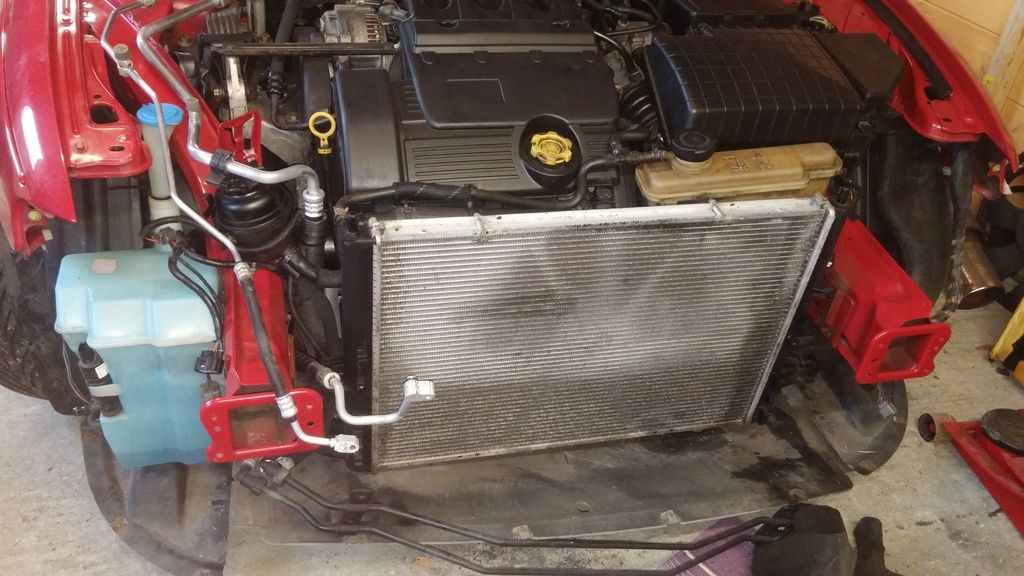
Down to the fan 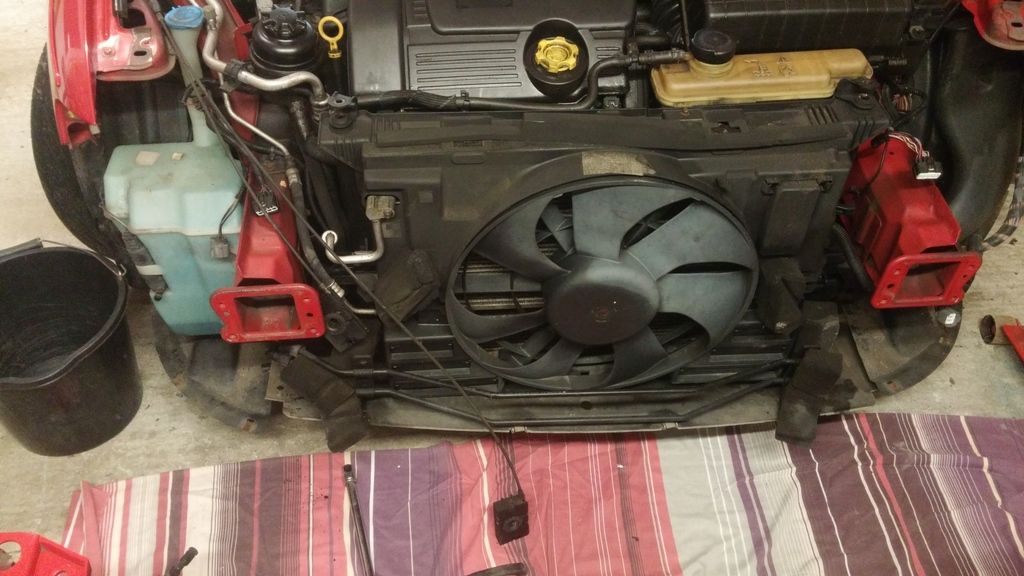 To take the fan off there are 2 x M6 bolts halfway down each side of the cowling, the twin loom connectors outboard of the passenger side front beam. The next bit is either trim the left hand side of the cowling around the AC pipes so the cowling can be lifted off or empty the fridge gas system and disconnect the pipes. I went for the latter knowing the AC condensor/dryer would be knackered. As a qualified fgas engineer I had the gas recovered.What others do in their own garages is up to them  I then took the straps of the top of rubber mounts so I could lift the cowling off of the radiator. You also need to undo1 M6 bolt on the coolant header tank and remove the tank from two lugs. With the fan and cowling off the state of the condensor could be seen Admittedly I did brush the fins just to prove how worn they were 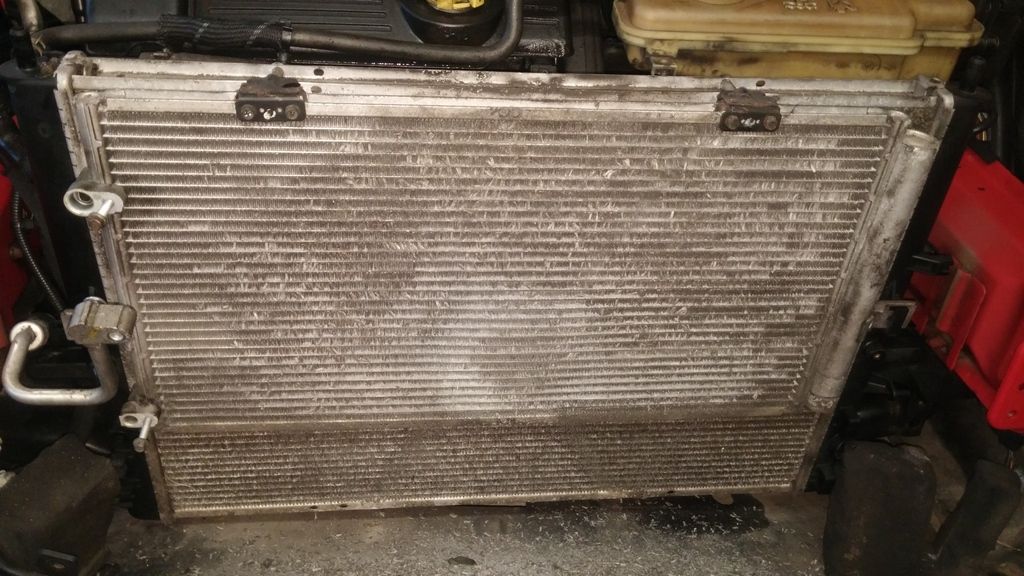 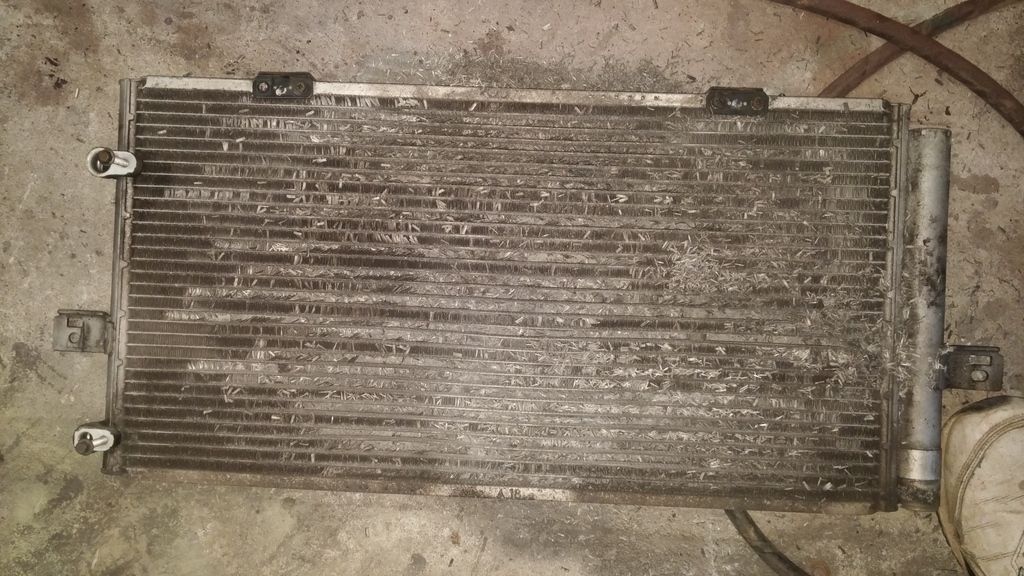 2 x long M6 bolts that go through the radiator and the condensor lifts off leaving the rad which although dirty was in good nick  Next it was back to the cleaning mode whilst I waited for a new condesnor/dryer for Jules  Right hand leg (wiring and pipe bracket removed 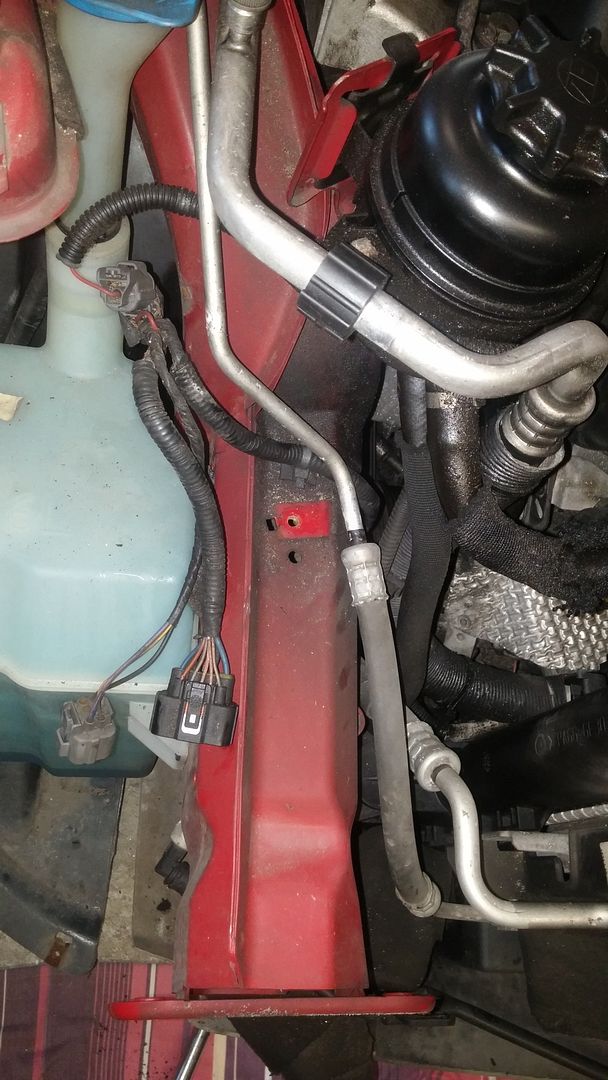 and cleaned off 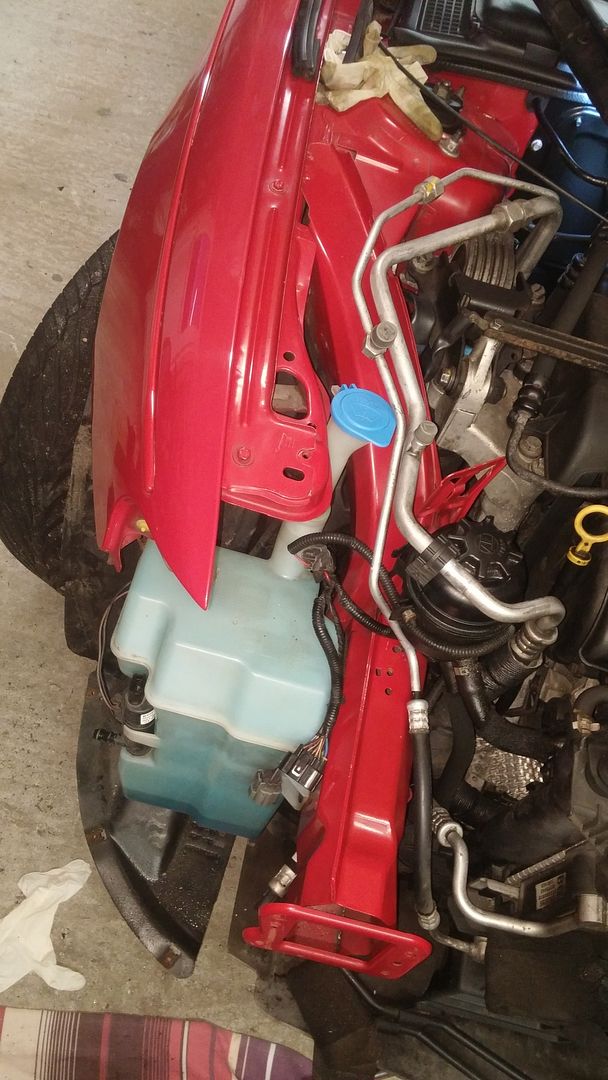 Passenger side 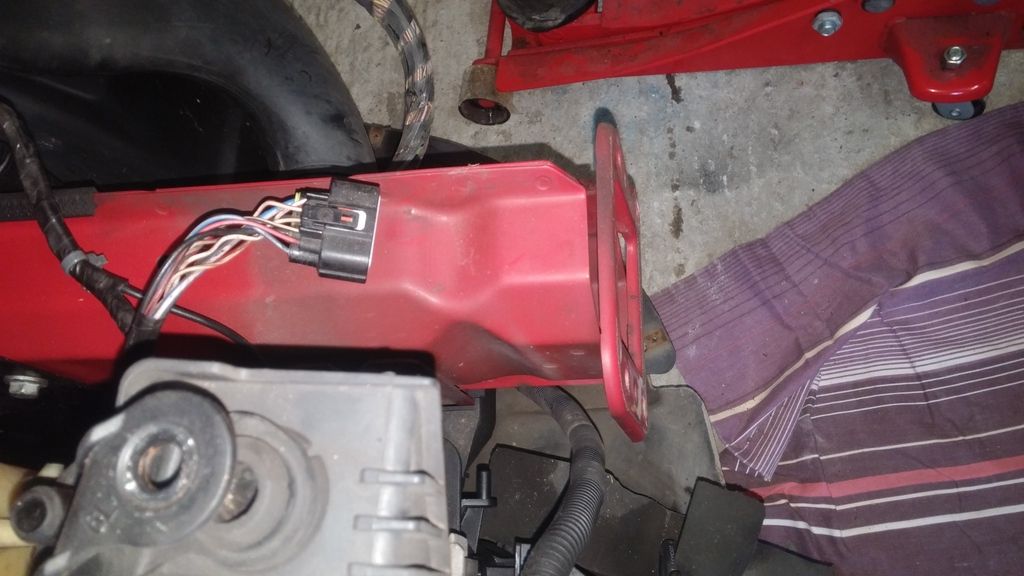 and clean 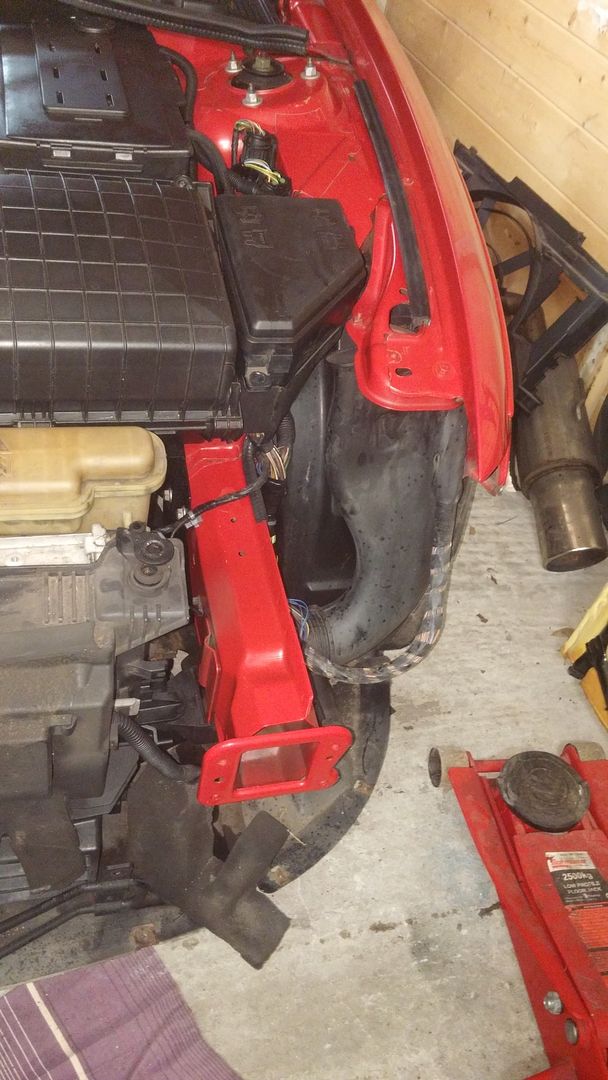 Next job was the fan. This was an original 3 speed fan the low and medium speeds were not working. 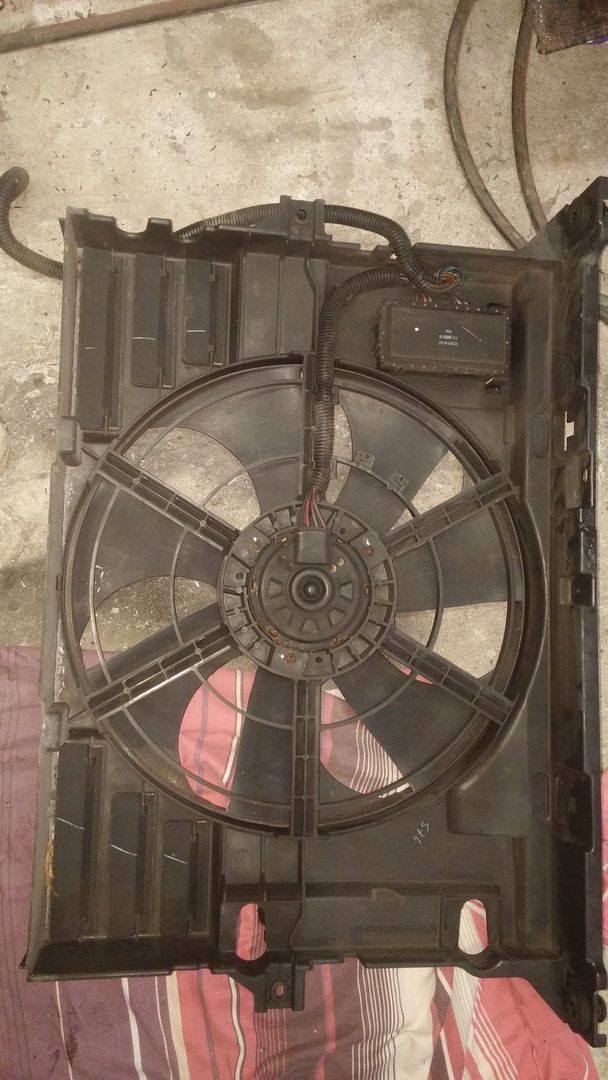 To remove the fan from the motor I held onto the centre nut with a box spanner and turned the fan impeller (anti clockwise I think  ) to take the fan of its lugs. The motor is bolted to the cowling with 3 x M5 star drive set screws. ) to take the fan of its lugs. The motor is bolted to the cowling with 3 x M5 star drive set screws. The fan can be broken into by straightening the 6 x split lugs on the body passing through the cover. 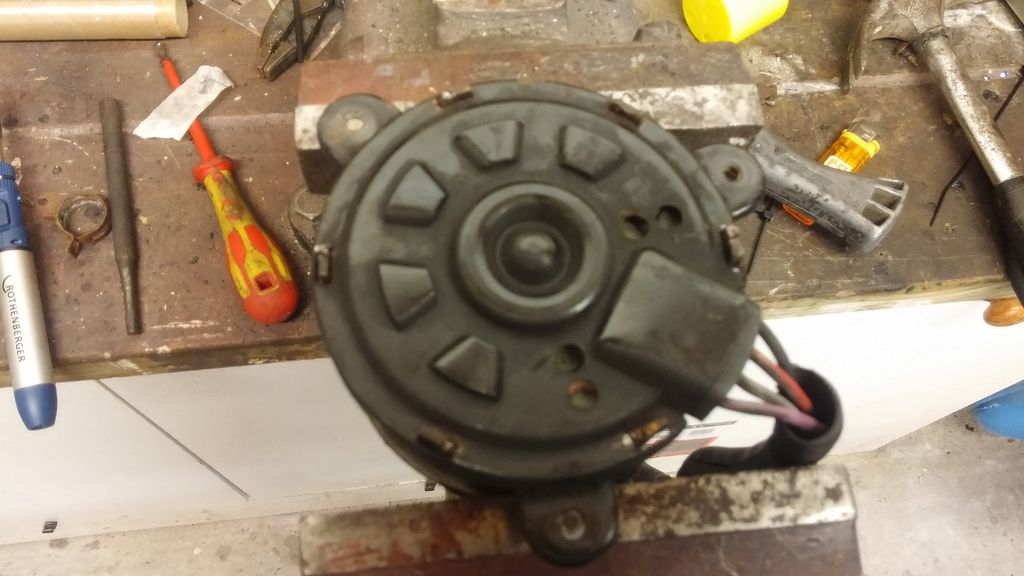 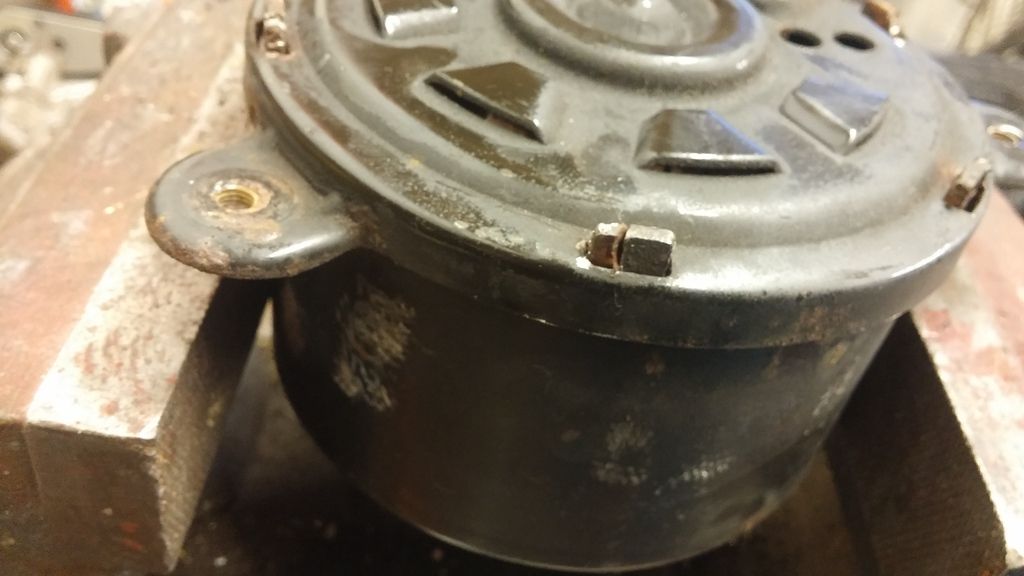 once these are straight the cover lifts off and the brush mounting board can be lifted out 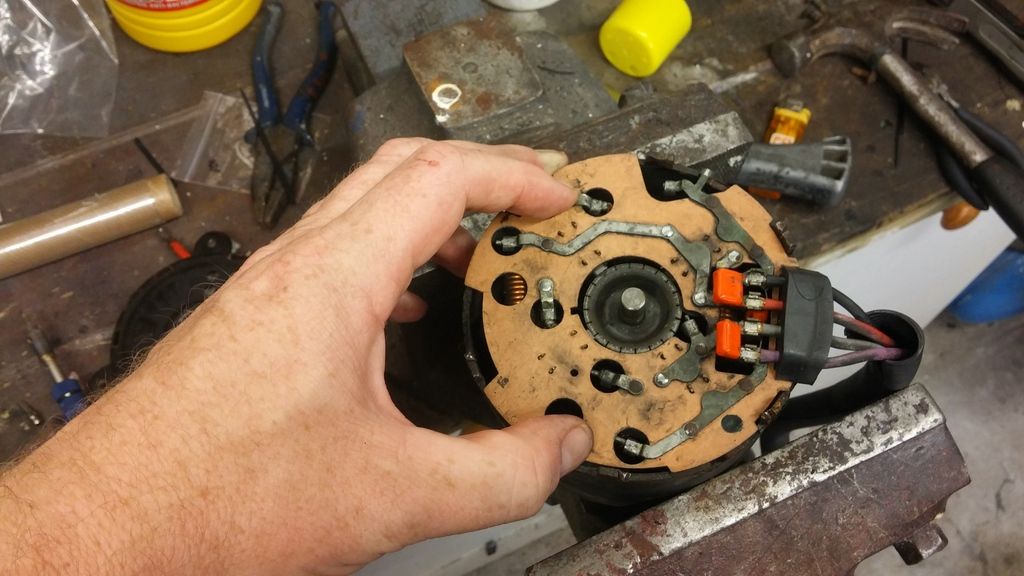 Once lifted off it was easy to see the two brushes that had totally worn down (the ones on the top in this photo). 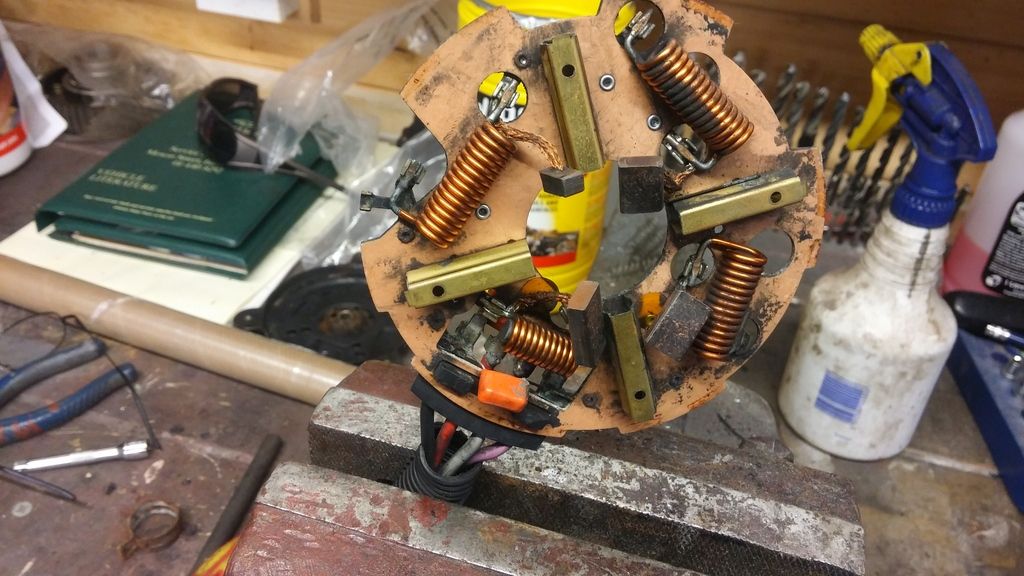 I already had some good quality replacements so I cut off the worn ones and soldered on the replacements. 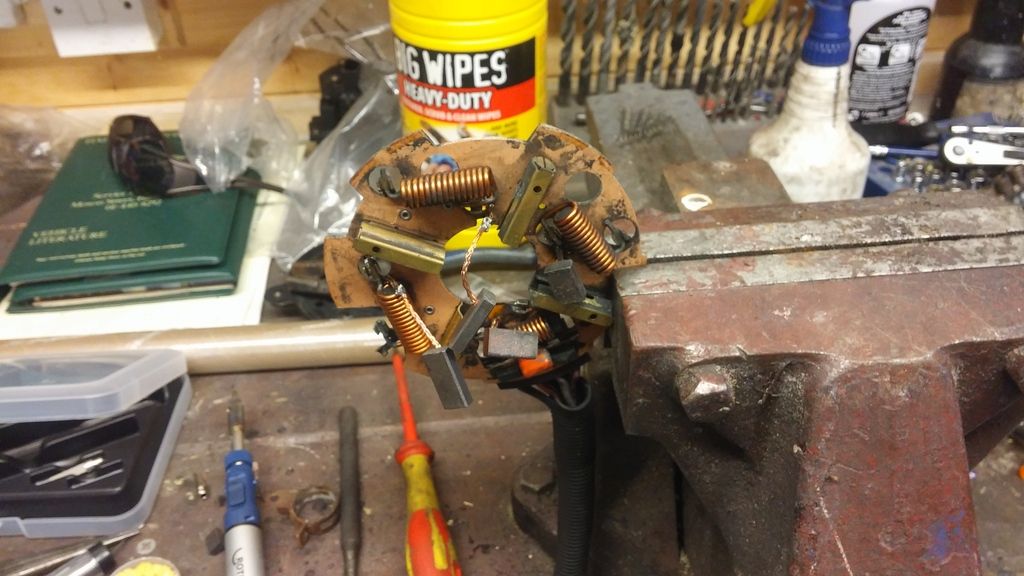 I then tested continuity between all the brushes and their connections in the control box before re assembling. The hardest part was keeping the brushes stowed in the housings as you slid the mounting board over the commutator. I used tie wraps to hold the brushed in and cut them once slid over. The cover was then replaced and the lugs bent back. I added a little grease onto the shaft bearing at the same time. 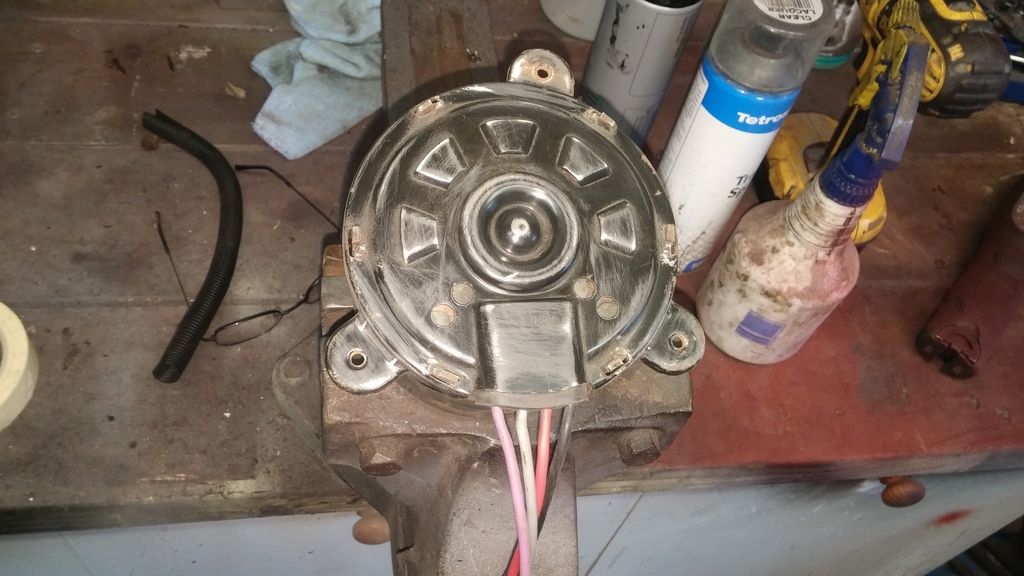 The motor was then tested with 12v supply by connecting the +- like this in the control box: 1. Speed one: red + black - 2. Speed two: red and grey + black - 3. Speed three: red and grey + black and purple - All 3 speeds worked so I cleaned the fan up and re sprayed the body. 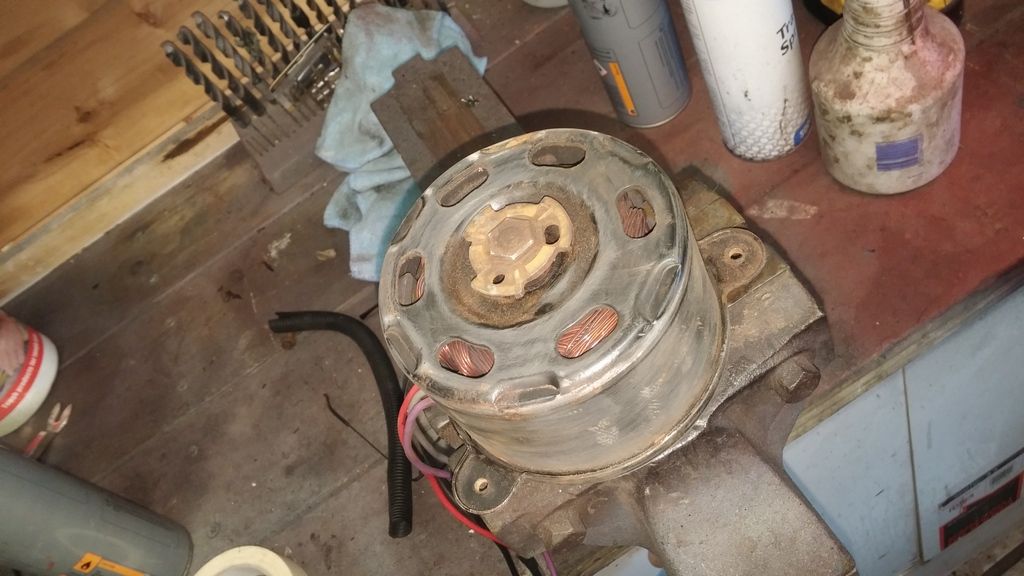 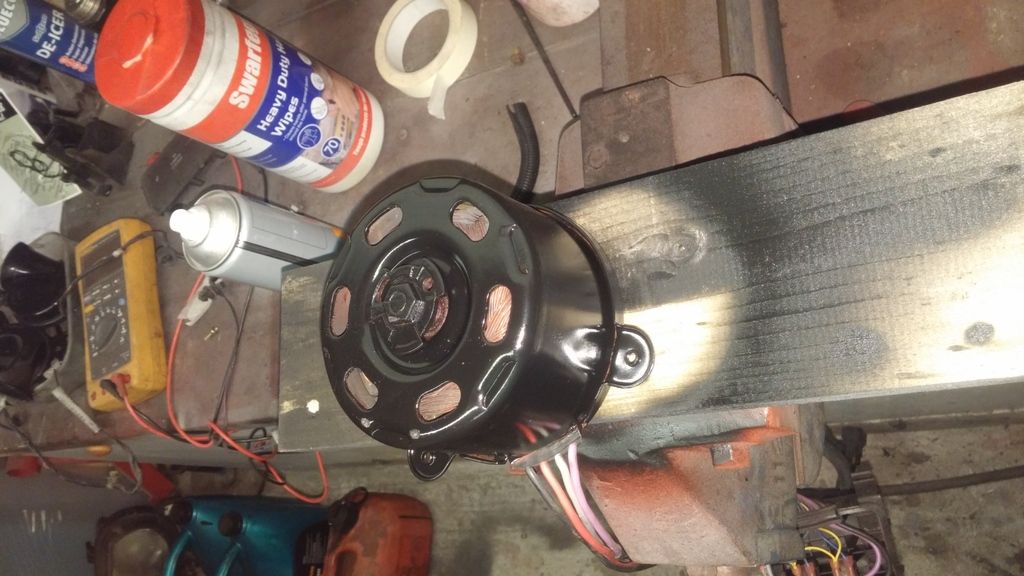 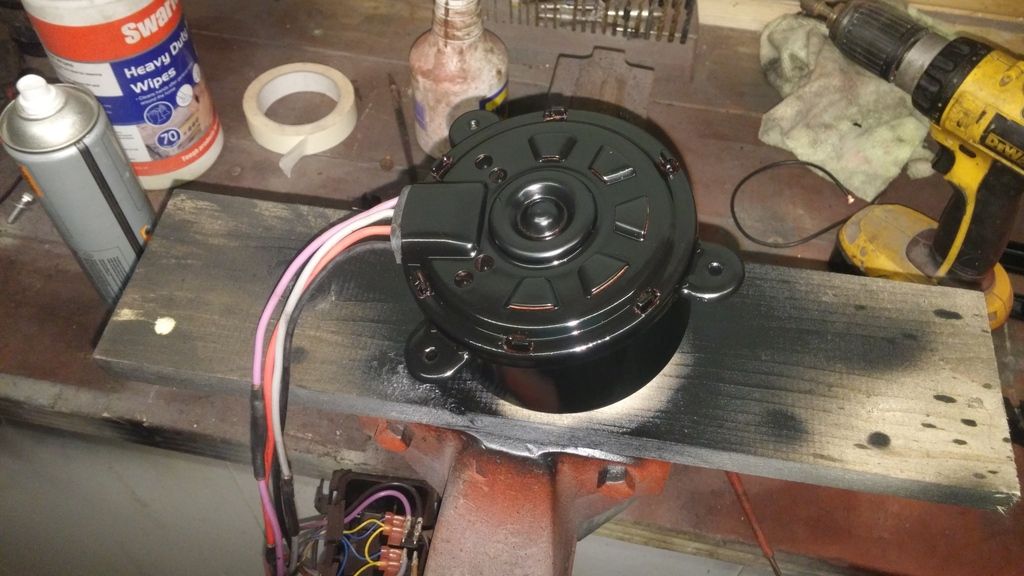 next up I deep cleaned the fan impeller and cowing plus I cut the plastic of around where the AC pipes would be so the cowling could be lifted off without dropping the A/C in the future. 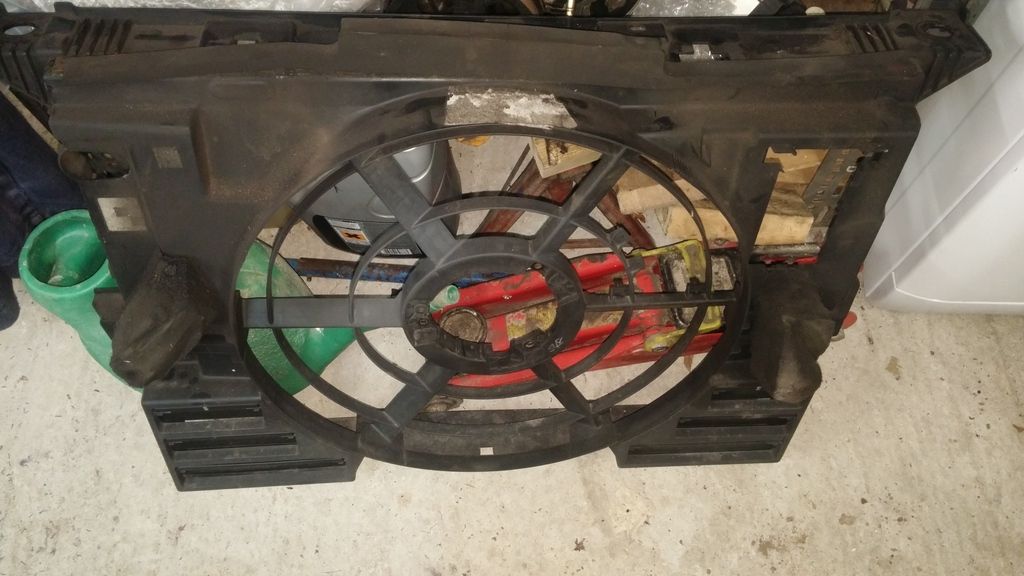 Items cleaned 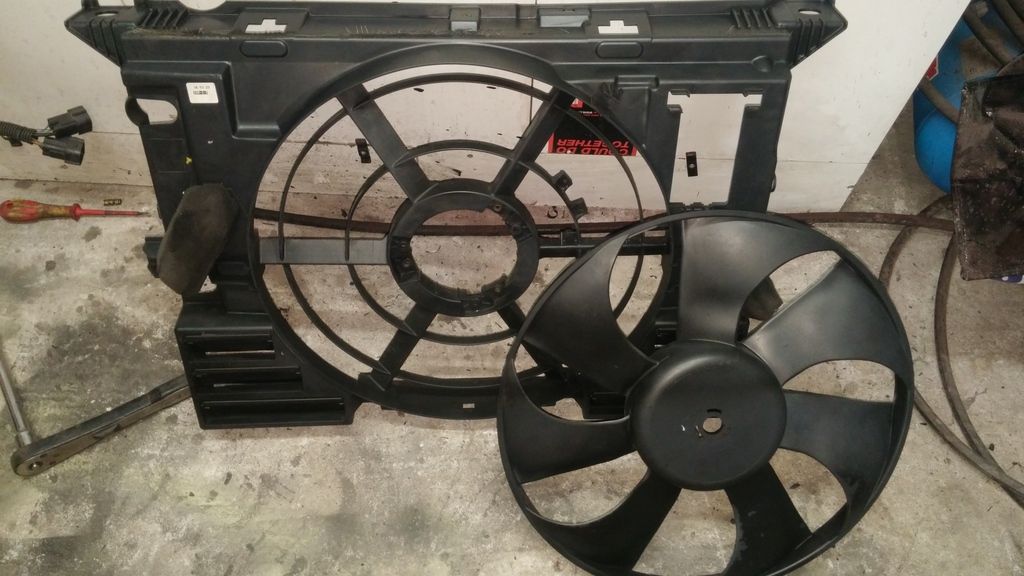 Impeller fitted back onto motor 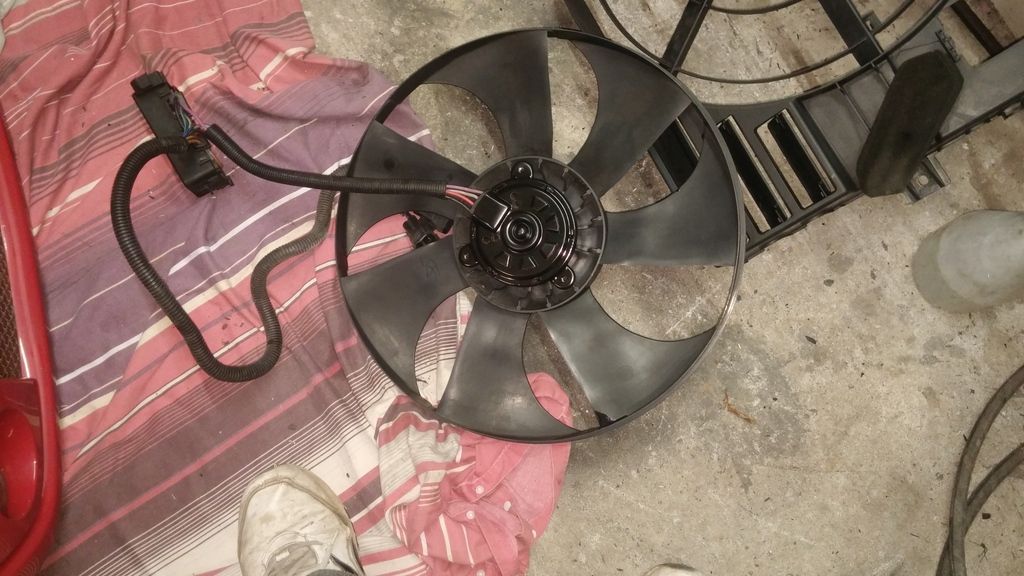 Motor and impeller fitted to cowling 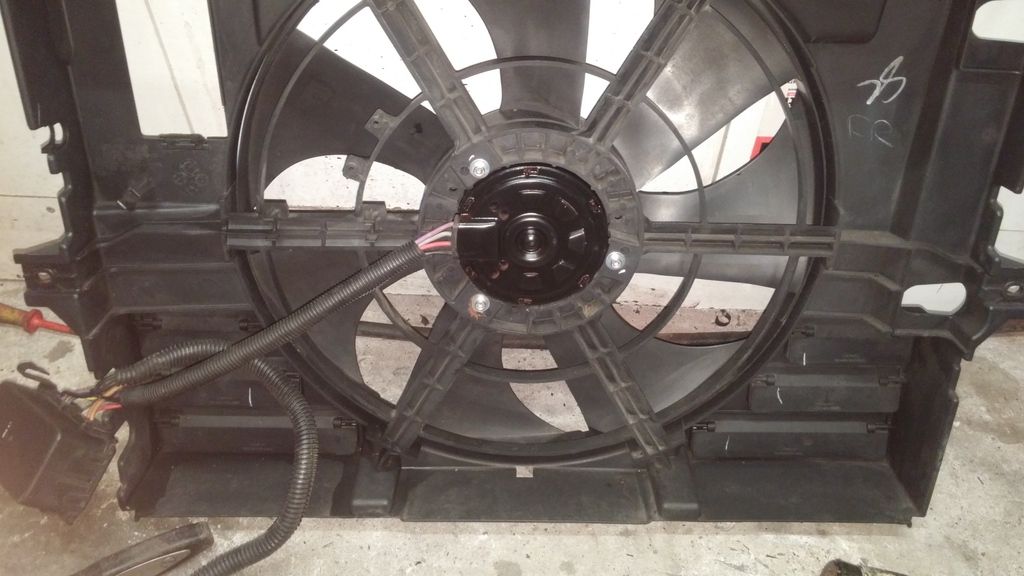 and the wiring clipped back in. 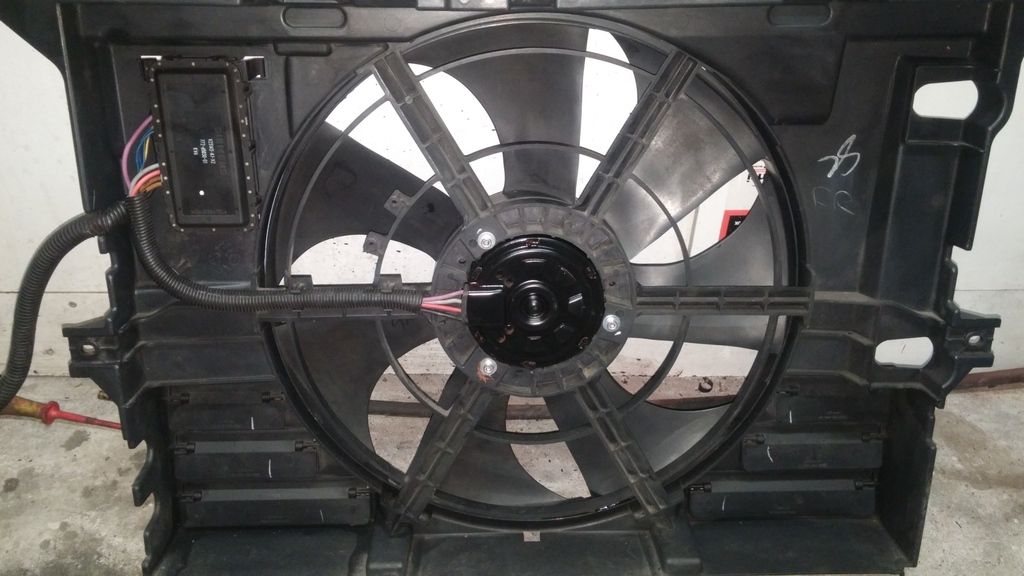 Finished article ready fro refitting 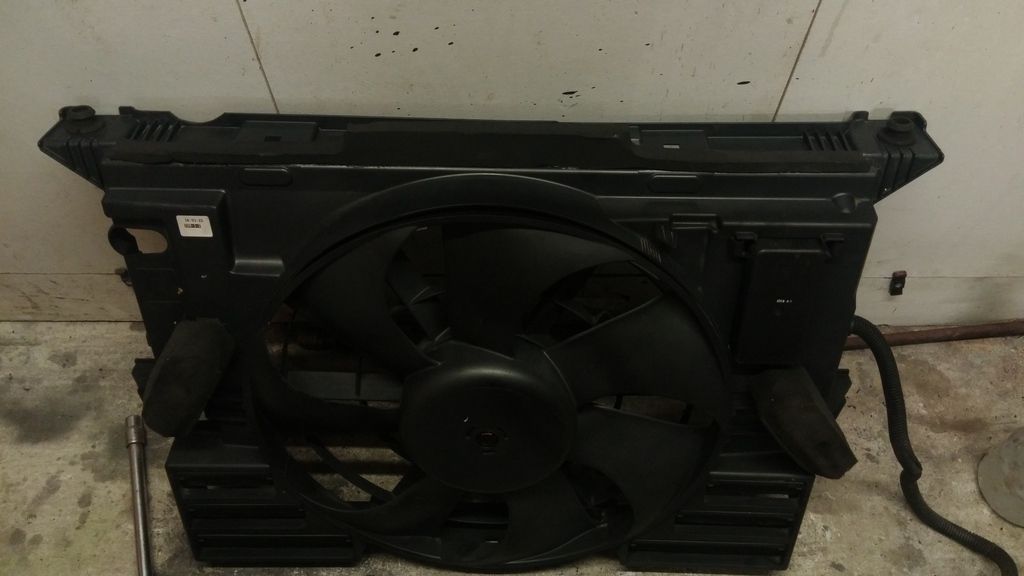 Here you can see the material cut away so the AC pipes dont need disconnecting again when the fan fails  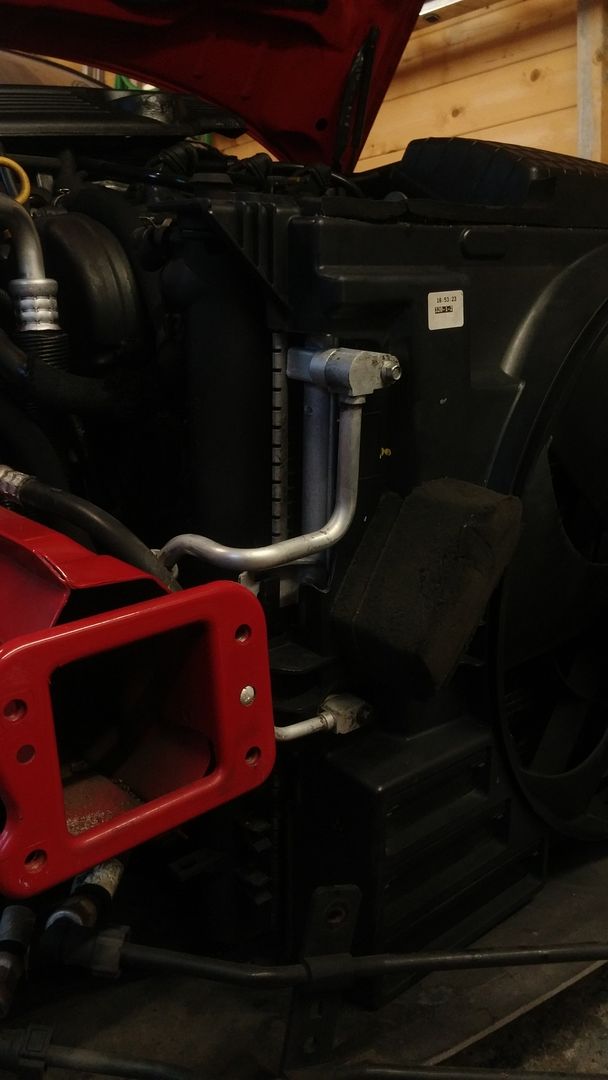 Next up more cleaning and fitting up of condenser etc.
__________________
Jon C Living the dream MK IV VVTI Tiptronic TT Toyota Supra MG ZT 190+
BornTuesday, 10th July 2001 @ 09:01:10 259th ZT to run off the production line, out of 18,894 252nd ZT 190 + to be made out of 4,023 101st ZT in Solar Red (code: CEU) to be made out of 1,888 Last edited by jonc3725; 20th August 2017 at 20:48.. |
|
|
|
|
8th February 2016, 22:44
|
#95 |
|
This is my second home
ZT 260 SE Twilight and 10 other 75 ZT's :O Join Date: Jan 2007
Location: Conwy NORTH WALES
Posts: 11,094
Thanks: 512
Thanked 1,116 Times in 763 Posts
|
New Condenser I hope coz that one looks shot

__________________
[SIGPIC][/SIGPIC] Newbies do now!! 1. Plenum drains..all 3 or 4 year dependent 2. Cooling fan..All speeds functioning 3. Bonnet cable divider block |
|
|
|
|
9th February 2016, 17:56
|
#96 | |
|
Posted a thing or two
MG ZT 190 + and MKIV Supra Join Date: Jan 2009
Location: Plymouth
Posts: 1,551
Thanks: 224
Thanked 493 Times in 359 Posts
|
Quote:
__________________
Jon C Living the dream MK IV VVTI Tiptronic TT Toyota Supra MG ZT 190+
BornTuesday, 10th July 2001 @ 09:01:10 259th ZT to run off the production line, out of 18,894 252nd ZT 190 + to be made out of 4,023 101st ZT in Solar Red (code: CEU) to be made out of 1,888 |
|
|
|
|
|
9th February 2016, 18:40
|
#97 |
|
This is my second home
ZT 260 SE Twilight and 10 other 75 ZT's :O Join Date: Jan 2007
Location: Conwy NORTH WALES
Posts: 11,094
Thanks: 512
Thanked 1,116 Times in 763 Posts
|
Of course
Senior moment there
__________________
[SIGPIC][/SIGPIC] Newbies do now!! 1. Plenum drains..all 3 or 4 year dependent 2. Cooling fan..All speeds functioning 3. Bonnet cable divider block |
|
|
|
|
9th February 2016, 22:32
|
#98 |
|
Posted a thing or two
MG ZT 190 + and MKIV Supra Join Date: Jan 2009
Location: Plymouth
Posts: 1,551
Thanks: 224
Thanked 493 Times in 359 Posts
|
Next up I cleaned all the A/c pipes to and from the condensor (the aluminium pipes running down the right side of the engine bay
  Fitted the New condensor drier from Jules (Thanks mate ), fitted new seals on the condensor pipe connections, oiled them and fitted them into the condensor.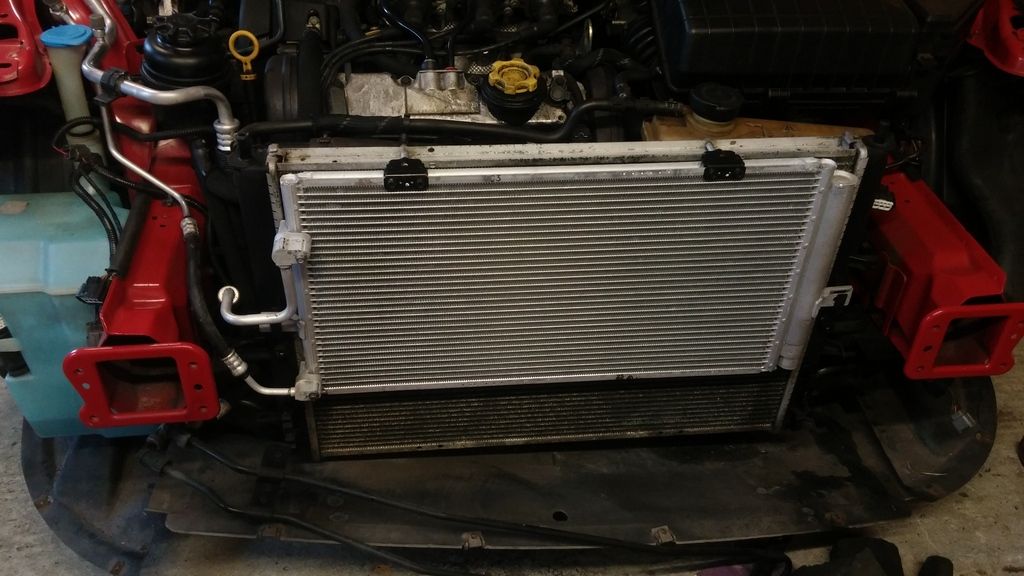 Next I bracketed the A/C pipes in position using a refurbished bracket on the RH leg. 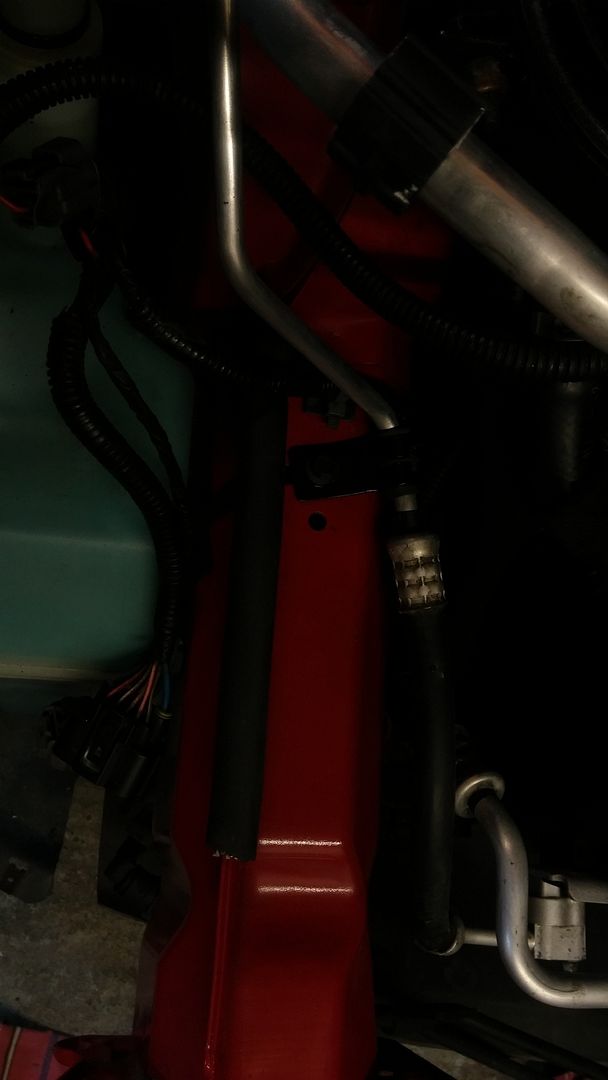 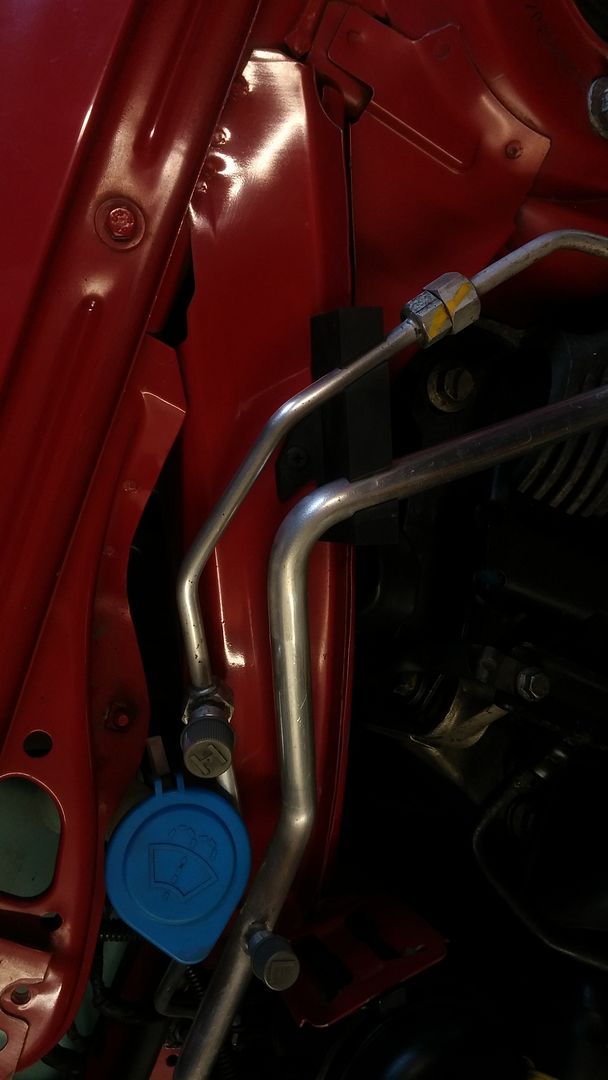 When I was working in this area I noticed the power steering hose was pretty scabby where the power steering reservoir had been leaking. I don't believe this is from a leaking cap but from a pressurised system because of internal leaks in the rack. 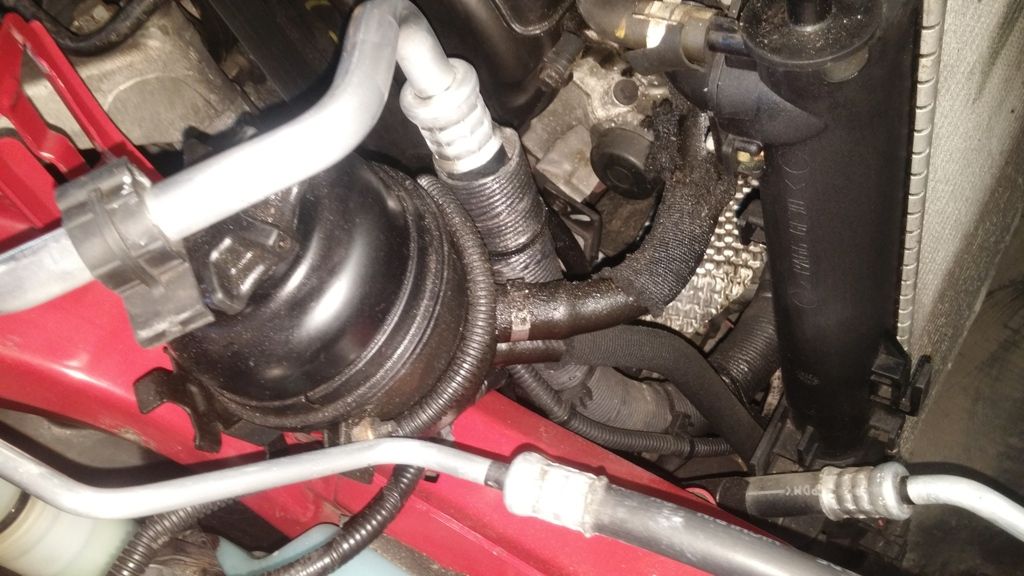 And changed for a new hose 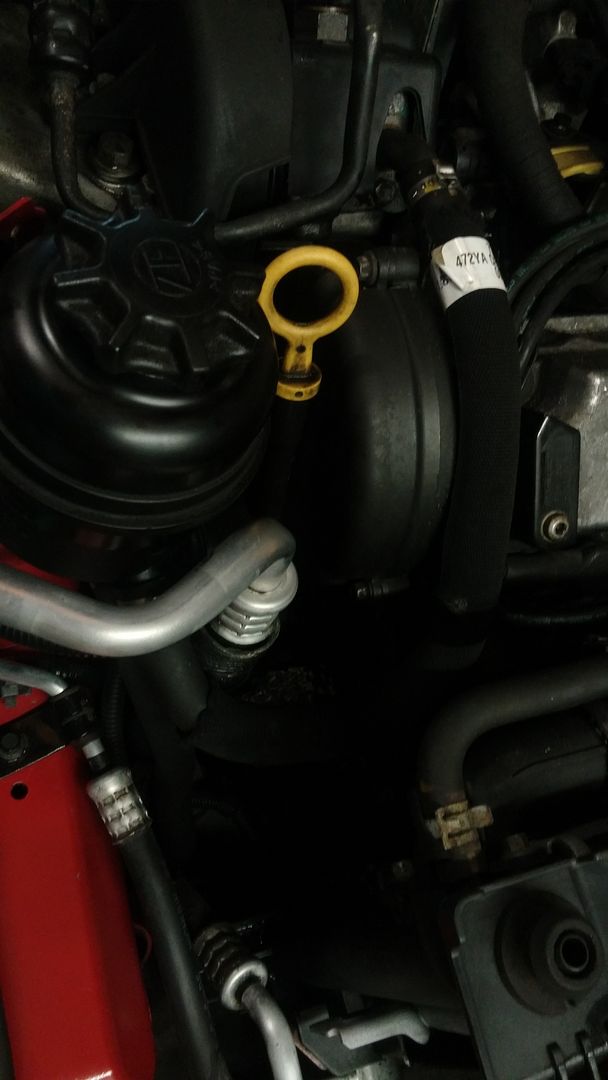 Next i made sure the left and right legs had protection on their leading edges where the looms go across the leg. Recent posts on the main forum have highlighted this need Left side 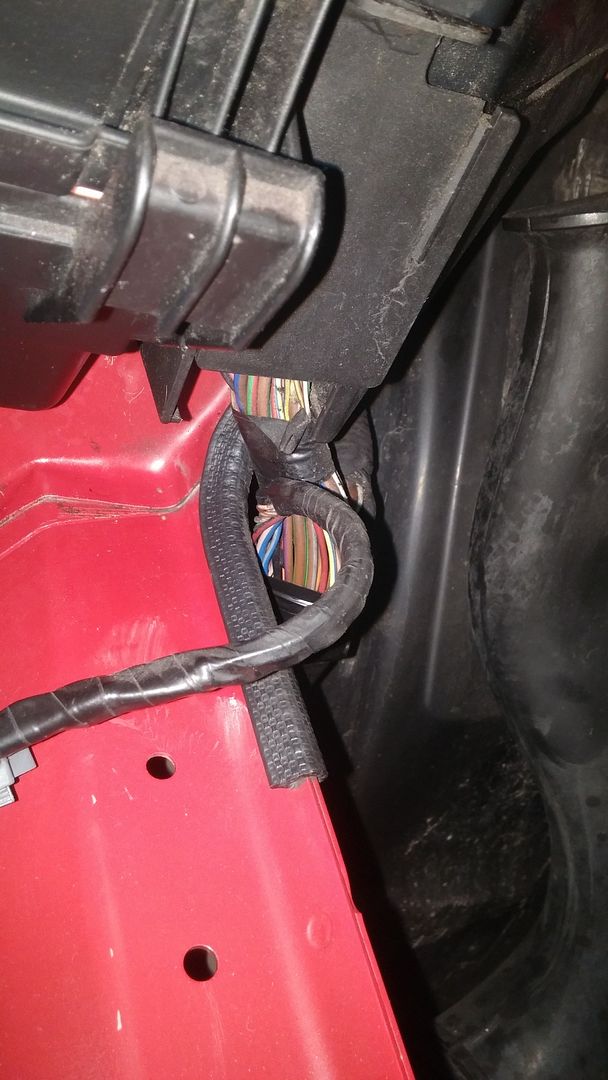 Right side Next up I fitted the overhauled fan and cowl to the condensor, replaced the bolts on the side and fitted the rubber mounts on top. 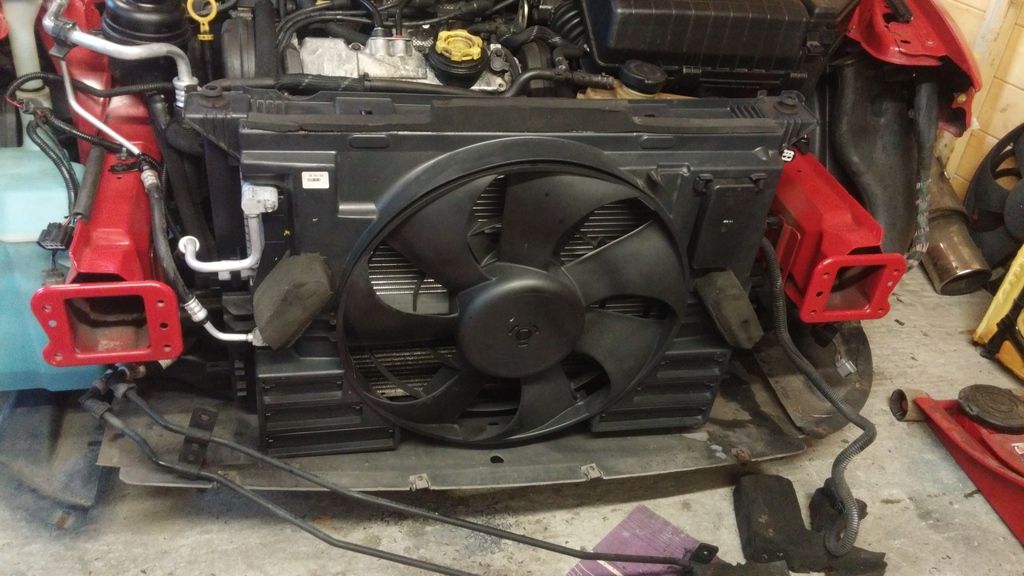 I also wax-oiled the legs and the chassis box sections at the front of the car. 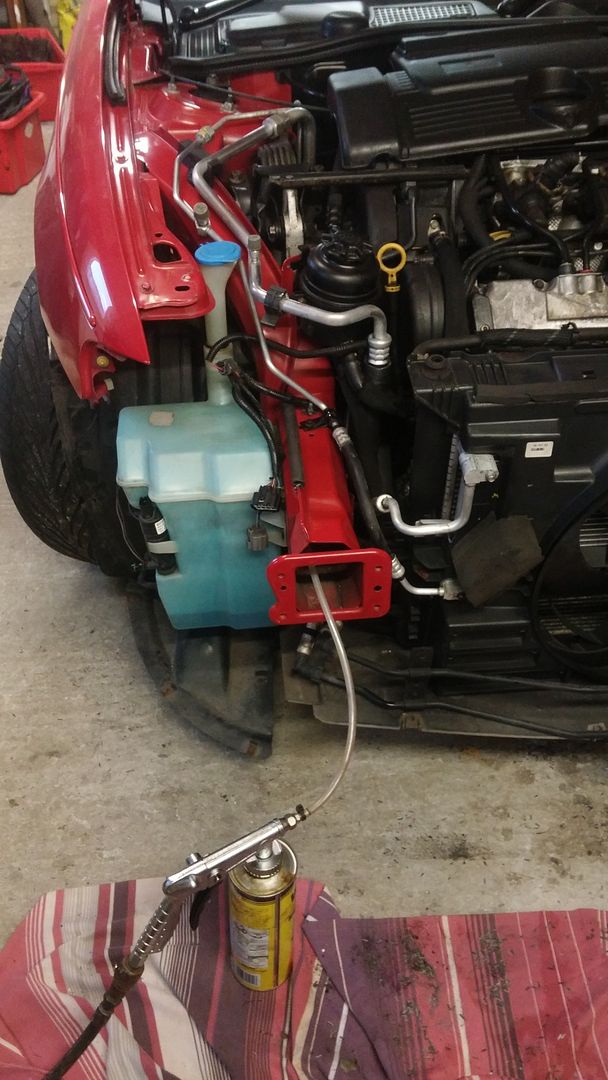 Also replaced the Xenons with some good ones I had off my old car. I polished these back about 18 months ago so know they have good lenses. I will keep the old ones as spares. 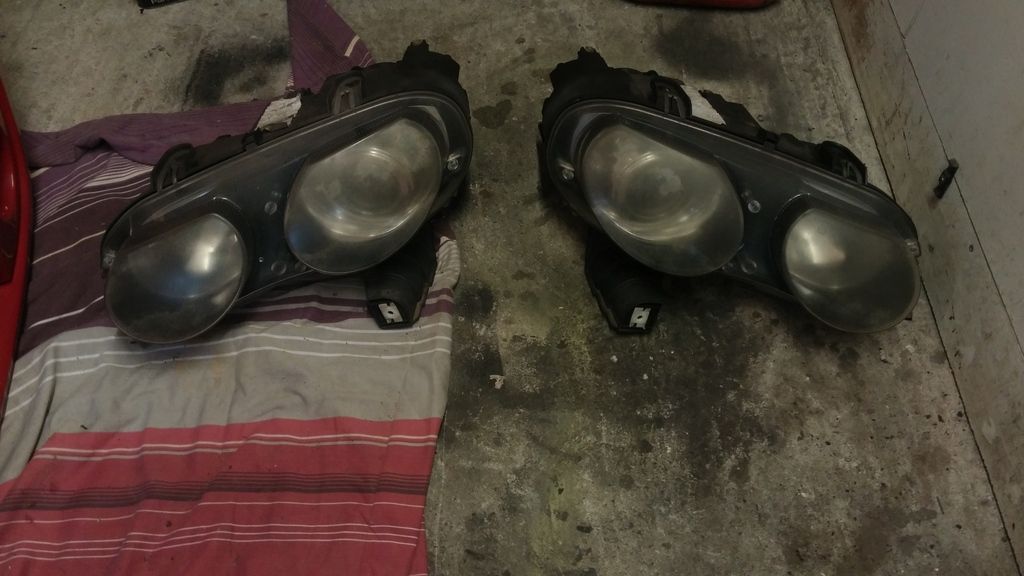 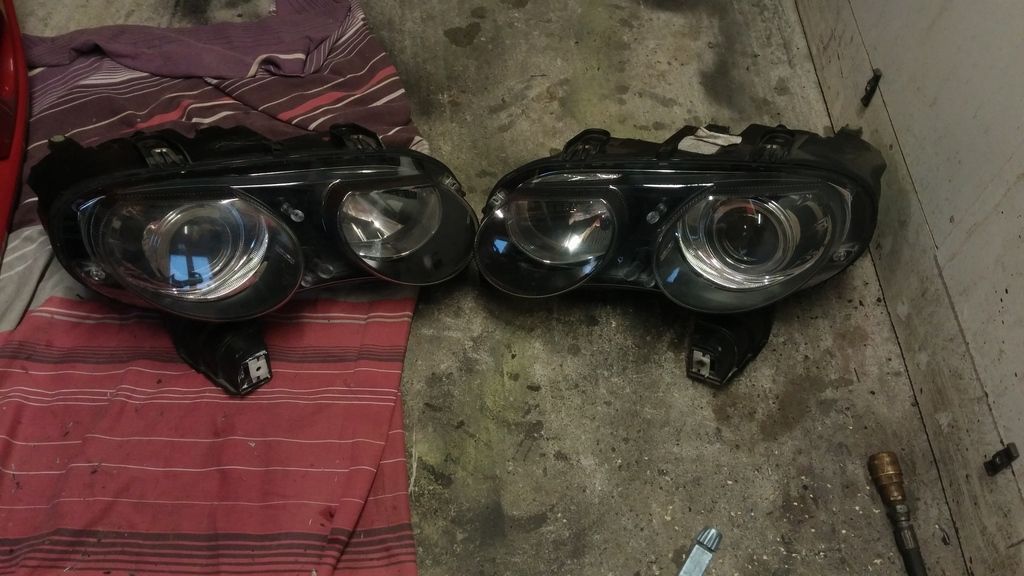 Now for prepping the rest of the front and building up the slam panel but that's for another night.
__________________
Jon C Living the dream MK IV VVTI Tiptronic TT Toyota Supra MG ZT 190+
BornTuesday, 10th July 2001 @ 09:01:10 259th ZT to run off the production line, out of 18,894 252nd ZT 190 + to be made out of 4,023 101st ZT in Solar Red (code: CEU) to be made out of 1,888 Last edited by jonc3725; 20th August 2017 at 20:50.. |
|
|
|
|
9th February 2016, 22:55
|
#99 |
|
This is my second home
ZT 260 SE Twilight and 10 other 75 ZT's :O Join Date: Jan 2007
Location: Conwy NORTH WALES
Posts: 11,094
Thanks: 512
Thanked 1,116 Times in 763 Posts
|
What is your day job Jon ?!!
__________________
[SIGPIC][/SIGPIC] Newbies do now!! 1. Plenum drains..all 3 or 4 year dependent 2. Cooling fan..All speeds functioning 3. Bonnet cable divider block |
|
|
|
|
10th February 2016, 20:31
|
#100 | |
|
Posted a thing or two
MG ZT 190 + and MKIV Supra Join Date: Jan 2009
Location: Plymouth
Posts: 1,551
Thanks: 224
Thanked 493 Times in 359 Posts
|
Quote:
I am an engineer in the Marine industry. More management than on the tools for the last 15 years or so hence the need to disappear into the man cave and open up the tool chest in the evenings and weekends Ive always spent my leasure time with cars either building, restoring or tinkering. 
__________________
Jon C Living the dream MK IV VVTI Tiptronic TT Toyota Supra MG ZT 190+
BornTuesday, 10th July 2001 @ 09:01:10 259th ZT to run off the production line, out of 18,894 252nd ZT 190 + to be made out of 4,023 101st ZT in Solar Red (code: CEU) to be made out of 1,888 |
|
|
|
|
 |
|
|


 Linear Mode

