
|
|
|
|
|
|
||
|
|
||
 3rd September 2020, 13:50
|
#1 |
|
Posted a thing or two
Rover 75 Saloon Join Date: Apr 2019
Location: Under the car
Posts: 1,840
Thanks: 210
Thanked 244 Times in 221 Posts
|
I've just bought one to change the front pipes (modulator to hoses).
Can anyone tell me a good supplier for the pipes and fittings? TIA. Last edited by Blink; 3rd September 2020 at 13:54.. |

|

|
|
3rd September 2020, 13:58
|
#2 |
|
Doesn't do things by halves

Rover 75 2.5 Connoisseur Auto (1999) Dealer launch model. Join Date: Mar 2007
Location: Former Middlesex
Posts: 20,344
Thanks: 1,587
Thanked 3,749 Times in 3,181 Posts
|
__________________
"Whatever is rightly done, however humble, is noble." Sir Henry Royce. |
|
|
|
|
3rd September 2020, 14:32
|
#3 | |
|
Posted a thing or two
Rover 75 Saloon Join Date: Apr 2019
Location: Under the car
Posts: 1,840
Thanks: 210
Thanked 244 Times in 221 Posts
|
Quote:
Do you know exactly which bits I need for these? 1) The modulator end 2) The hose end (union in wheel arch L bracket) I'm not sure whether to go for brass or stainless steel. SS sounds like a good idea but automec only appear to have one fitting (link). |
|
|
|
|
|
4th September 2020, 21:25
|
#4 | |
|
Banned
ROVER 75 Connoisseur Join Date: Jul 2020
Location: BRACKNELL
Posts: 270
Thanks: 125
Thanked 130 Times in 92 Posts
|
Quote:
If you want stainless steel Simon, you need this type for both ends. https://www.carbuilder.com/uk/stainl...SABEgIqYfD_BwE Hope this helps Chris |
|
|
|
|
|
5th September 2020, 11:08
|
#5 | |||
|
This is my second home
Rover75 and Mreg Corsa. Join Date: Nov 2006
Location: Sumweer onat mote o'dust (Sagin)
Posts: 21,752
Thanks: 341
Thanked 3,660 Times in 2,924 Posts
|
Quote:
The pipe at the wheel arch bracket flexi-connection may be best simply cut through against the union. You need to retain as much length as possible for matching up the new piping. The old connector nut will then respond easily to a standard socket. The vertical pipe section here has to be bent back upwards so it is horizontal and will pass into the engine bay through the two wing panels/grommet. Quote:
You'll use two of these of course. Quote:
The centre of the flexi-hose is clipped to the hub with a U-clip which I got from eBay: https://www.ebay.co.uk/itm/4X-Brake-...72.m2749.l2649 When you eventually get the old pipe in your hands, use it as a template for the new pipe. I found the best metod is to start with a 140cm length of straight pipe. One end should be prepard for flaring according to the supplied instructions. Flare the ABS end now. If you're happy with the flare, slot a connector nut onto the pipe and butt it to the flare and hold in place with a bit of insulating tape. You must do this before shaping the pipe. I have two scapped attempts to prove it! Starting at the ABS connector, shape the first bend. It's very close to the nut. Once you're happy with this first bend, begin using the old pipe as a template by taping it to the new pipe. This way you don't have to handle separate pipes that seem to have a life of their own. Each time you make a new bend, tape the straight section to the old ppe section. I found it easiet to work two bends ahead of the taped section. Eventually, you'll have the old and new pipes taped together as exact copies. The free end section will be longer than the old one, but that's OK and can be trimmed to the correct length under the wheel arch. Reverse the pipe winkling excercise to get the thing in position with the ABS connector sitting nicely in place. Clip the new pipe into the firewall clips and remember the one just near the grommet into the wheel arch. The straight end sticking through to the wheel arch wll require bending carefully down towards the connector bracket. You only get one chance to cut it so ensure the swaged end will sit down into the flexi-pipe receiver. There's about half and inch of tolerance through the grommet, but try to ensure the pipe will sit reasonably well in the middle so it won't rub on the body panel. Put the connector nut onto the pipe now and tape it out of the way while you prepare to cut and flare the pipe. the rest is pretty obvious and staright forward. Good luck. EDIT: For geting tight bends (which fit an look better) I used a set of bending pliers like these:https://www.ebay.co.uk/itm/US-PRO-58...72.m2749.l2649 These seemed to provide a bit more flexibility that the other types of tool (of which there are dozens). But it's up to you. Here's a couple of photos 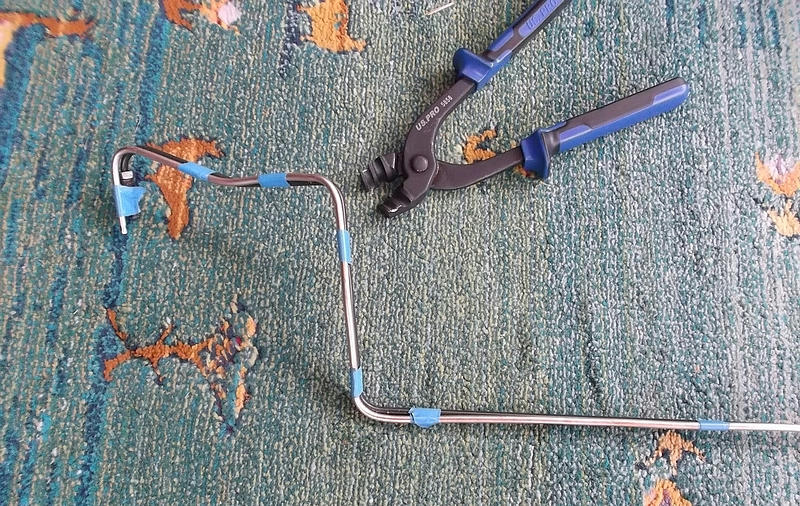 This shows the method I use for duplicating the bends. Note that the ABS end on the left doesn't have the connector nut. Big mistake - there's insufficient room to use the flaring tool. This shows the method I use for duplicating the bends. Note that the ABS end on the left doesn't have the connector nut. Big mistake - there's insufficient room to use the flaring tool.The next is the new pipe and the old one taped together. 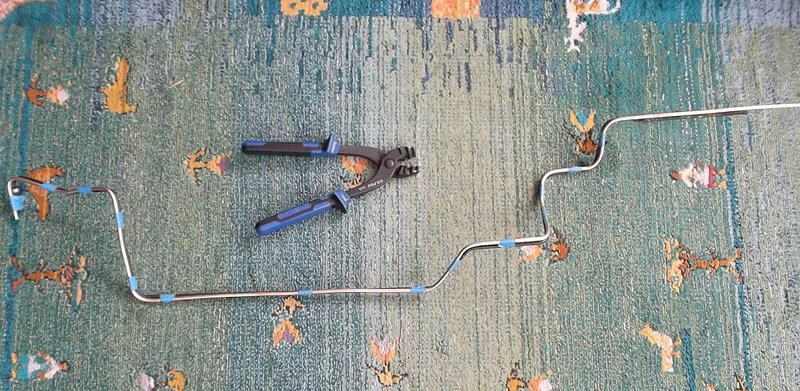 As already noted, I had to repeat all this after first flaring the ABS end and adding the nut and then making the first sharp bend. The other false start I had was in underestimating the required length of piping. The wheel arch section was an inch short! TC Last edited by T-Cut; 5th September 2020 at 12:01.. |
|||
|
|
|
|
5th September 2020, 17:35
|
#6 |
|
This is my second home
R75 Saloon. Join Date: Feb 2009
Location: France/or Devon.
Posts: 14,003
Thanks: 3,851
Thanked 2,167 Times in 1,816 Posts
|
The above useful post by T-Cut really needs to go into the How-To's----------------
 |
|
|
|
|
5th September 2020, 18:47
|
#7 |
|
This is my second home
Rover 75 Saloon & Tourer Join Date: Sep 2012
Location: Lincoln
Posts: 14,912
Thanks: 1,630
Thanked 3,032 Times in 2,181 Posts
|
https://www.ebay.co.uk/itm/3-16-X-25...m/311892050848
https://www.ebay.co.uk/itm/Land-Rove...t/362172180875 How much did you pay for your Sykes Flaremaster 2 ? Just seen one on ebay £260 macafee2 |
|
|
|
|
5th September 2020, 19:21
|
#8 |
|
This is my second home
Rover75 and Mreg Corsa. Join Date: Nov 2006
Location: Sumweer onat mote o'dust (Sagin)
Posts: 21,752
Thanks: 341
Thanked 3,660 Times in 2,924 Posts
|
I found this DIN flaring tool very cost effective and small enough to work under the wheel arch: https://www.ebay.co.uk/itm/Hand-Held...72.m2749.l2649
Flaring Cunifer pipe was very easy and satisfying. TC |
|
|
|
|
6th September 2020, 14:09
|
#9 |
|
Posted a thing or two
Rover 75 Saloon Join Date: Apr 2019
Location: Under the car
Posts: 1,840
Thanks: 210
Thanked 244 Times in 221 Posts
|
Thanks all - I've just answered the other thread so I'll come back to this one later. (That'll teach me to start 2 threads on 1 subject
 ). ).Simon - I paid £152 from Prime Tools. It's the Flaremaster 2 kit ending 9600. |
|
|
|
|
7th September 2020, 09:07
|
#10 | ||
|
Give to Learn

Freelander 2 Join Date: Aug 2010
Location: West Midlands
Posts: 18,700
Thanks: 1,155
Thanked 6,407 Times in 3,874 Posts
|
Quote:
thank you.
__________________
Arctic Givology Learn to Give Everything is Achievable  ad altiora tendo. Check out our Nano meet dates http://www.midlandsnanomeets.co.uk/ http://www.the75andztclub.co.uk/index.php?thepage=howto " You do the work , we supply the expertise " |
||
|
|
|
 |
|
|


 Linear Mode

