
|
|
|
|
|
|
||
|
|
||
 23rd October 2020, 21:10
|
#11 |
|
Posted a thing or two

75 Conn CDT Tourer, 75 Conn SE V6, 75 Conn V6, 75 Conn CDTi Tourer, ZS 180 Join Date: Jan 2014
Location: Devon
Posts: 1,986
Thanks: 1,287
Thanked 963 Times in 534 Posts
|
I replaced the HG on a TF a couple years ago, liner heights were all about 1 thou proud of the block, with negligible difference between adjoining liners.
Head had recently been skimmed to it's limit, but with no indents from the previous gasket (guess I was lucky  ). ).I used a genuine Payen elastomer gasket, new bolts, etc. and it's been fine so far (approx 8000 miles) and doesn't use any coolant. Also fully flushed and now using green anti-freeze with low level warning.....just in case ! 
__________________

|

|

|
|
24th October 2020, 11:00
|
#12 | |
|
Posted a thing or two
Rover 75 2.0 V6 Auto Join Date: May 2011
Location: Sandnes - Norway
Posts: 1,560
Thanks: 64
Thanked 283 Times in 174 Posts
|
Quote:
 Will remove the sensors from the manifold first then... Will remove the sensors from the manifold first then... |
|
|
|
|
|
24th October 2020, 11:02
|
#13 | |
|
Posted a thing or two
Rover 75 2.0 V6 Auto Join Date: May 2011
Location: Sandnes - Norway
Posts: 1,560
Thanks: 64
Thanked 283 Times in 174 Posts
|
Quote:
(no indents) |
|
|
|
|
|
24th October 2020, 14:19
|
#14 |
|
Gets stuck in

MG ZT Join Date: Apr 2018
Location: Bristol
Posts: 696
Thanks: 332
Thanked 164 Times in 133 Posts
|
I did my 25's HG etc at the beginning of the COVID lockdown over a couple of weekends. Although I'd have liked to put in an MLS the liner heights were low and uneven, so I went for a DMGRS elastomer. Glad I did it then as the car's a real workhorse now with the kids living at home. In my case the fault was just having to top up coolant every couple of weeks, not the chocolate milkshake you had.
__________________
gnu |
|
|
|
|
26th October 2020, 05:47
|
#15 | |
|
Posted a thing or two
Rover 75 2.0 V6 Auto Join Date: May 2011
Location: Sandnes - Norway
Posts: 1,560
Thanks: 64
Thanked 283 Times in 174 Posts
|
Quote:
 The elastomer gasket is great. As we all know, time/temperature/chemicals is what that deteriorate the elastomer seal and make it fail at some point, making the water to go either out or into the oil. If a failing elastomer gasket is identified and replaced at an early stage there will be no problem to just replace it with a new one In my case, the car has been driven with a failed gasket until the car was not driveable. As mentioned earlier, this car was identified with a failing HG for 2 years/1000miles ago. The owner did just ignore this and continued to use it, wrecking the cylinder head. The elastomer gasket is great. As we all know, time/temperature/chemicals is what that deteriorate the elastomer seal and make it fail at some point, making the water to go either out or into the oil. If a failing elastomer gasket is identified and replaced at an early stage there will be no problem to just replace it with a new one In my case, the car has been driven with a failed gasket until the car was not driveable. As mentioned earlier, this car was identified with a failing HG for 2 years/1000miles ago. The owner did just ignore this and continued to use it, wrecking the cylinder head. |
|
|
|
|
|
26th October 2020, 05:56
|
#16 |
|
Posted a thing or two
Rover 75 2.0 V6 Auto Join Date: May 2011
Location: Sandnes - Norway
Posts: 1,560
Thanks: 64
Thanked 283 Times in 174 Posts
|
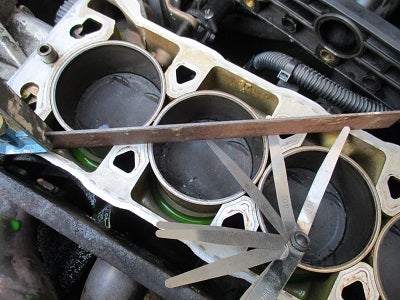
Continued with the stripdown and cleaning process a bit this weekend. Have pulled the pistons and liners. The liners sat pretty well in the block due to carbon buildup. I was able to get two of the liners out by tapping them up from the underside with an aluminium tubing. The two others not. I made a liner pulling tool by grinding a steel plate that fit nicely on the lower edge of the liner and connected this one to a sliding hammer. Was the able to get out the two others without making any marks/damage to the liners.
All the parts cleaned up in a diesel bath and visually inspected. No obvious damage/wear seen, so all this will go right back into the block with shims and fresh hylomar.    |
|
|
|
|
3rd November 2020, 10:39
|
#17 |
|
Posted a thing or two
Rover 75 2.0 V6 Auto Join Date: May 2011
Location: Sandnes - Norway
Posts: 1,560
Thanks: 64
Thanked 283 Times in 174 Posts
|
Hi all,
Things moving slowly at the moment. All necessary parts received, so that will not stop my progress now. I have used some time to remove the valves from the cylinder head, cleaned it up and have now had a round lapping in the valves. I have spent some time on each valve, starting with coarse grinding compound, and then fine compound. The valve has a nice grey ring around, but are struggling to get the seats completely clean. I am not sure that this is good enough or not... Seems not to get better with more work either. I am tempted to put all the valves back in and do a leak test the "WD40" way. If they dont leak, then complete the cylinder head. Then, there is another question raised. Are there any guidance regarding fire ring indentation on the cylinder head? Both cylinder heads I have available has a slightly indentation on the exhaust side. Both was removed from running engines after approx 25000 and 36000 miles. Both heads was skimmed before that and mounted in a configuration with head saver shim. Seems to me that you get indentation whatever you do.. So whats the "limits"?? Both cylinder heads have been skimmed below the factory limit, so will not do another skim as I probably will get new indentations anyway. Starting to get in doubt about these cylinder heads.... and it also seems to be hard to get a good known used one.  |
|
|
|
|
4th November 2020, 09:27
|
#18 |
|
Posted a thing or two
Rover 75 2.0 V6 Auto Join Date: May 2011
Location: Sandnes - Norway
Posts: 1,560
Thanks: 64
Thanked 283 Times in 174 Posts
|
Was a but gutted over this project yesterday due to the condition of cylinder head #1. I put that CH away and took CH #2 in for closer inspection. Removed its valves and did a quick cleanup on one of the exhaust valves. This one looks a lot better and the fire ring indentations is a lot less. I guess I have started with the wrong cylinder head in the first place, so just have to put this behind me and start working with CH#2. I think this one will be good in the combination with the MLS gasket. Looking forward to get to the point where I can start assembling the engine back together. More to come....
|
|
|
|
|
6th November 2020, 19:25
|
#19 |
|
Regular poster
Rover 75, and Mg zt 1.8T Join Date: Aug 2019
Location: Huntingdon
Posts: 92
Thanks: 302
Thanked 23 Times in 22 Posts
|
I would get a sheet of glass and stick wet n dry paper to it, and give it a diy "skim" also consider which coolant you use after, I used this
https://prestone.com/products?detail=AF2000 |
|
|
|
|
6th November 2020, 20:23
|
#20 | |
|
same car since 2005

2001 Rover 75 2.0 v6 Connoisseur Saloon Join Date: Nov 2006
Location: Ellesmere Port , Cheshire
Posts: 3,811
Thanks: 379
Thanked 549 Times in 466 Posts
|
Quote:
Also , it is usual to find the valve faces grind in faster than the head seats as they are better metal and get less pitted. The leak test is a good way of proving a good seal ; I use paraffin .
__________________
 Who said it was simples ? Who said it was simples ?
|
|
|
|
|
 |
|
|


 Linear Mode

