
|
|
|
|
|
|
||
|
|
||
 25th August 2017, 13:47
|
#11 |
|
This is my second home
75 Tourer 2.5 Auto, 1.8T, 75V8ZT Join Date: Jun 2007
Location: Johannesburg ZA
Posts: 6,200
Thanks: 1
Thanked 859 Times in 613 Posts
|
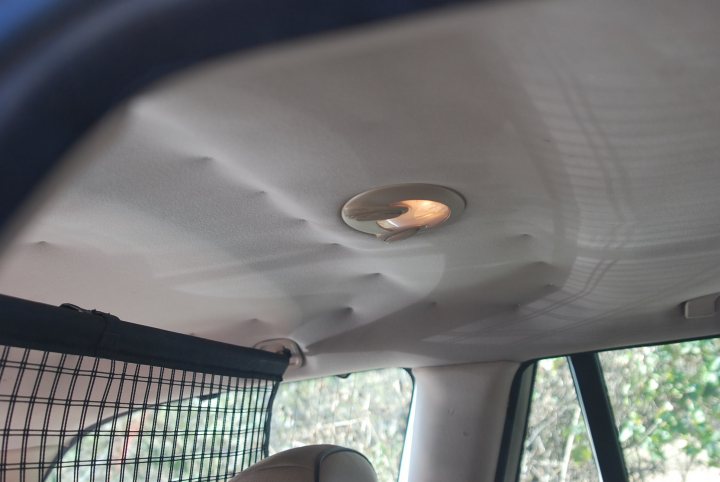  Note the sun is very sharp and coming in at a low inclination, throwing large shadows. Before this, the lining was drooping maybe 20 centimeters and was quite visible from outside. I had problems with TinyPics and found this free and much easier picture uploader! The only problem is I had to weed the URLs to get the pics to work, but if I can, anybody can!  http://thumbsnap.com/
__________________
Worth his V8 in gold |

|

|
|
26th August 2017, 05:19
|
#12 |
|
Loves to post
Rover 75 Tourer Join Date: Oct 2015
Location: Bishop's Stortford
Posts: 418
Thanks: 210
Thanked 289 Times in 124 Posts
|
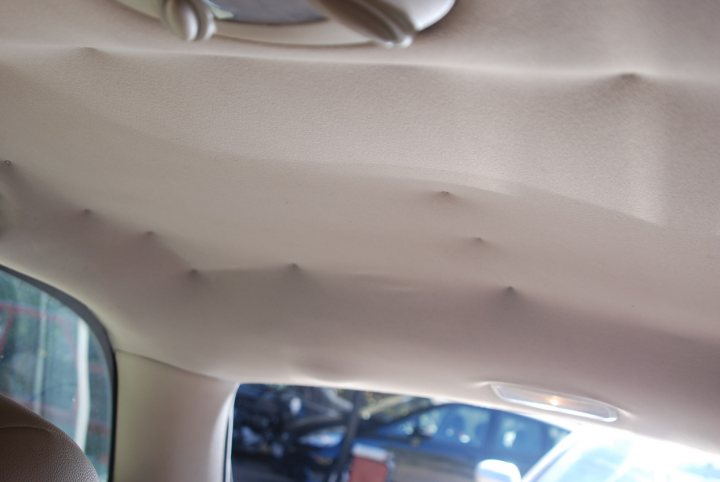
Thanks for the pictures. Mine is not sagging as much as yours was - YET, but this is a good idea. If laid out in a balanced pattern, it could look like a studded roof!
|
|
|
|
|
26th August 2017, 05:37
|
#13 |
|
This is my second home
75 Tourer 2.5 Auto, 1.8T, 75V8ZT Join Date: Jun 2007
Location: Johannesburg ZA
Posts: 6,200
Thanks: 1
Thanked 859 Times in 613 Posts
|
You are welcome.
and yes - it will.
__________________
Worth his V8 in gold |
|
|
|
|
26th August 2017, 21:40
|
#14 | |
|
Gets stuck in
Rover 75 Tourer Join Date: Mar 2013
Location: Gainsborough
Posts: 580
Thanks: 31
Thanked 45 Times in 39 Posts
|
Quote:
 . Took me allot longer than that but it's out now . Took me allot longer than that but it's out now Foam falling to bits so that's why it's dropped. Cleaned off the loose foam, once some trim glue arrives I'll stick it back together and refit it |
|
|
|
|
|
27th August 2017, 11:02
|
#15 |
|
Avid contributor
Rover 75 Saloon Join Date: Dec 2016
Location: Surrey
Posts: 154
Thanks: 103
Thanked 20 Times in 15 Posts
|
Hi Kaiser really liking this pinned design
Should I pin up the dropped lining first or pin the whole ceiling before the rest comes down cheers. |
|
|
|
|
27th August 2017, 17:15
|
#16 |
|
This is my second home
75 Tourer 2.5 Auto, 1.8T, 75V8ZT Join Date: Jun 2007
Location: Johannesburg ZA
Posts: 6,200
Thanks: 1
Thanked 859 Times in 613 Posts
|
I started in the middle the whole way, and then applied extra needles radiating out from the middle, where I saw a need, working towards the sides.
Try and keep distance fixed and pattern symmetrical, and you will have a result that will please you. I only did the last third of the ceiling towards the rear. the rest is still glued on, but I will chase that as and if required. Good luck, and try a couple of pics before and after
__________________
Worth his V8 in gold |
|
|
|
|
18th October 2019, 16:34
|
#17 | |
|
Loves to post

BMW 330i Touring Join Date: Jul 2015
Location: Blandford Forum
Posts: 378
Thanks: 184
Thanked 159 Times in 89 Posts
|
Quote:
I know that this is an old thread, but I have got the dreaded 'sag'. Would like to use pins until funds permit a new headlining (tried glue, but no good!) Just wanted to know if there are any hidden wires that I need to be aware of, as I don't want to short anything and add to my woes. Thanks Geoff |
|
|
|
|
|
18th October 2019, 19:04
|
#18 |
|
This is my second home
75 Tourer 2.5 Auto, 1.8T, 75V8ZT Join Date: Jun 2007
Location: Johannesburg ZA
Posts: 6,200
Thanks: 1
Thanked 859 Times in 613 Posts
|
There are some wires right at the front, going to the sun visors and the light in the middle, and then again a few wires towards the middle for the alarm and to the rear for the light.
If you insert the needles sideways, they are not likely going to touch any wires, and/or if they do, they would just push the wires ahead of the pin. You could only penetrate the insulation if you get the wire trapped, which will only happen if you push the needle against the roof!. So don't worry! Oh, and yes, pics, before and after!
__________________
Worth his V8 in gold |
|
|
|
|
28th July 2023, 19:20
|
#19 |
|
Newbie
Rover 75 Tourer Join Date: Aug 2021
Location: Medway
Posts: 10
Thanks: 0
Thanked 0 Times in 0 Posts
|
The pins look like a good temporary solution. Ive noticed the corners starting to sag on my tourer this afternoon.
|
|
|
|
|
31st July 2023, 13:21
|
#20 |
|
Newbie
2001 Rover 75 Connoisseur Diesel Tourer Join Date: Aug 2016
Location: Lymm
Posts: 12
Thanks: 0
Thanked 1 Time in 1 Post
|
I replaced the headliner on my 51 plate tourer a few weeks ago. It turned out not nearly as difficult as I expected. Took about 3 days. Day 1 remove the whole liner card etc (remove it via the tailgate), Day 2 strip the fabric, scrub the card clean, glue on, and trim new fabric, Day 3 refit the whole card into the car and refix sun visors, handles, light fittings, and sunroof and door opening trim.
I took the car to Martrim in Sandbach who supplied me with 4m fabric they selected to match the existing and 4 spray cans of their glue. Learning: Be very careful around the 4 grab handle mountings. The card is highly contoured here and if doing it again I would leave spraying the glue around these until the last minute - then after spraying these bits fold the fabric generously into the recess, smoothing it out as you go. The fabric is flexible but not quite enough to stretch into these recesses without cutting. If I can work out how to do it I will add some photos https://drive.google.com/file/d/1NAL...ew?usp=sharing https://drive.google.com/file/d/19ps...ew?usp=sharing https://drive.google.com/file/d/1tXh...ew?usp=sharing The first shows the headliner removed but not cleaned The second shows it after cleaning The third shows it from above (as if in the car) with new fabric glued but not yet trimmed. Health warning: The card is made from unsealed fiberglass sheet. Wear some surgical gloves if possible |
|
|
|
 |
|
|


 Linear Mode

