
|
|
|
|
|
|
||
|
|
||
 26th October 2016, 13:17
|
#11 |
|
Regular poster
LHD Rover 75 Tourer 2.0 CDT Conn auto 2002 Join Date: Apr 2014
Location: By a fjord
Posts: 59
Thanks: 3
Thanked 3 Times in 3 Posts
|
So does anyone know how to remove the washer fluid hose that runs through the roof of the boot and the top of the tailgate, to the jet?
And since my headlining is out anyway, how can I prevent the dreaded roof rattle? What are the causes and where are they located? Cheers, QuestionMark |

|

|
|
26th October 2016, 14:43
|
#12 | |
|
This is my second home

75 Join Date: Nov 2006
Location: Leeds
Posts: 8,432
Thanks: 176
Thanked 907 Times in 716 Posts
|
Quote:
Secure the roof strengthening bars to the roof with silicone. Gently separate the roof from the roof bars with wooden wedges and inject silicone between. You will have to be careful so as not to ding the roof from the inside. 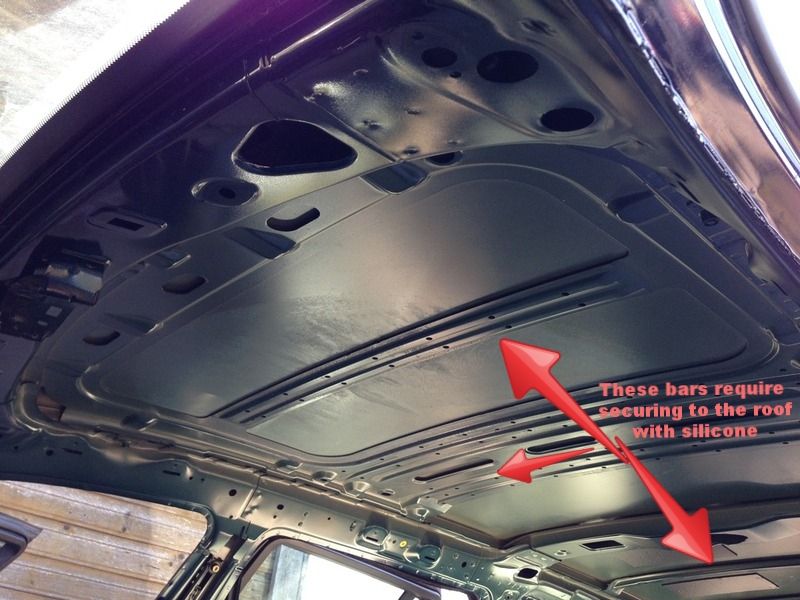 Dave T |
|
|
|
|
|
26th October 2016, 17:39
|
#13 | ||||||||||||||
|
Gets stuck in
2001 Rover 75 Tourer 2.0 CDT manual Royal Blue (JFM) Join Date: Dec 2012
Location: Viljandi, Estonia
Posts: 855
Thanks: 233
Thanked 98 Times in 87 Posts
|
Quote:
Quote:
I hope you didn't break the trims? They're actually easy to get off. The metal clips (3 (or 4?) per side) stay in the pillar while the trim has lugs that lock into the clips. Basically you start from the top end and pull the trim to the other side of the car to unlock the lugs and when all of them are free, lift the trim upwards to release from the dash where it is also secured with a single spring clip. Refitting is the reversal - once you push the lower end of the trim into the dash, align the lugs and just push until they click. I've removed/refitted them a dozen times without breaking anything. Quote:
It's pretty much the same with mine. When I want it to leak, it doesn't, but when I go through a car wash or when it rains heavily, it's leaking. You will find a few photos in the album from a time when it had been raining for a couple of days straight and there was 1cm of water in the left cubby hole. To make it short, I've sealed some of the body seams which didn't make a difference. It's almost certainly the rear side windows in my case but I can't imagine how that's possible unless there are holes in the body panel underneath the window sealant. (It would be great if anyone could take a picture of tourer with the rear windows removed) I've now finally used some Captain Tolley's Creeping Crack Cure on it but I'm already too late this year as there are negative temperatures at night. You will find a photo in the album where this blue coloured captain tolley's is dripping at my usual leak point. This is taken 2 days after applying captain tolley's and after going through a car wash. It didn't reach this spot before car wash  I was thinking of having the rear windows re-glued but it was suggested to me to have spare windows available in case they couldn't remove the old ones in one piece. Quote:
 Quote:
Quote:
Quote:
Quote:
When the headlining is removed, it's a matter of releasing the rubber... can't find the word for it - the rubber piping in which the wires and washer hose run... from between the body and the tailgate and tailgate and tailgate glass. Then just replace a part of the hose. Be careful when removing the washer jet, the rubber grommet is probably very brittle and might break. That's what happened to me but I got a replacement from Dave (Duotone), thanks  The tailgate finisher will probably get in your way when you try to refit the rubber pipe (??) to the body and I hate to say it but you can't get it off without breaking it. Or perhaps you will manage without removing it. Fortunately, you can get a new one for £11 from Rimmers. I also bought and fitted 7 of THESE because it was a pig to get the broken off lugs out of the spring clips. Regarding the roof rattle. On the same day when taking the pictures in the album, I did the roof bars and you can see from one of the pictures that I used ordinary silicone. Now, 2 years later, you can see from the outside that the roof isn't smooth anymore (you can see where the bars are located). When I had some work done on the car this summer, I was told by the garage that there is a special (probably simple PU) foam they use in places like this. I don't know how much of a difference it would have really made but if I had the chance to do it again from scratch myself, I would use more professional means instead of silicone.
__________________
MODS: Front fog lamps, FBH timer switch, FBH OBD, boot and arm rest power sockets, cruise control, Powerflex lower arm bushes, illuminated vanity mirrors, high-line IPK, Symphony stereo + SLE, 160 remap, Revotec fan, 12N+12S, auto-dimming rear view mirror, rain sensor, volumetric alarm sensor, PDC, powerfolds, sports leather memory seats, passenger anti-trap sensor TO DO: Tilt sensor, low coolant sensor, FBH GSM remote control, heated washer jets, front parking sensors |
||||||||||||||
|
|
|
 |
|
|


 Thank you so much for your help!

 So now I'm worried that I won't be able to refit the trim properly. After all of that, I saw that the plug was tucked as far as possible into the corner of the windscreen - barely visible and impossible to reach with your hands. So I had to get creative with assorted tools to pull it out... Phew.
 Linear Mode

