
|
|
|
|
|
|
||
|
|
||
 2nd October 2020, 13:45
|
#31 |
|
Posted a thing or two
Rover 75 Saloon Join Date: Apr 2019
Location: Under the car
Posts: 1,840
Thanks: 210
Thanked 244 Times in 221 Posts
|
Here's the flare & fitting side on.
1625  And here it is screwed fully home into the hose. Do the two parts look like they'll lock together when they're on the car or is the gap between them slightly too big? (it looks it to me) 1622  |

|

|
|
2nd October 2020, 18:36
|
#32 |
|
This is my second home
Rover75 and Mreg Corsa. Join Date: Nov 2006
Location: Sumweer onat mote o'dust (Sagin)
Posts: 21,752
Thanks: 341
Thanked 3,660 Times in 2,924 Posts
|
The basic shape of the flare is OK, but there seems to be more 'spare' pipe behind the compression button than I recall. Maybe it looks that way because of the scale of your images.(?) Did you use the flat end of the die to set the amount of pipe available for the swage? If the pipe protrudes too much, the 'shoulder' will be broader. I have a test flare in the garage which I'll compare with your photos.
The last photo looks about OK to me. The spring clip has a fair bit of tolerance in the compressed height. Obviously the size of the shoulder has an effect on this. The grease should go on the curved surface around the 'pin' The pin is simply to keep everything centred by fitting into the bore of the pipe. You only need a smear using a cotton bud. Too much won't work any better. Wiping off any visible grease on or in the pipe using a clean tissue will be OK. Lubes for brake pipe flaring will be formulated for the application and will be / should be compatible with DOT fluids. You might soak a labbered up pipe in white spirit for an hour or two before cleaning as above and allowing to dry thoroughly. It's simpler to use just a smear. EDIT: This is the best I could do with my useless Fuji Finepix (not a patch on my old Canon Sureshot). 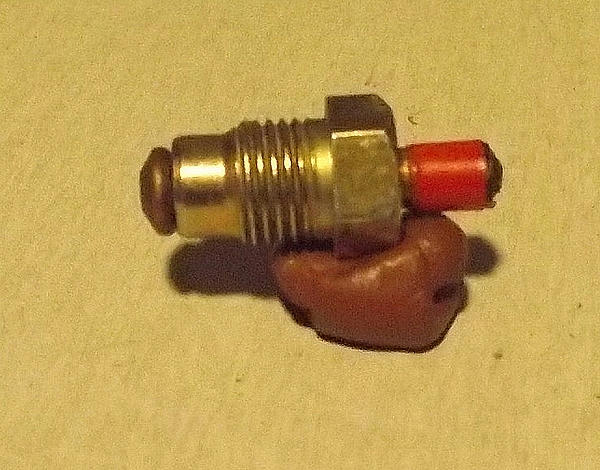 Anyway, there doesn't seem to be much difference in the volume of the flare. Maybe yours is slightly broader. That's what controls the height of the compression nut above the spring clip. As long as you used the flat positioning gizmo to set the pipe in the clamp, it has to be correct. The bits you see here are the blanking plug I made for the ABS module to prevent fluid loss. The pipe stub was filled with epoxy resin. The red part is a strip of tape to stop it falling out of the nut. TC Last edited by T-Cut; 2nd October 2020 at 19:28.. |
|
|
|
|
3rd October 2020, 15:11
|
#33 | |||||
|
Posted a thing or two
Rover 75 Saloon Join Date: Apr 2019
Location: Under the car
Posts: 1,840
Thanks: 210
Thanked 244 Times in 221 Posts
|
Quote:
Quote:
Then I tightened the two 10mm bolts as far as they'd go before reversing the die and screwing it back in again with the 16mm ratchet and making the flare. Quote:
Quote:
1645  Quote:
|
|||||
|
|
|
|
3rd October 2020, 19:42
|
#34 | |||
|
This is my second home
Rover75 and Mreg Corsa. Join Date: Nov 2006
Location: Sumweer onat mote o'dust (Sagin)
Posts: 21,752
Thanks: 341
Thanked 3,660 Times in 2,924 Posts
|
Quote:
Quote:
Quote:
TC |
|||
|
|
|
|
3rd October 2020, 21:05
|
#35 |
|
Banned
ROVER 75 Connoisseur Join Date: Jul 2020
Location: BRACKNELL
Posts: 270
Thanks: 125
Thanked 130 Times in 92 Posts
|
What type of pipe flaring tool is the one pictured?
The Flaremaster doesn't need the dies to be greased surely? In regards to the length of the flare and it's overall effect on the clamping arrangement, as the U shaped clips are made of spring steel and they are designed to spread slightly upon being tightened and contained by the upturned tabs on the bracket that the flexible pipe passes through. Any minor length differential is compensated for by the side of the spring clip with the hole which the union passes being slightly convex. I certainly didn't experience any issues when I did the job. |
|
|
|
|
4th October 2020, 11:20
|
#36 | ||
|
Posted a thing or two
Rover 75 Saloon Join Date: Apr 2019
Location: Under the car
Posts: 1,840
Thanks: 210
Thanked 244 Times in 221 Posts
|
Quote:
Or - the lens I was using for pic 1625 might have been too far over to the left but tilted slightly right, which would have the effect of reducing the apparent width of the button and increasing the apparent width of the 'spare' pipe behind it. The lens is a long macro - it's heavy and very tricky to use accurately but it does give razor sharp pics when you get it right and it can see the tiniest detail. Quote:
 Last edited by Blink; 24th November 2020 at 12:48.. |
||
|
|
|
|
4th October 2020, 11:21
|
#37 | ||
|
Posted a thing or two
Rover 75 Saloon Join Date: Apr 2019
Location: Under the car
Posts: 1,840
Thanks: 210
Thanked 244 Times in 221 Posts
|
Quote:
I sent the Flaremaster back btw. Quote:
|
||
|
|
|
|
4th October 2020, 11:34
|
#38 |
|
This is my second home

Roverless + 1.7D Sportage Join Date: Aug 2014
Location: East Norfolk
Posts: 7,050
Thanks: 729
Thanked 2,021 Times in 1,449 Posts
|
When I've made brake pipes in the past, I've used brake fluid as a lube. It just allows you to separate the tool from the job more easily and will not contaminate the system.

__________________
Oil in my veins! |
|
|
|
|
4th October 2020, 12:25
|
#39 |
|
Posted a thing or two
Rover 75 Saloon Join Date: Apr 2019
Location: Under the car
Posts: 1,840
Thanks: 210
Thanked 244 Times in 221 Posts
|
Why didn't I think of this before.
 Here's one of the test unions next to the two old unions I'm replacing. The new one is hand tight only - the other two are spanner tight. 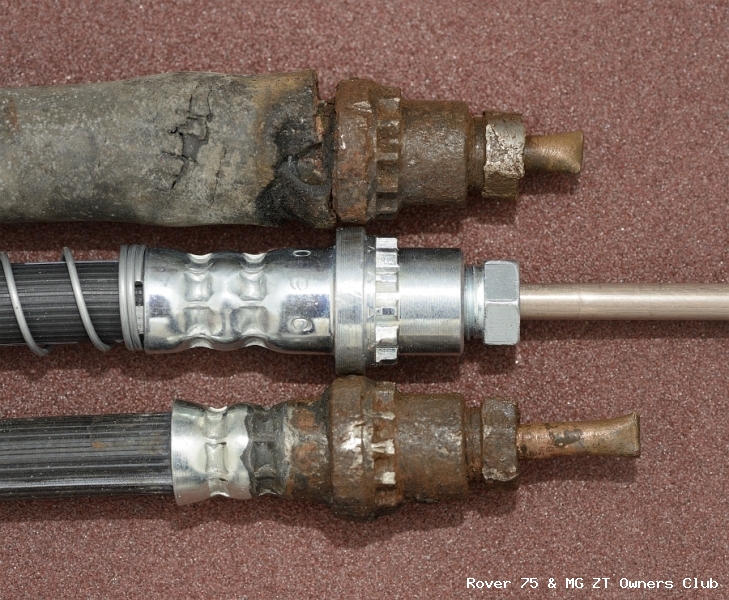 The gap between the hex and the start of the hose socket is greater on the new one but not by much - it'll probably match the old ones when it's been tightened by spanner. |
|
|
|
|
4th October 2020, 12:34
|
#40 | |
|
This is my second home
Rover75 and Mreg Corsa. Join Date: Nov 2006
Location: Sumweer onat mote o'dust (Sagin)
Posts: 21,752
Thanks: 341
Thanked 3,660 Times in 2,924 Posts
|
Quote:
TC Last edited by T-Cut; 4th October 2020 at 12:40.. |
|
|
|
|
 |
|
|


 Linear Mode

