
|
|
|
|
|
|
||
|
|
||
 14th May 2022, 15:20
|
#1 |
|
Newbie
Rover 75 saloon Join Date: Apr 2021
Location: Bracknell
Posts: 20
Thanks: 0
Thanked 15 Times in 4 Posts
|
Just completed a cambelt change on my 75 auto and thought members might be interested in my findings.
Firstly, I have never done a floating cam 3 belt belt before so was very careful to research it properly, looked at all the info I could find before hand and bought a set of tooling on the Bay for the princely sum of £48 The tooling - in short it did the job but you get what you pay for, one of the spigot pins fell out after use and had to be locktighted back in, the tensioner retaining pin was non tensile wire and bowed during use and the secondary sprocket holding tool was bowed and made it quite hard to hold the two secondary sprockets together whilst tightening the bolts ( the exhaust cam locating dogs barely made contact on one side because of the bow) These defects can all be sorted if I use it again but bear it in mind folks these cheap kits are of less than "professional quality" and you might need a hydraulic press to straighten the secondary sprocket tool, a substitute tensioner retainer and locktight to hold errant spigot pins in place. To the actual belt change - it went quite well but two things stand out. One - My car is an early one and it has the old type of oil cooler, I found it necessary to remove this, disconnecting the rear oil pipes and the coolant hoses, to access the A/C pump bolts. Two - I think the old primary belt had been fitted wrongly. It was quite slack between the two sprockets,so much so that the water pump pully could be freely rotated against the belt. Anyway the new belt went on and with bolts tightened correctly and tensioner fitted, it manually rotated one tooth back on the rear sprocket marks that I had made as a precaution The engine has now done about 100 miles and seems to have gained more torque, it changes up at noticeably lower revs and is as smooth as ever in cruise Overall, the job is challenging, particularly in gaining access and the number of parts you need to remove but greatly satisfying when it stars an runs properly at the end. PS. how experts such as Tom manage the job in a shift is beyond me - This old codger took over a week! |

|

|
|
14th May 2022, 17:40
|
#2 |
|
Newbie
Rover 75 saloon Join Date: Apr 2021
Location: Bracknell
Posts: 20
Thanks: 0
Thanked 15 Times in 4 Posts
|
Sorry folks just realised this post is in the V8 section and I am talking about a V6 - what a doughnut!!
 |
|
|
|
|
14th May 2022, 18:13
|
#3 |
|
This is my second home
ZT260 #243 (resting) Join Date: May 2010
Location: Prestonpans
Posts: 22,488
Thanks: 650
Thanked 4,624 Times in 3,358 Posts
|
Send one of the Mods a PM and they'll move it for you.
|
|
|
|
|
15th May 2022, 04:25
|
#4 |
|
Owners Club Director

Rover 75 Join Date: Oct 2006
Location: Sherfield-on-Loddon
Posts: 4,874
Thanks: 137
Thanked 996 Times in 444 Posts
|
Thread moved to General Forum
|
|
|
|
|
15th May 2022, 08:10
|
#5 | ||
|
Doesn't do things by halves

Rover 75 2.5 Connoisseur Auto (1999) Dealer launch model. Join Date: Mar 2007
Location: Former Middlesex
Posts: 20,394
Thanks: 1,587
Thanked 3,749 Times in 3,181 Posts
|
Quote:
I agree with your warning about cheap, unbranded tooling from eBay. The kits by Laser, Sealey and Sykes Pickavant are considerably more expensive but pay in the long run. The slack primary belt that you found could have been due to incorrect setting of the tensioner pulley. As you know, this can easily be done if the subject isn't fully researched beforehand. By the way, when removing your rear belts, did you find that you had to remove the "flywheel" locking pin and turn the engine slightly in order to line-up the rear sprockets and fit the removal tool? Quote:
 Simon
__________________
"Whatever is rightly done, however humble, is noble." Sir Henry Royce. |
||
|
|
|
|
15th May 2022, 13:55
|
#6 |
|
Newbie
Rover 75 saloon Join Date: Apr 2021
Location: Bracknell
Posts: 20
Thanks: 0
Thanked 15 Times in 4 Posts
|
Yes there was a bit of "jiggling" involved to get the tool to fit but after final secondary bolt tightening I rotated the engine twice and the safe mark and and secondary cam marks all lined up OK.
|
|
|
|
|
16th May 2022, 14:03
|
#7 |
|
Discount MG Rover Spares

Rover 75 CDTi, 2x MG ZS180 Join Date: Jun 2011
Location: Hythe, Southampton
Posts: 11,320
Thanks: 456
Thanked 3,377 Times in 2,027 Posts
|
We found the same with the tooling kit - in the end we opted for a Sealey kit to rent out to members for this reason (charged at £50 per 14 day rental period).
That said, I did use an old kit I found in the garage which I believe was an 'eBay special' from many years ago - and while the fit and finish was pretty poor it did help to get the job done a lot easier than it would have been by hand.
__________________
 Your trusted MG Rover specialist! Tel: 02380 001133 / Email: [email protected] We now have a 'chat' function on our site for even quicker replies. Give it a try! Remember - discount code FORUM5 for 5% off |
|
|
|
|
16th May 2022, 14:27
|
#8 | |
|
Posted a thing or two
Rover 75 Saloon Join Date: Mar 2014
Location: Louth
Posts: 1,422
Thanks: 380
Thanked 986 Times in 476 Posts
|
Quote:
|
|
|
|
|
|
16th May 2022, 14:47
|
#9 |
|
Regional Secretary London South & West
75 Join Date: Mar 2012
Location: Reading
Posts: 1,044
Thanks: 395
Thanked 177 Times in 124 Posts
|
Done some a few weeks back 12k miles from new but original belts. I guess some would still perhaps risk them but at 16 years old, wasn't risking it.
As for how long it takes heard some have taken months. 4.5 hrs taking it carefully, constant methodical working gets it done Sent from my CPH2371 using Tapatalk
__________________
 Andy T4.KV6 belt special tools [2002 MG ZT 2.5 177 manual Starlight silver 2004 MG ZT-T 1.8T 160 manual green |
|
|
|
|
21st May 2022, 02:41
|
#10 |
|
Gets stuck in

MG ZT-T Join Date: Jun 2016
Location: White Rock, BC on Canada's Pacific Coast
Posts: 851
Thanks: 338
Thanked 367 Times in 210 Posts
|
I have used my "Budget" tool kit a few times now and have had to file various bits of it for fit. I last used it this spring and decided to modify it to work more like the factory kit by cutting the hex ends off the front holding tools and making up a separate cam turning tool. This makes the tools much easier to mount on the cams and avoids the fear of damaging the ends of the cams with the tools. I also invested in a set of 190 adaptors which didn't fit the cheap tools properly and involved yet more tool filing. They did the job though.
 Here are the modified tools with my homemade turning tool at the rear. 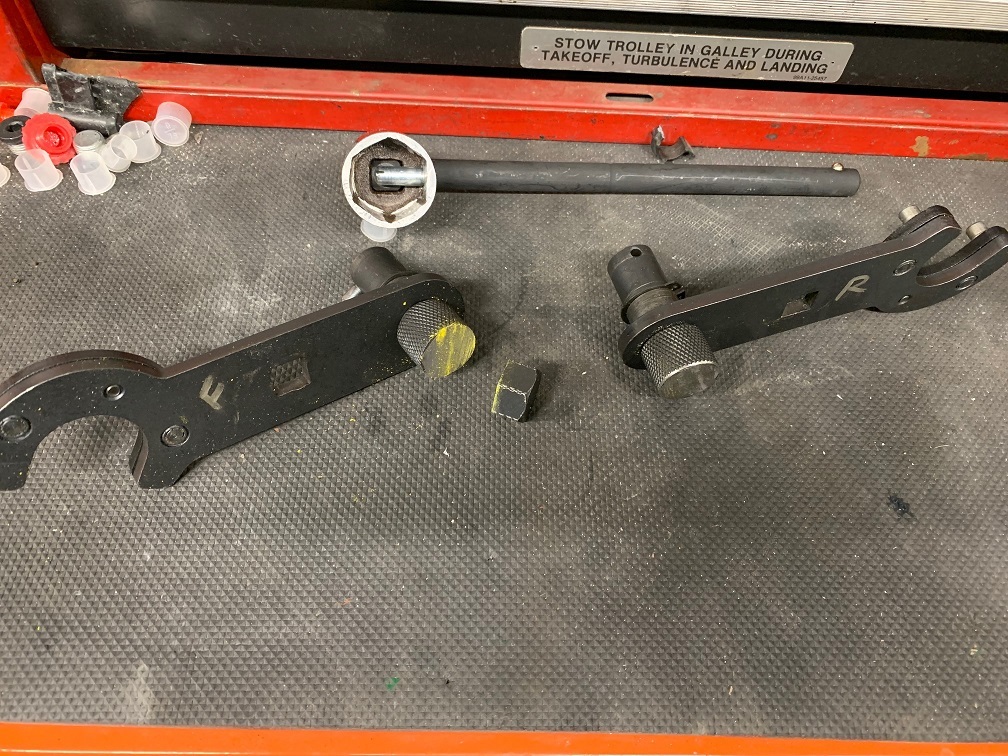
__________________
ZT-T190, Anthracite, LHD, Left the Line on June 24, 2002, Sold new in Switzerland, spent time in Germany, Imported to Canada in September 2021 Last edited by Rich in Vancouver; 21st May 2022 at 02:48.. |
|
|
|
 |
|
|


 Linear Mode

