
|
|
|
|
|
|
||
|
|
||
 13th April 2020, 16:54
|
#11 | |
|
Newbie
MG ZT Join Date: Dec 2019
Location: Malta
Posts: 18
Thanks: 2
Thanked 0 Times in 0 Posts
|
Quote:
I only noticed one under the ECU/pollen filter. Did all models have two? It's a real hassle to get access to the area. I wouldn't be able to do it by myself as I lack the pulling tool needed to remove the wipers. I need to order a new filter as from the look of it, it would seem like mine has never been replaced. |
|

|

|
|
13th April 2020, 17:03
|
#12 | |
|
This is my second home

rover 75 1.8 vvc club se wedgwood blue Join Date: Aug 2009
Location: Seaton Carew
Posts: 26,912
Thanks: 65
Thanked 7,142 Times in 4,642 Posts
|
Quote:
 You don't need to remove the wipers , just the plastic scuttle panel. You can also for future checking, do the "Spyhole" mod, ie, drill a hole in the plastic cover above the drain hole near the pollen filter so you can look down into the plenum. It's all well documented You don't need to remove the wipers , just the plastic scuttle panel. You can also for future checking, do the "Spyhole" mod, ie, drill a hole in the plastic cover above the drain hole near the pollen filter so you can look down into the plenum. It's all well documented 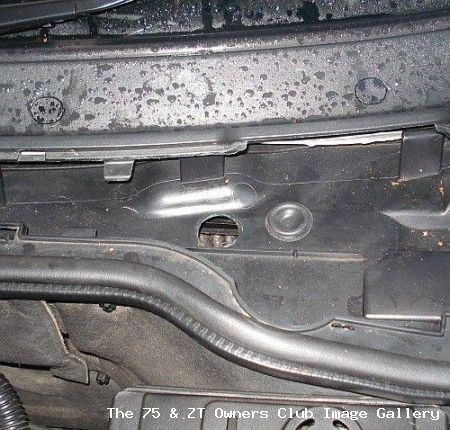 |
|
|
|
|
|
13th April 2020, 17:15
|
#13 |
|
MG ZT Join Date: Jan 2011
Location: Newcastle Upon Tyne
Posts: 20,151
Thanks: 3,565
Thanked 10,837 Times in 5,718 Posts
|
Excellent stuff Ian, it's a shame you didn't take pictures as it would have been beneficial to others in your situation.
I always run water damaged PCB through my heated sonic cleaning bath prior to any repair, using isopropanol as the wash media, as it removes damaged conformal coatings, making visual inspection easier and also washes out most contaminants from beneath the major ICs. It's not often you can get away with one as lightly as you have This is the other side of the PCB, the large IC to the right is the main processor, and the one at the top, the flash containing the vehicle programming, the one to the left forms part of the PSU. Generally speaking, the AM29F400BT flash memory generally needs to be lifted, as the tracks beneath the device are not varnished, and they will carry on fizzing away unseen Hopefully you will have cleaned it all, and it will remain reliable for you. Brian  |
|
|
|
|
13th April 2020, 17:41
|
#14 | |
|
Newbie
MG ZT Join Date: Dec 2019
Location: Malta
Posts: 18
Thanks: 2
Thanked 0 Times in 0 Posts
|
Quote:
Yes I've seen the posts about the spyhole mod. I'm planning on doing it. I meant that it would be difficult to access again to replace the pollen filter. |
|
|
|
|
|
13th April 2020, 17:53
|
#15 | |
|
This is my second home
rover 75 1.8 vvc club se wedgwood blue Join Date: Aug 2009
Location: Seaton Carew
Posts: 26,912
Thanks: 65
Thanked 7,142 Times in 4,642 Posts
|
Quote:
 Easy peasy Easy peasySteve's excellent guide https://www.the75andztclub.co.uk/for...d.php?t=170300 |
|
|
|
|
|
13th April 2020, 18:01
|
#16 |
|
Newbie
MG ZT Join Date: Dec 2019
Location: Malta
Posts: 18
Thanks: 2
Thanked 0 Times in 0 Posts
|
I do indeed consider myself lucky. I think that one thing that was on my side was that the car had been garaged for the better part of the last 6 years as the previous owner lived abroad and only drove it when he visited.
I'm sure that all the gunk blocking the drain built up over many years but it's likely that the flooding was recent. I've had the car since November and it doesn't rain as much here as it does in the UK. As is visible in the photo in my original post, the water level doesn't seem like it had gotten so high so not all ICs were flooded. This is a lot of speculation though as I can't be certain. Hopefully it doesn't develop any other faults due to this event further down the road. If it does I know who to contact On another note, I've noticed a few things that lead me to believe that the car may have been involved in a frontal collision in its past as there are little cracks in a few places under the bonnet, around the suspension strut area. They could explain the various squeaking noises that I hear when driving on uneven roads. The car drives well and straight though so no symptoms there. Also, the back of the rear seat no longer clips to the hooks at the back. I suspect that the springs holding the back in place are shot. It was also hard to clip the bottom of the rear seat back into its place and the driver side wouldn't clip back in whatever we tried. It dawned on me today that no matter how diligently I wash and clean my car, that will not make any of the wear go away. I'm ranting now, so I'd better stop. Maybe I should have put all this in another thread? |
|
|
|
|
13th April 2020, 18:08
|
#17 |
|
Newbie
MG ZT Join Date: Dec 2019
Location: Malta
Posts: 18
Thanks: 2
Thanked 0 Times in 0 Posts
|
Yep, great explanation! Thanks for the link. Just read it. So it is possible to access everything through the cover.
|
|
|
|
|
13th April 2020, 18:14
|
#18 | |
|
This is my second home
rover 75 1.8 vvc club se wedgwood blue Join Date: Aug 2009
Location: Seaton Carew
Posts: 26,912
Thanks: 65
Thanked 7,142 Times in 4,642 Posts
|
Quote:
The seat base needs to be pushed as far back as you can with your knees before pushing down to locate the spring clips |
|
|
|
|
|
13th April 2020, 18:30
|
#19 | |
|
Newbie
MG ZT Join Date: Dec 2019
Location: Malta
Posts: 18
Thanks: 2
Thanked 0 Times in 0 Posts
|
Quote:
 There's everything on here Great to know there's a solution for the rear seat locking mechanism too. It looks like quite an advanced job. I hope to pluck up the courage to do that some time in the near future. The project currently in the pipe-line is reupholstering the interior. I did the rear driver side door so far and am satisfied with the results. I just need to buy a wire-brush drill bit to facilitate the removal of the old glue. I used my dremel-like tool on my first door but that made most of the bristles fall off. There's everything on here Great to know there's a solution for the rear seat locking mechanism too. It looks like quite an advanced job. I hope to pluck up the courage to do that some time in the near future. The project currently in the pipe-line is reupholstering the interior. I did the rear driver side door so far and am satisfied with the results. I just need to buy a wire-brush drill bit to facilitate the removal of the old glue. I used my dremel-like tool on my first door but that made most of the bristles fall off.Other projects on my list are to try to repair the key remote locking and unlocking the doors and the headset steering controls. Though I'd like to replace the cassette player with something more modern sometime. |
|
|
|
|
|
13th April 2020, 18:34
|
#20 | |
|
This is my second home
rover 75 1.8 vvc club se wedgwood blue Join Date: Aug 2009
Location: Seaton Carew
Posts: 26,912
Thanks: 65
Thanked 7,142 Times in 4,642 Posts
|
Quote:
|
|
|
|
|
 |
|
|


 Linear Mode

