
|
|
|
|
|
|
||
|
|
||
 10th March 2020, 22:09
|
#1 |
|
Avid contributor

Rover 75 2.0 V6 Connoisseur SE Saloon Join Date: Aug 2010
Location: Hassocks, West Sussex
Posts: 195
Thanks: 51
Thanked 24 Times in 15 Posts
|
HOW TO renew the cable link between the private lock and the door latch
The symptoms of cable failure, and the means of access will be found in these threads of the Technical Help Forum: www.the75andztclub.co.uk/forum/showthread.php?t=302103 (postings Nos. 2&4) www.the75andztclub.co.uk/forum/showthread.php?t=302744 Materials required: - 0.68mm dia. stainless steel wire rope from: www.tecni.uk (they sell single metres) - 3 No. solder nipples, type BN575/55A from: www.venhill.co.uk (sold as individual units) - Liquid flux type A8 for SS from: http://www.solderconnection.com/ (125cc bottle is least available) NB: postage, in all cases, far exceeds the cost of the materials! - Oddment of scrap timber, ply or MDF (about 300mm lg.) Method: Step 1. Create a jig by drilling 3No. sinkings, 6mm dia. X 3mm dp. in a straight line, at 134mm centres, in the scrap material.  Step 2. Saw a screwdriver slot in one face of each of 2No. nipples. Step 3. Thread 1No. slotted nipple onto the cable, with the solder recess away from the cable. Take the end which emerges and turn it back through through the nipple, forming a loop. 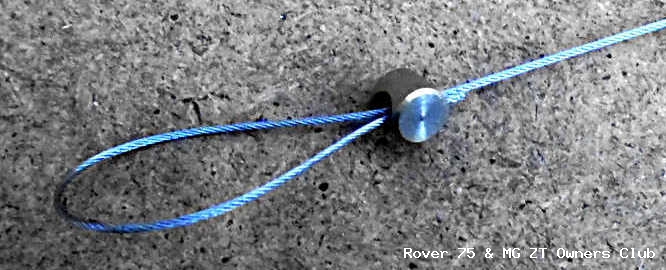 Gently pull the free portion of the cable while restraining the turned-back end, until the loop is within the solder recess.  Step 4. Heat the nipple, brush in A8 flux liquid, then apply solder to fill the recess. Allow to cool. Step 5. Thread onto the cable, in order, plastic sleeve, unmodified nipple, plastic sleeve and second modified nipple, with solder recess away from the sleeve.  Step 6. Insert the 3No. nipples into the sinkings in the jig. Pull the cable straight and cut it 7mm past the final nipple.  Step 7. Lift the final nipple and turn the free end of cable back on itself to form a loop, as Step 3. Again, restraining the turned back end, gently slide the nipple along the cable until it drops into its sinking. If the loop has not sunk fully into the solder recess, restrain the cable and push the loop so that the free end emerges beside the cable. Step 8. Solder the middle and final nipples, as Step 4, above, and check that the previously-cut slots are clear. The cable is ready to install, but you are not there yet. Step 9. The two wheels in the banana must be modified to accept the new cable as the solder nipples are larger than the Valeo swaged originals. a) Open the slot in the lock-end wheel by filing symmetrically to widen it, and deepen it such that the cable sits on the bottom of the circumferential groove. b) The two sockets in the lower wheel need more care. Dont try to drill them out as you risk fracturing the separator. Instead, file away from the separator until the nipples are a snug fit in their respective sockets. Step 10. Use a screwdriver if necessary (hence the solder-free slots) to rotate the nipples, ensuring the cable sits fully in the groove. Step 11. Mount the wheels in their casing and refit the cover.  Last edited by Francophile; 11th March 2020 at 12:26.. Reason: Removing spurious data. Revised 'firm' to 'snug' in Step 9b. |

|

|
|
11th March 2020, 00:44
|
#2 |
|
Give to Learn

Freelander 2 Join Date: Aug 2010
Location: West Midlands
Posts: 18,769
Thanks: 1,155
Thanked 6,407 Times in 3,874 Posts
|
HI Derek.
Very neat job, with precise outlay of what to do thank you for sharing your excellent work with us  I am sure a few will follow in your foot steps. I am sure a few will follow in your foot steps.
__________________
Arctic Givology Learn to Give Everything is Achievable  ad altiora tendo. Check out our Nano meet dates http://www.midlandsnanomeets.co.uk/ http://www.the75andztclub.co.uk/index.php?thepage=howto " You do the work , we supply the expertise " |
|
|
|
|
27th November 2021, 11:21
|
#3 |
|
Owners Club Director

Rover 75 Conn SE V6 / MG ZT 260 SE V8 / MG ZT 180 SE V6 Join Date: Feb 2007
Location: Southampton
Posts: 20,955
Thanks: 645
Thanked 6,851 Times in 2,537 Posts
|
Good guide Derek, it's now copied into the How-To section under Car Interior for easy reference
 Here Here |

|
|
|
16th April 2024, 09:23
|
#4 |
|
Give to Learn
Freelander 2 Join Date: Aug 2010
Location: West Midlands
Posts: 18,769
Thanks: 1,155
Thanked 6,407 Times in 3,874 Posts
|
Bump up for Martin
__________________
Arctic Givology Learn to Give Everything is Achievable ad altiora tendo. Check out our Nano meet dates http://www.midlandsnanomeets.co.uk/ http://www.the75andztclub.co.uk/index.php?thepage=howto " You do the work , we supply the expertise " |
|
|
|
 |
|
|


 Linear Mode

