
|
|
|
|
|
|
||
|
|
||
 10th June 2013, 07:59
|
#1 |
|
This is my second home

BMW 330d Tourer, MG ZT 180 SE XPG, VW Polo 6R 1.2 TDI Bluemotion Join Date: Jul 2011
Location: York
Posts: 6,026
Thanks: 363
Thanked 574 Times in 319 Posts
|
NOTE: This guide is for factory fitted Highline systems only.
There have been many threads about this subject and it seems to be a common question that crops up so I decided to do a write up on how I did mine. Even though the Highline TV SatNav is a very capable system I always felt it needed a little more oomph as it were. I managed to find a car with the full system in but the breaker only sent the speakers and then crushed the car with the amp and loom in it. This meant I had to make up the loom myself which I was initially daunted by, it is actually far easier than I thought. Basically, Highline equipped cars have the BMW 17 pin plug in the boot as opposed to behind the head unit. This means that you don't need to remove interior trim and run wires up and down the car. The 17 pin plug sends the output signal to the speakers and all we need to do is cut into these speaker wires and add the amplifier in between. The amplifier has an input plug and an output plug, the amplifier takes the input signals from the 17 pin plug, processes it and redistributes it via the amps output plug and sends the signals to the speakers. Simple. I did find some wiring diagrams on the forum which helped me but I have added some notes to help others identify the wiring in their cars easier. The diagram below shows the BMW 17 pin plug (CO818) and shows the wiring colours as were in my car. All we are interested in are the speaker wires, the lives and the earth wires.  Now we have identified the speaker wiring we can now chop and splice this into the amplifiers 12 pin plug (CO491), this carries the power, earth and speaker signals into the amplifier. Pin placements show where the wires need to go though if you're lucky to have the plugs or the loom the colours will be the same. As I didn't have a loom and made it up from 2 colours of wire I needed to label everything to ensure I didn't get them mixed up. 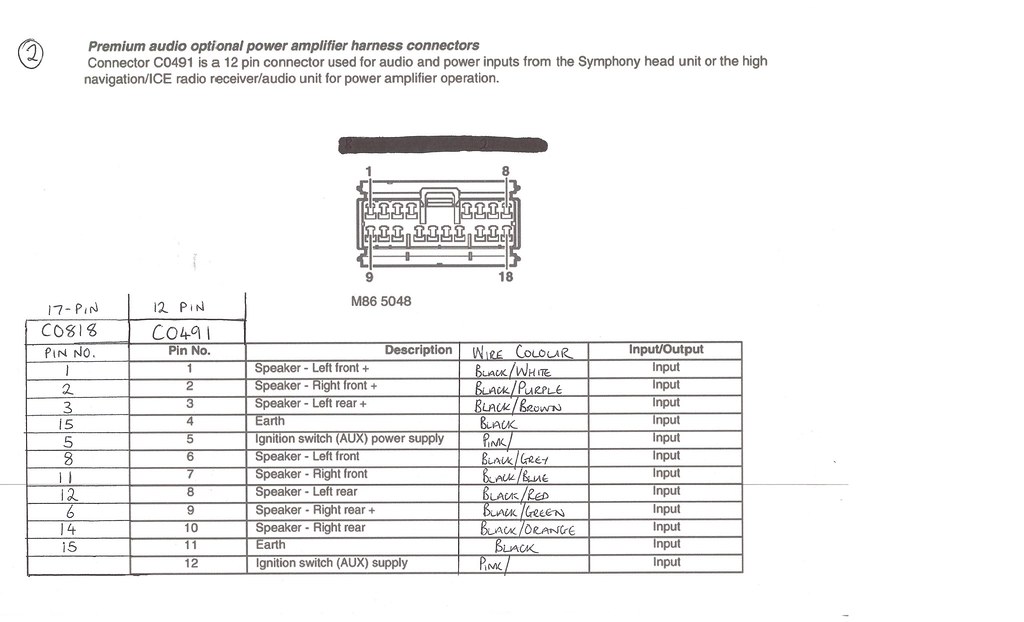 Now you have spliced the wiring to the input plug you'll be left with just the amplifiers 18 pin output plug (CO492), this sends the processed and amplified signals to the speakers. Note there is one INPUT wire on this plug, which is the remote ON/OFF signal, this will turn the amplifier on with ignition. Again refer to the wiring colours and pin placements for confirmation. 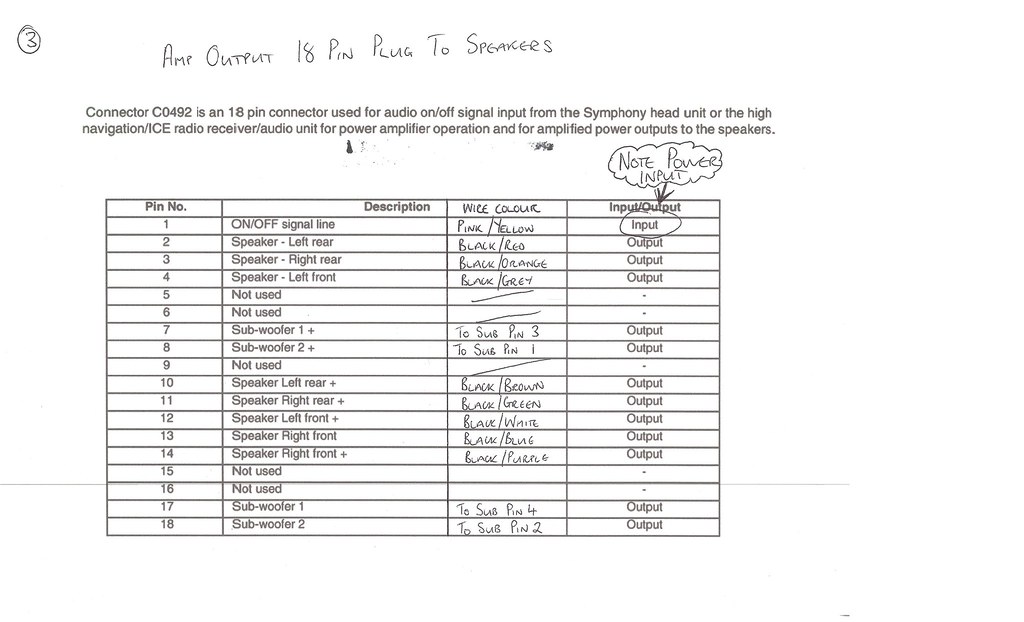 Once done ensure there is no exposed wiring and fire her up. You'll notice the subwoofer straight away and should have a vast improvement on the standard audio. The full MG Rover wiring diagrams can also be viewed on my Flickr should you need any further information for the wiring: http://www.flickr.com/photos/chantry...7632823133396/ |

|

|
|
10th June 2013, 08:05
|
#2 |
|
This is my second home
no mg/rover ATM Join Date: Nov 2011
Location: Morecambe
Posts: 4,464
Thanks: 92
Thanked 230 Times in 183 Posts
|
Can we put this as a HOW TO....
Thanks alan it's very good
__________________
Full T4 Testbook diagnostics and Replacement Key Service see BigRuss and Marinabrian  Please click below for nano website and 2014 dates etc etc http://www.midlandsnanomeets.co.uk/i...nocard_sig.jpg Thanks  Andy |
|
|
|
|
10th June 2013, 08:31
|
#3 |
|
This is my second home
BMW 330d Tourer, MG ZT 180 SE XPG, VW Polo 6R 1.2 TDI Bluemotion Join Date: Jul 2011
Location: York
Posts: 6,026
Thanks: 363
Thanked 574 Times in 319 Posts
|
Thanks. I did take a lot of photos but they're a bit pointless and due to the amount of chopped wiring make it look really complex. These diagrams should simplify the whole process I hope.
|
|
|
|
|
10th June 2013, 09:54
|
#4 |
|
This is my second home
no mg/rover ATM Join Date: Nov 2011
Location: Morecambe
Posts: 4,464
Thanks: 92
Thanked 230 Times in 183 Posts
|
Hopefully a mod will pick up on it soonnnnn
__________________
Full T4 Testbook diagnostics and Replacement Key Service see BigRuss and Marinabrian Please click below for nano website and 2014 dates etc etc http://www.midlandsnanomeets.co.uk/i...nocard_sig.jpg Thanks Andy |
|
|
|
|
11th June 2013, 13:07
|
#5 |
|
Banned
None Join Date: Feb 2010
Location: Here on the Forum
Posts: 5,352
Thanks: 632
Thanked 822 Times in 573 Posts
|
Thanks Canonite
Will you allow me to use that Diagram if required at times? |
|
|
|
|
11th June 2013, 20:14
|
#6 |
|
This is my second home
BMW 330d Tourer, MG ZT 180 SE XPG, VW Polo 6R 1.2 TDI Bluemotion Join Date: Jul 2011
Location: York
Posts: 6,026
Thanks: 363
Thanked 574 Times in 319 Posts
|
You can for me, though I just added to an existing diagram I found on the forum.
I believe its on the Rave disc |
|
|
|
|
11th June 2013, 20:21
|
#7 |
|
This is my second home
Jaguar XJ 3.0 V6 Auto (X350) & Hyundai Tuscon 2020 Join Date: Oct 2008
Location: Bridgend
Posts: 10,342
Thanks: 69
Thanked 559 Times in 356 Posts
|
And as if by magic

__________________
"The only thing to do with good advice is pass it on. It is never any use to oneself" |
|
|
|
|
11th June 2013, 20:57
|
#8 |
|
This is my second home
None * DROWNED Join Date: Aug 2007
Location: Cardigan
Posts: 33,339
Thanks: 1,257
Thanked 1,664 Times in 1,081 Posts
|
__________________
Andrew Ich Dien Problem solving is... lateral thinking SEARCH FIRST ...ASK LATER... |
|
|
|
|
6th April 2018, 18:37
|
#9 |
|
Newbie
Rover 75 Join Date: Feb 2018
Location: SAn Fernando
Posts: 3
Thanks: 0
Thanked 0 Times in 0 Posts
|
good afternoon
congratulations for your contribution. I need a little help, I do not understand where I have to connect the sub, to pin 1 -2-3-4 I have to connect them. thanks |
|
|
|
|
6th April 2018, 19:20
|
#10 | |
|
Gets stuck in
75 MK1 2.5 V6 Saloon Join Date: May 2017
Location: Samokov
Posts: 781
Thanks: 372
Thanked 423 Times in 240 Posts
|
Quote:
Subwoofer 1 "+" to pin 7 Subwoofer 1 "-" to pin 17 Subwoofer 2 "+" to pin 8 Subwoofer 2 "-" to pin 18 Take a look at the post #1 above. On subwoofer speaker the "+" male connector is bigger than the "-" male
__________________
Don`t drive faster than your guardian-angel can fly! Last edited by hrissim; 6th April 2018 at 19:23.. |
|
|
|
|
 |
|
|


 Linear Mode

