
|
|
|
|
|
|
||
|
|
||
|
|
 14th April 2020, 14:03
|
#1 |
|
Avid contributor
MG ZT 160 V6 Join Date: Jul 2012
Location: West Sussex
Posts: 132
Thanks: 1
Thanked 8 Times in 7 Posts
|
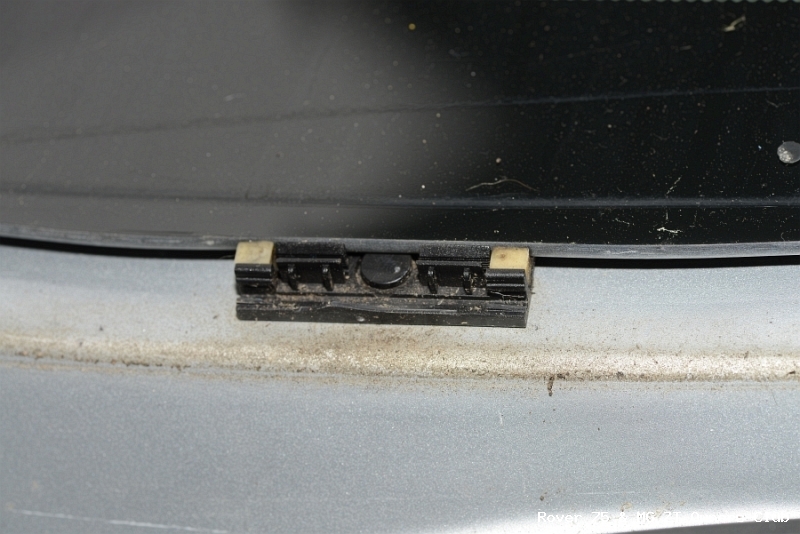
I have searched for this but couldn't find a guide with any photos etc.
I have a 2000 Rover 75 saloon and a 2002 MG ZT saloon. Both have water leaking in to the boot from the rear window trim clips. Firstly, there is no way I am having the rear glass removed on both cars to reseal in some new clips. How is the trim removed? If some clips break then surely the trim can be re- fitted with a couple of blobs of sealant? I've seen windscreen fitters do this to A pillar trims when clips have broken. I've got some Creeping Crack cure as recommended by someone on here. I've got some silicone on the way to me too. Any advice or photos would be much appreciated. |

|

|
|
14th April 2020, 14:31
|
#2 |
|
This is my second home

rover 75 1.8 vvc club se wedgwood blue Join Date: Aug 2009
Location: Seaton Carew
Posts: 26,922
Thanks: 65
Thanked 7,142 Times in 4,642 Posts
|
Feel under the window from inside the boot for the clips, pointy things, then seal from underneath. You can also peel the rubber from around the window to locate the clips and run a bead of sealant into and around.
 |
|
|
|
|
14th April 2020, 15:15
|
#3 |
|
This is my second home
Rover 75 Saloon & Tourer Join Date: Sep 2012
Location: Lincoln
Posts: 14,931
Thanks: 1,630
Thanked 3,032 Times in 2,181 Posts
|
the clips are available I believe. The chrome trim levers away from the screen, you may well break some clips. Make a note of which colour clip goes where.
Below the trim are some black fittings around the bottom of the screen with some pegs in, suzublu mentions them. I member I think carfully cut half the head of the peg so the whole fitting can be removed, they then sealed under the fitting and replaced it. somewhere I've done a write up on removing the trim, i'll try to fnd it macafee2 |
|
|
|
|
14th April 2020, 15:20
|
#4 |
|
This is my second home
Rover 75 Saloon & Tourer Join Date: Sep 2012
Location: Lincoln
Posts: 14,931
Thanks: 1,630
Thanked 3,032 Times in 2,181 Posts
|
pm me your email address I will send you something that may help but you will need to check your spam folder
macafee2 |
|
|
|
|
14th April 2020, 15:22
|
#5 |
|
Loves to post
Rover 75 CDTI Classic Join Date: Jul 2014
Location: Galleywood
Posts: 374
Thanks: 80
Thanked 67 Times in 45 Posts
|
The rubber has dried out and fallen away at the bottom of my screen. A small length (2") has lifted and broken away below the chrome strip. The rubber beyond this is starting to curl like a dried sandwich and I suspect this will follow.
What is the best fix for this? Thanks.
__________________
2006 Rover 75 CDTI in Starlight Silver 1973 Rover P6 3500 in Monza Red |
|
|
|
|
15th April 2020, 07:13
|
#6 | |
|
Posted a thing or two
Rover 75 Saloon & Tourer Join Date: Mar 2013
Location: Wilmslow
Posts: 1,515
Thanks: 433
Thanked 301 Times in 212 Posts
|
Quote:
|
|
|
|
|
|
19th April 2020, 14:23
|
#7 | |
|
I really should get out more.......
Vauxhall Insignia CDTi; MG TF 135 Join Date: Jan 2010
Location: Norn Iron
Posts: 2,958
Thanks: 942
Thanked 378 Times in 297 Posts
|
Quote:
Ron, I've been trying to do this, but am I mistaken in thinking that the ones at the bottom corner of each side are inside a double skin...?
__________________
Past cars: MGB GT; Escort 1300 Sport; Vauxhall VX4/90; Marina Coupe TC; Celica ST (1972); Montego Turbo; Astra GTE 16V; Astra GSI 16V; Golf GTI 16V (Mk II); Sierra XR4x4 Estate; BMW 325i (E30); BMW M3 3.0; BMW M3 3.2 Evo. Left some of the more embarrassing ones out. And about 30 motorbikes. |
|
|
|
|
|
2nd May 2020, 17:49
|
#8 | |
|
Posted a thing or two
Rover 75 Saloon & Tourer Join Date: Mar 2013
Location: Wilmslow
Posts: 1,515
Thanks: 433
Thanked 301 Times in 212 Posts
|
Quote:
|
|
|
|
|
|
3rd May 2020, 15:10
|
#9 | |
|
Posted a thing or two
Rover 75 Saloon Join Date: Apr 2019
Location: Under the car
Posts: 1,840
Thanks: 210
Thanked 244 Times in 221 Posts
|
Quote:
  I've just taken the finisher assembly off and seven out of the eight retaining clips on the bodywork broke - they're as brittle as hell.  This could get expensive! |
|
|
|
|
|
3rd May 2020, 15:32
|
#10 | |
|
Posted a thing or two
Rover 75 Saloon Join Date: Apr 2019
Location: Under the car
Posts: 1,840
Thanks: 210
Thanked 244 Times in 221 Posts
|
Quote:
        Looks like the glass will have to come out now. |
|
|
|
|
 |
|
|


 Hybrid Mode
