
|
|
|
|
|
|
||
|
|
||
 23rd May 2010, 23:17
|
#1 |
|
Owners Club Director

Rover 75 Conn SE V6 / MG ZT 260 SE V8 / MG ZT 180 SE V6 Join Date: Feb 2007
Location: Southampton
Posts: 20,936
Thanks: 645
Thanked 6,851 Times in 2,537 Posts
|
After getting a ZT SE with SE Pack, I was amazed to discover that with all those extras fitted, the sun visors were still poverty spec vynl units without lights and not even a mirror on the driver's side.
A couple of members told me that all MG ZTs were the same in this respect, but that the wiring to accomodate the illuminated versions (as fitted to most 75s) was actually present in the car. So here's how I tackled the upgrade, which is a great, low cost mod that doesn't take more than an hour to do. 1) From ebay, or a breakers yard, get hold of a set of Light Smokestone illuminated visors (make sure they come from a Rover 75 which had dark grey seats, not beige). 2) Unscrew and remove the original visors by simply removing the two screws in the head lining that hold each one in place. 3) On the driver's side, remove the two Philips screws that hold the drivers footwell upper trim in place, then pull away the trim piece that covers the light switch module (LSM) and steering column (it's just held by clips). 4) Now undo the three screws holding the LSM in place, and without having to disconnect it, push it to one side. 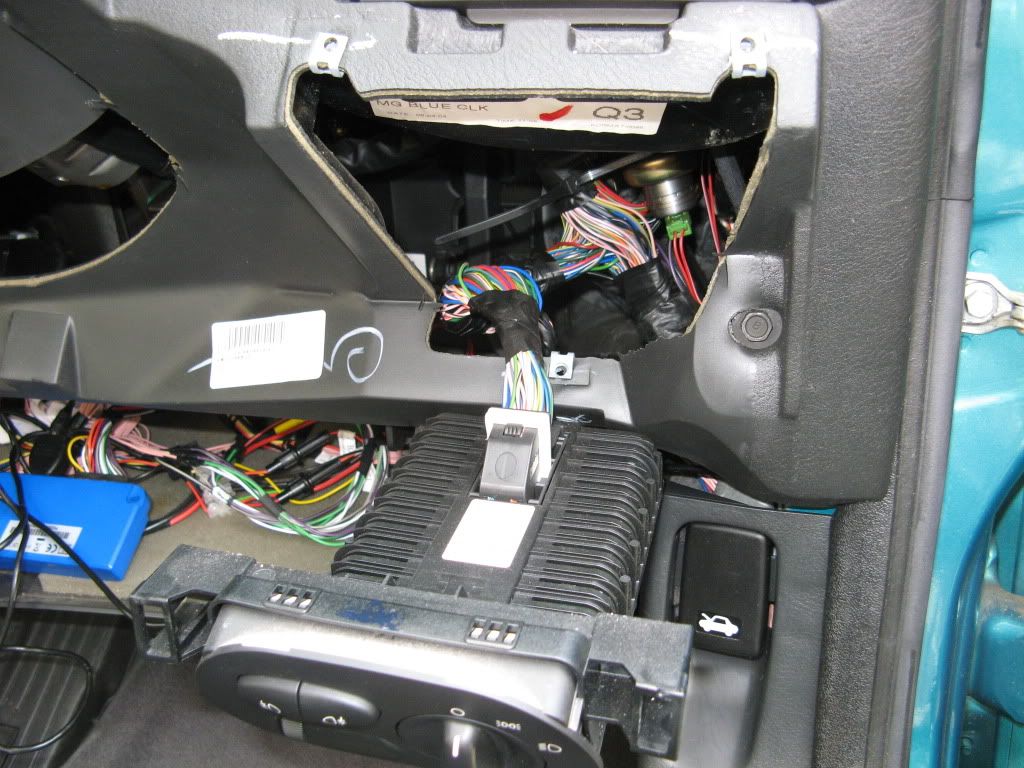 5) Next take a close look behind where the LSM was, and you should see a large wiring harness with lots of wires bundled together. Strapped up to this harness, you should be able to see a seperate set of two wires (Purple & Black), these terminate in a small black 2-pin connector. 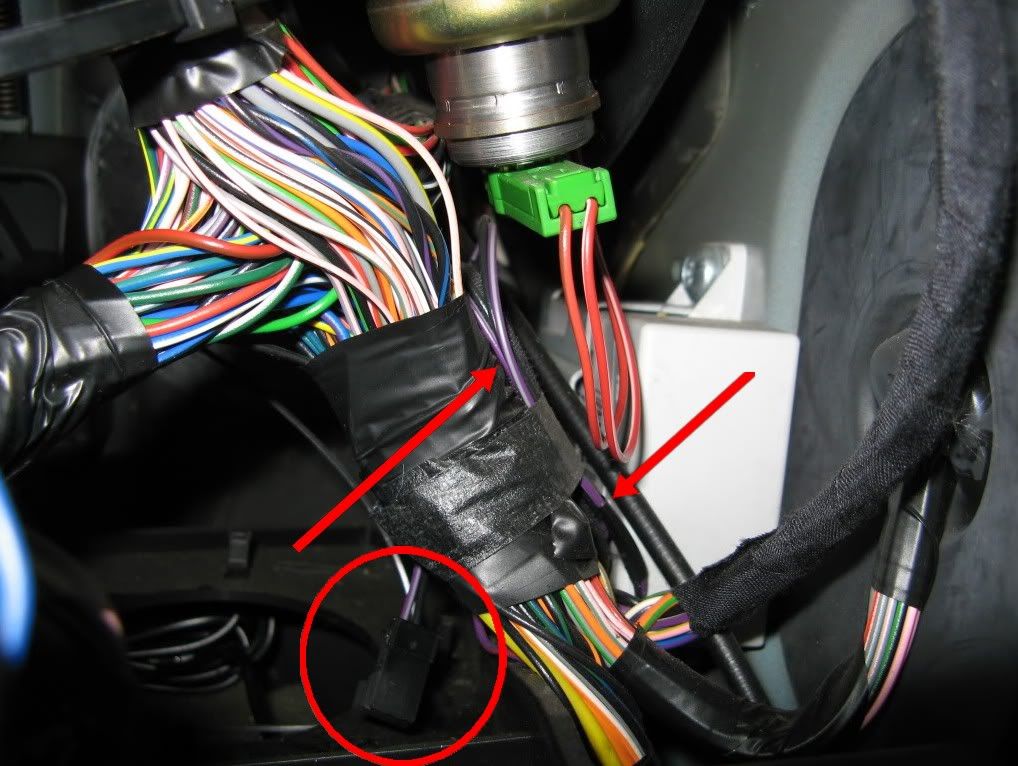 5) Simply unstrap this from the main harness, and let it run free down to the driver's footwell. 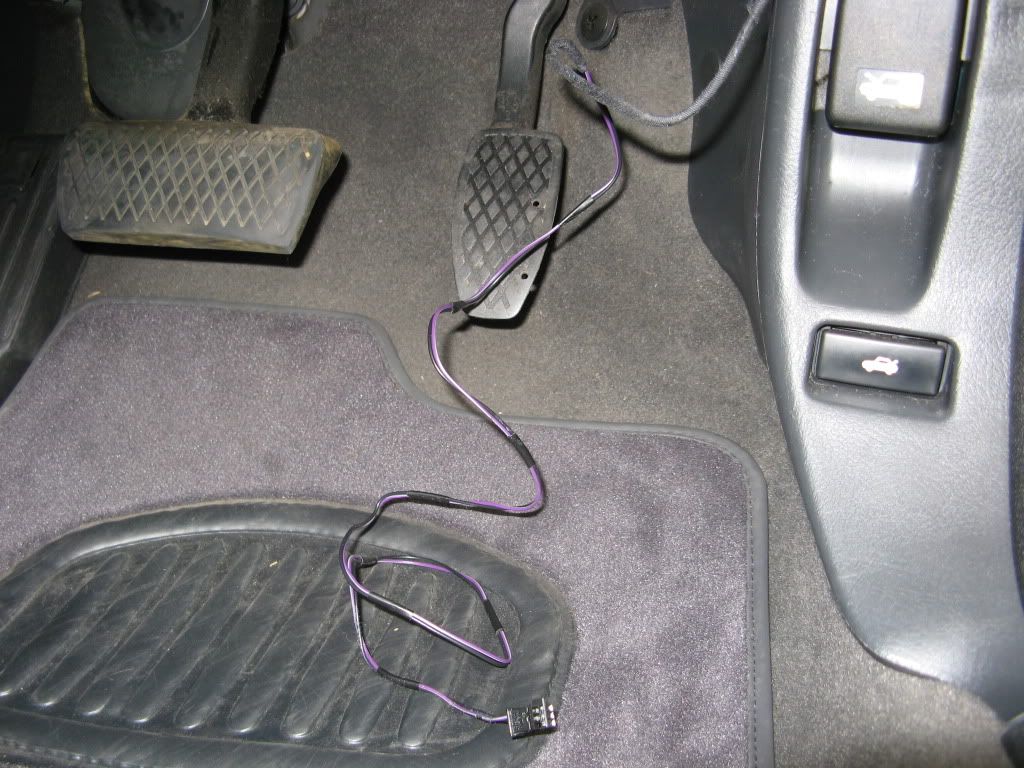 6) Put back all the removed trim, then taking the Purple & Black cable, feed it up the car, tucking it behind the rubber door seal as you go. 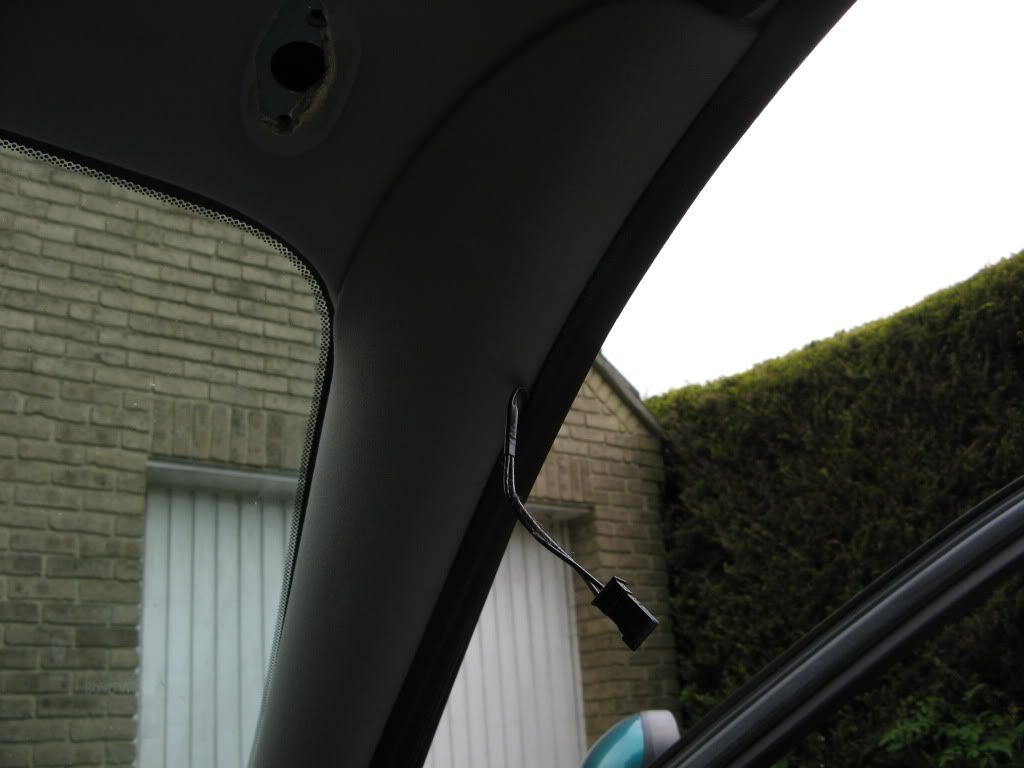 7) You may find (as I did) that there isn't quite enough length to reach the sun visor screw hole, this is due to having to run the cable in a less than direct route behind the dash. The solution I found was to simply cut the end off the loom, and extend it by about 20cms using your own wire, then attaching the original end with the connector, back on. 8) finally feed the end of the two wires up to the windscreen where it meets the head lining, and pushing it under the lining until it pops out at the screw hole 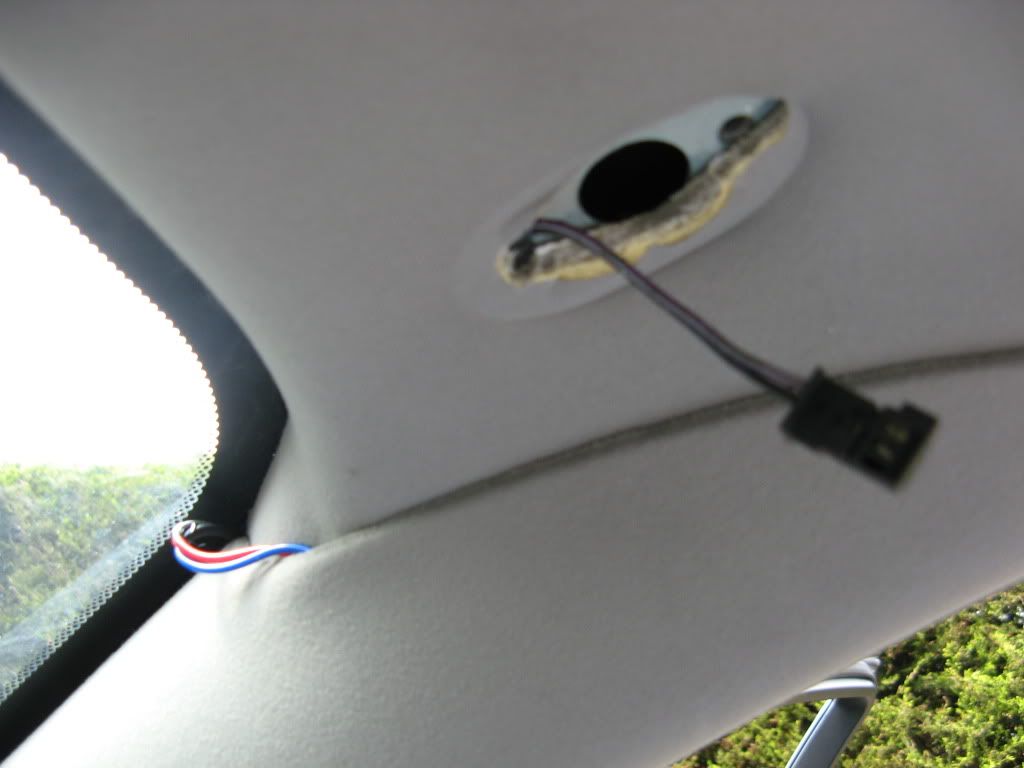 9) All you have to do then is clip the connector onto the new visor, and screw it back onto the car. Job done 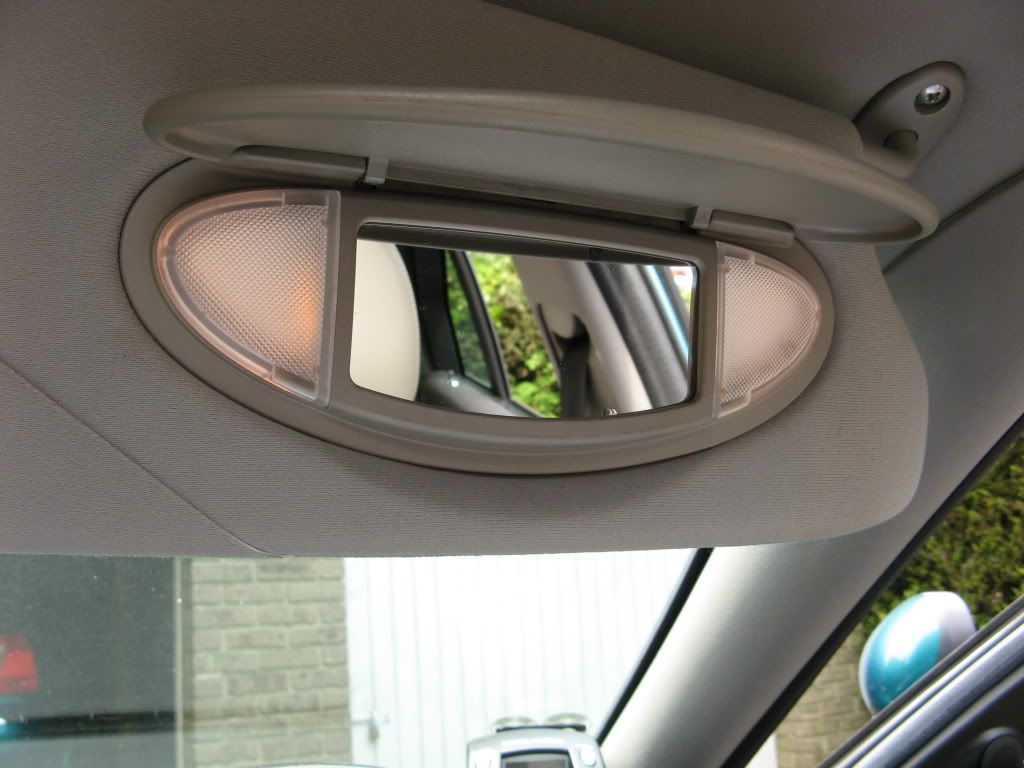 The passenger side, is much easier, just remove the lower left, side trim piece from the passenger footwell, and that should reveal the same two Purple and Black cables just dangling free. Route the wire in the same way behind the rubber door liner, and for me, I didn't need to extend this one, it reached all the way just fine. There you have it, a quick and very straight forward mod to any ZT.
__________________
Last edited by Reebs; 14th August 2010 at 18:13.. |

|

|
|
24th May 2010, 13:03
|
#2 |
|
Banned
Join Date: May 2009
Posts: 5,724
Thanks: 0
Thanked 9 Times in 7 Posts
|
many thanx for this, i couldnt locate my wires so thread my own and gained power from the stereo, but have just looked and found my wire due to this how to, so correctly wired now, cheers for the how to.
 FORGOT TO MENTION if you get a wire coat hanger and take off the windscreen piller trim and gently push one end down wards, some bending of the hanger is needed, it will poke thru the bottom where the connector is, then tape it up secuerly and pull back thru, this was its run the way it was meant to be, thread under the piller trim and bobs your aunty Last edited by baconbuttyman; 24th May 2010 at 13:38.. |
|
|
|
|
24th May 2010, 13:18
|
#3 |
|
This is my second home
ZT 260 SE Join Date: Oct 2008
Location: Ashington, West Sussex
Posts: 3,512
Thanks: 2
Thanked 1 Time in 1 Post
|
Excellent how to - another one to add to my list
Anyone know if the grey interior trim colour on a ZT260 is Light Smokestone or something different
__________________
I've learned that no matter how serious your life requires you to be, everyone needs a friend to act goofy with. 
|
|
|
|
|
24th May 2010, 16:10
|
#4 | |
|
Owners Club Director
Rover 75 Conn SE V6 / MG ZT 260 SE V8 / MG ZT 180 SE V6 Join Date: Feb 2007
Location: Southampton
Posts: 20,936
Thanks: 645
Thanked 6,851 Times in 2,537 Posts
|
Quote:
 |
|
|
|
|
|
24th May 2010, 16:16
|
#5 | |
|
Owners Club Director
Rover 75 Conn SE V6 / MG ZT 260 SE V8 / MG ZT 180 SE V6 Join Date: Feb 2007
Location: Southampton
Posts: 20,936
Thanks: 645
Thanked 6,851 Times in 2,537 Posts
|
Quote:
Also, the workshop manual states that if they are removed, they should be discarded and replaced with new ones!! That's why I took the longer route  |
|
|
|
|
|
24th May 2010, 17:25
|
#6 | |
|
Banned
Join Date: May 2009
Posts: 5,724
Thanks: 0
Thanked 9 Times in 7 Posts
|
Quote:
|
|
|
|
|
|
24th May 2010, 18:25
|
#7 |
|
I really should get out more.......
MG ZT CDTI Join Date: Sep 2007
Location: 17500 REAUX, CHARENTE-MARITIME
Posts: 2,749
Thanks: 2
Thanked 133 Times in 90 Posts
|
If you feed the wires through the screwhole, how do you put the screw back in ???
Mick |
|
|
|
|
24th May 2010, 18:31
|
#8 |
|
Gets stuck in
ZT 190+ Join Date: Jun 2009
Location: Ballymena, Northern Ireland
Posts: 851
Thanks: 0
Thanked 0 Times in 0 Posts
|
a simpler way is to splice the wires going into the main interior light cluster, takes 2 minutes, well would have taken 2 minutes if i hadnt mis matched the wires and blown the fuse
|
|
|
|
|
24th May 2010, 19:51
|
#9 | |
|
Owners Club Director
Rover 75 Conn SE V6 / MG ZT 260 SE V8 / MG ZT 180 SE V6 Join Date: Feb 2007
Location: Southampton
Posts: 20,936
Thanks: 645
Thanked 6,851 Times in 2,537 Posts
|
Quote:
The wire pokes out from the gap between the metal roof, and the head lining fabric, just make sure you don't trap the wires in a position that they cover the screw holes as you do it back up. There is plenty of space to accomodate the wire under the plastic visor base, so it's not trapped or damaged. |
|
|
|
|
|
24th May 2010, 19:52
|
#10 |
|
I really should get out more.......
2005 Monogram Atmosphere ZT CDTI Auto + 2010 BMW 123d Convertible + 2005 MG TF 160 Join Date: Feb 2010
Location: Winchester, Hampshire
Posts: 2,202
Thanks: 37
Thanked 194 Times in 159 Posts
|
You've answered my question before I asked it.
I was trying to do this to my car the other day, turns out I didn't go far enough into the dash to find the wiring. Will have to give it another go now. |
|
|
|
 |
|
|


 Linear Mode

