
|
|
|
|
|
|
||
|
|
||
 20th March 2013, 22:52
|
#11 | |
|
Give to Learn

Freelander 2 Join Date: Aug 2010
Location: West Midlands
Posts: 18,699
Thanks: 1,155
Thanked 6,407 Times in 3,874 Posts
|
Quote:
I have made metal brackets for the bottom fixing if they have failed to much if not i have used stailess steel washer either side so the fixing hole is sandwiched between them    
__________________
Arctic Givology Learn to Give Everything is Achievable  ad altiora tendo. Check out our Nano meet dates http://www.midlandsnanomeets.co.uk/ http://www.the75andztclub.co.uk/index.php?thepage=howto " You do the work , we supply the expertise " |
|

|

|
|
21st March 2013, 09:50
|
#12 |
|
Banned
MG ZT+ V6 190 Join Date: Nov 2011
Location: Spalding
Posts: 13,245
Thanks: 369
Thanked 1,196 Times in 818 Posts
|
Is there anything you can't fix on these cars Steve?
  |
|
|
|
|
28th March 2013, 22:57
|
#13 | |
|
Give to Learn
Freelander 2 Join Date: Aug 2010
Location: West Midlands
Posts: 18,699
Thanks: 1,155
Thanked 6,407 Times in 3,874 Posts
|
Quote:
The ability to make them do 100 mile to the gallon for £1.50 and zero tax only Mr Cameron can do that  but lets not go there but lets not go there  Arctic Arctic
__________________
Arctic Givology Learn to Give Everything is Achievable ad altiora tendo. Check out our Nano meet dates http://www.midlandsnanomeets.co.uk/ http://www.the75andztclub.co.uk/index.php?thepage=howto " You do the work , we supply the expertise " |
|
|
|
|
|
29th March 2013, 06:32
|
#14 |
|
Banned
MG ZT+ V6 190 Join Date: Nov 2011
Location: Spalding
Posts: 13,245
Thanks: 369
Thanked 1,196 Times in 818 Posts
|
Best not get me started on the LibLabCon, had you!
|
|
|
|
|
29th March 2013, 15:56
|
#15 |
|
This is my second home

75 Join Date: Nov 2006
Location: Leeds
Posts: 8,432
Thanks: 176
Thanked 907 Times in 716 Posts
|
Steve.
I took your great idea about using pc blanking plates and secured the bottom bracket with the drilled pc plate. I then made another shorter plate for the top securing bracket. I secured both plates by filling the void between the new plate and the original securing bracket with hot melt glue, as seen in the picture below,, 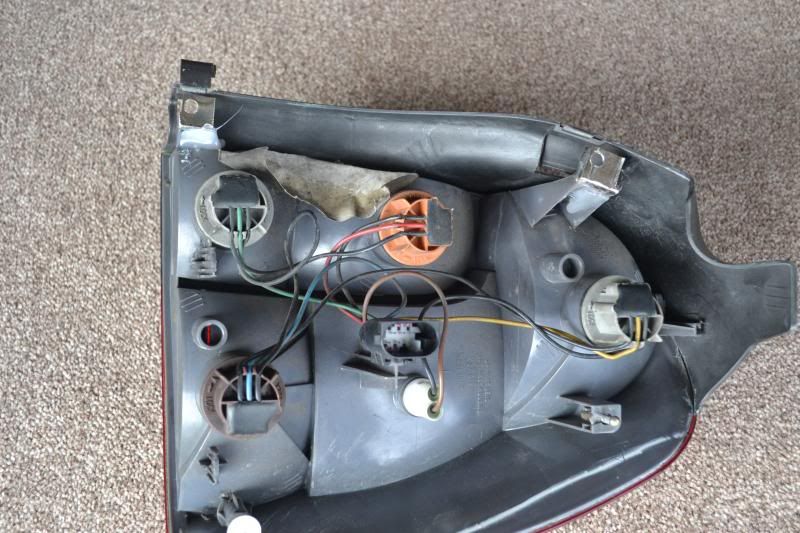 Dave T |
|
|
|
|
29th March 2013, 16:52
|
#16 | |
|
Give to Learn
Freelander 2 Join Date: Aug 2010
Location: West Midlands
Posts: 18,699
Thanks: 1,155
Thanked 6,407 Times in 3,874 Posts
|
Quote:
HI Dave Great i fitted mine today finally will post after once the brackets have been re-inforced they should in effect not break again i also sorted out the little white clips and used the plaster board rawlplugs but had to make the hole larger which i doubt many members would like to do but you never know, it should be easy for me to change the bulbs without the worry of the light fixings breaking Arctic.
__________________
Arctic Givology Learn to Give Everything is Achievable ad altiora tendo. Check out our Nano meet dates http://www.midlandsnanomeets.co.uk/ http://www.the75andztclub.co.uk/index.php?thepage=howto " You do the work , we supply the expertise " Last edited by Arctic; 19th December 2019 at 17:16.. Reason: Thumbnails enlarged |
|
|
|
|
|
6th June 2013, 00:42
|
#17 |
|
Give to Learn
Freelander 2 Join Date: Aug 2010
Location: West Midlands
Posts: 18,699
Thanks: 1,155
Thanked 6,407 Times in 3,874 Posts
|
I will update this thread early next week as i have to do alittle work on the rear bumper and will be doing some wiring work behind the rear lights also Arctic.
__________________
Arctic Givology Learn to Give Everything is Achievable ad altiora tendo. Check out our Nano meet dates http://www.midlandsnanomeets.co.uk/ http://www.the75andztclub.co.uk/index.php?thepage=howto " You do the work , we supply the expertise " |
|
|
|
|
30th June 2013, 00:32
|
#18 |
|
Give to Learn
Freelander 2 Join Date: Aug 2010
Location: West Midlands
Posts: 18,699
Thanks: 1,155
Thanked 6,407 Times in 3,874 Posts
|
Hi sorry to not have got back to this thread earlier as i said i would but been busy, anyways while in the local diy shop i purchased some different plaster board rawl plugs the screw in type and guess what with a little fettling they are great to replace the brittle original clips that break so often.
They will need to be drilled out with a 5mm drill bit to make the hole the snug fit it needs to be i will details this more once i have out together a pictorial how to over the next few day as i am busy gearing up for the nano cheers Arctic
__________________
Arctic Givology Learn to Give Everything is Achievable ad altiora tendo. Check out our Nano meet dates http://www.midlandsnanomeets.co.uk/ http://www.the75andztclub.co.uk/index.php?thepage=howto " You do the work , we supply the expertise " Last edited by Arctic; 19th December 2019 at 17:17.. Reason: thumbnails enlarged |
|
|
|
|
30th June 2013, 09:38
|
#19 |
|
Been absent for a while
Rover 75 Tourer, Classic mini Cooper S, Abarth 595 competizione, MG TF and a Hyundai Tucson PHEV Join Date: Feb 2007
Location: Cumbria
Posts: 13,065
Thanks: 1,033
Thanked 1,686 Times in 1,040 Posts
|
Excellent work Steve
__________________
.................................................  'Marmite' Possibly one of the most famous 75 tourers produced! left the production line as the last of only Three Rover 75 tourers produced in Trophy Yellow. 48 hours later Longbridge closed. The last sold ordered 75 Tourer. Paid for by the Phoenix Four and handed over by John Towers to the Warwickshire Northampton Air ambulance service as a Rapid Response vehicle |
|
|
|
|
30th June 2013, 10:26
|
#20 | |
|
This is my second home
ZTT, Contemp Saloon, Duotone Tourer Join Date: May 2012
Location: Llandeilo
Posts: 4,192
Thanks: 290
Thanked 387 Times in 333 Posts
|
Quote:
cool stuff; wish I had looked at this yesterday; my new lamps are in though. seeing this end part got me thinking; I wondered it you could use something similar to these wall fixings to replace the truly awful bolts that spin!?? then you could use a stainless big self tapper to secure. There are a bunch of similar wall fixings that might do a similar job I can now at least mod the two lamp clusters I have that have broken posts |
|
|
|
|
 |
| Thread Tools | |
| Display Modes | |
|
|


 Linear Mode

