
|
|
|
|
|
|
||
|
|
||
 18th June 2012, 10:16
|
#1 |
|
Avid contributor
MG ZT CDTi Join Date: Dec 2010
Location: Farnborough
Posts: 164
Thanks: 32
Thanked 12 Times in 11 Posts
|
..............................
Last edited by niallb; 20th June 2012 at 07:10.. |

|

|
|
18th June 2012, 12:54
|
#2 |
|
Gets stuck in

MG ZT CDTI 170BHP, PUG CC 180 Sport Join Date: Feb 2011
Location: Leeds
Posts: 659
Thanks: 4
Thanked 18 Times in 14 Posts
|
I'm not an expert, but i got someone who knew what they were doing. I think there is a chance that the sprocket can fall into the engine then thats an engine out job ... Maybe be wrong.
|
|
|
|
|
18th June 2012, 13:06
|
#3 |
|
Passed Away
2002 Pale Blue. Rover 75 CDTi Connoisseur auto. 170K miles Join Date: Dec 2008
Location: Near the M67.
Posts: 14,509
Thanks: 199
Thanked 585 Times in 397 Posts
|
Yes you need to beg, borrow, or buy the tool for the job....
 ... |
|
|
|
|
18th June 2012, 13:06
|
#4 |
|
Gets stuck in
Rover 75 CDTi Con SE Join Date: Jul 2011
Location: Northallerton
Posts: 846
Thanks: 123
Thanked 131 Times in 91 Posts
|
Yes you do need the tool, I have one pm me for details.
Fitting procedure (not mine, nicked from somewhere else) You have to remove the engine undertray, then get a small trolly jack and a piece of wood under the left hand side and back end of the sump, Take the weight of engine, Take the engine cover off 3 bolts You then remove the air filter inlet pipe at the front of the engine 3 bolts and 2 on the inlet manifold, Then i removed the inlet manifold i think its 12 or so bolts the air inlet pipe from the inter cooler off from the egr Ther is a couple of electrical connectors i then put clean rag in all 8inlet holes , Then removed the high pressure steel fuel pipe from pump to fuel rail and put tape on the pump and pipe to stop dirt getting in, Then the two rubber pipes off the stainless fuel inlet pipes i left the rubber other ends on the pump You may need new jubilee clips as mine were one way clips and could not reuse them I then disconected the batterie lead and undid the starter motor 2 bolts the bottom one is a nut and bolt I then rested this on the lower chassis rail , i then undid the 4 bolts that hold the engine mounting to the engine If you have the jack correct these undo easy Then you have to follow the air con pipes to the front panel and undo a clip which is a snap clip with a screwdriver just a little lever up Then follow the 2 air con pipes up the the engine mounting and undo a little bracket holding them You then need to lift them slightly to allow you to lift the black bracket stopping you getting to the one bolt under this black bracket you may have to undo some more bols on the engine mounting bracket on the body , When you do it you will see what i mean, You then have to jack the engine up quite a bit to gain access to the round blanking plate on the engine timing cover (You dont have to remove the alternator belt) I then used a big allan key to remove this plug with a rubber seal on it, You then screw the big part of the removal tool into the timing case cover Then undo the bolt holding the sprocket on to the pump I had to have the car in gear and someone on the brakes to stop the engine turning Once you have the nut off screw the rest of the removal tool in and remove the sprocket and leave well alone,, you then have to undo the 3 bolts which hold the pump to the engine ,also one electrical conneter and pull it out, The pump itself is quite straight forward I cleaned mine with brake cleaner first making sure no bits go into any pipe holes you then have 3 plates with 4 torque bolts Udo the 4 torque bolts and remove the plate I think you will find that the little tube at the right hand side (pressure switch end ) is where the problem will be Remove the little pipe and prize the seals out one either end with a little washer on , One will be probably split, i put loctite on the 4 torque bolts which hold the plate on as the plate doesnt fit flat on the pump body there is About a 10 thou gap all the way around when its tightend down Then its just a matter of rebuilding in reverse sequence |
|
|
|
|
18th June 2012, 16:13
|
#5 |
|
Avid contributor
MG ZT CDTi Join Date: Dec 2010
Location: Farnborough
Posts: 164
Thanks: 32
Thanked 12 Times in 11 Posts
|
Wow thanks for the reply, I now need to figure when to do this job as reckon it will take some time. Will PM you for the tool once I figure when I can do the job.
Many many thanks Bigcul1  |
|
|
|
|
7th August 2012, 20:00
|
#6 |
|
Avid contributor
MG ZT 135+ Join Date: Aug 2008
Location: Sheffield
Posts: 120
Thanks: 0
Thanked 8 Times in 2 Posts
|
Hi
I'm hoping someone mght be able to offer some advice I'm in the process of replacing the seals on the HP pump on my cdti. I've followed the advice above but got to a point and i'm stuck. I'm at the point where i need to screw the sprocket holder/pump extractor in to the hole, however the large rubber engine mount is in the way and i can't seem to get the tool in the hole. 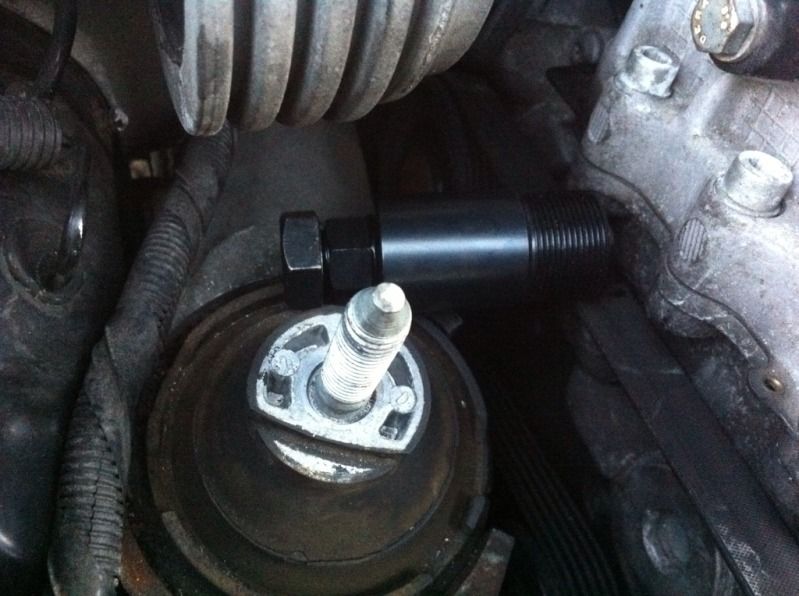 i've jacked the engine up as high as i can as the pulleys are now pressed up against the chassis leg so wont really go any higher. Does this tool look correct? its the Laser 4369 one listed for the BMW M47 engine thanks |
|
|
|
|
7th August 2012, 21:07
|
#7 | |
|
This is my second home
R75 Saloon. Join Date: Feb 2009
Location: France/or Devon.
Posts: 14,003
Thanks: 3,851
Thanked 2,167 Times in 1,816 Posts
|
Quote:
 |
|
|
|
|
|
7th August 2012, 21:42
|
#8 |
|
Avid contributor
MG ZT 135+ Join Date: Aug 2008
Location: Sheffield
Posts: 120
Thanks: 0
Thanked 8 Times in 2 Posts
|
ah i believe i need a different version of the tool. I need the shorter version Laser 5235
Oh well back to GSF tomorrow |
|
|
|
|
9th August 2012, 22:19
|
#9 |
|
Avid contributor
MG ZT 135+ Join Date: Aug 2008
Location: Sheffield
Posts: 120
Thanks: 0
Thanked 8 Times in 2 Posts
|
In case its of any use to others i thought i'd document how i get on repairing the high pressure pump which has started leaking rendering the car undriveable.
tbh any one with a decent socket set could perform this job if they take their time. Apart from the specal tool you need (£40 from GSF) and the couple of hours its taken me so far, it far outweighs the £800 or so quoted by the garage near me to fix it. One thing i would say is that i needed to weld a nut onto a short 17mm headed bolt so that i was able to undo the cover on the timing cover where the special tool gets screwed in, as i found it quite tight to undo, and no matter how tight i tightened 2 nuts against each other when i was pushing on the spanner it was making both nuts turn rather than the bolt. So its worth bearing in mind before you start. So this was the little bolt thing i welded to undo the cover 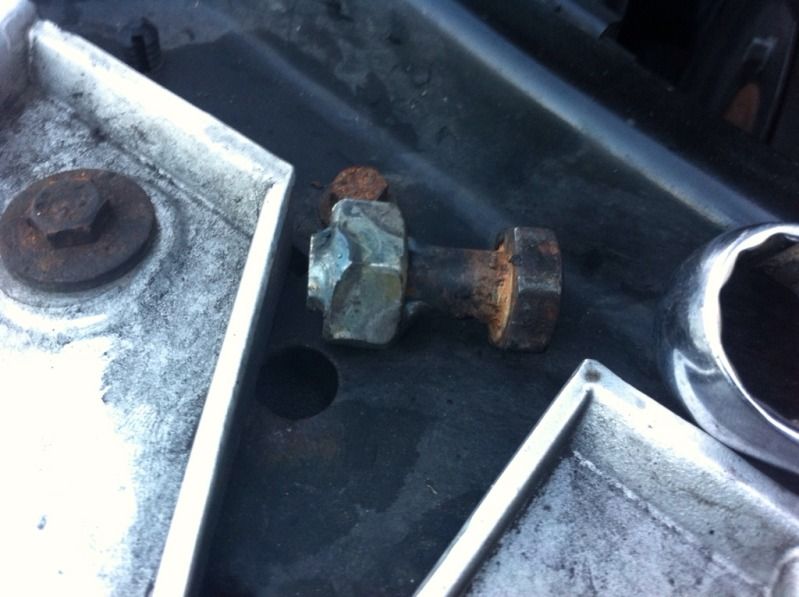 There are 2 covers on the timing cover, the one we're interested in is the larger one, nearest the front of the car. 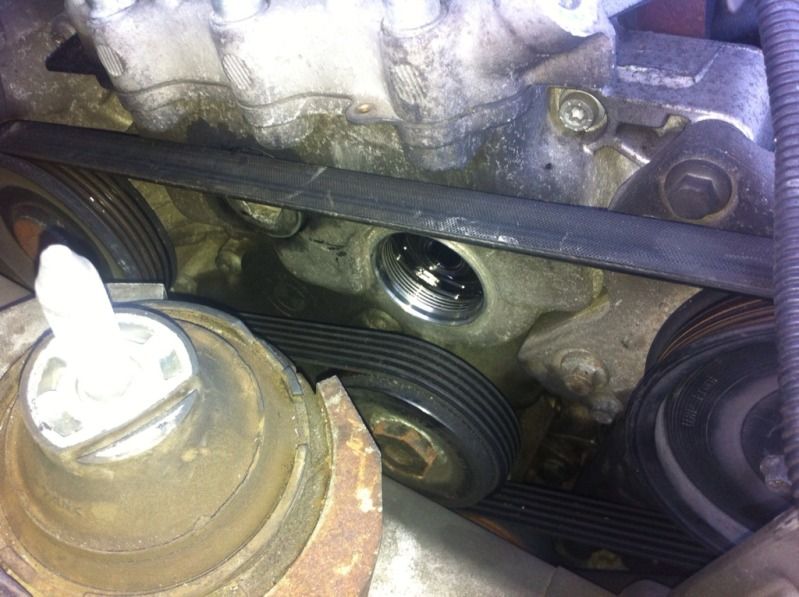 With the cover removed you can see the nut which holds the sprocket onto the tapered shaft of the pump. Don't undo this just yet. 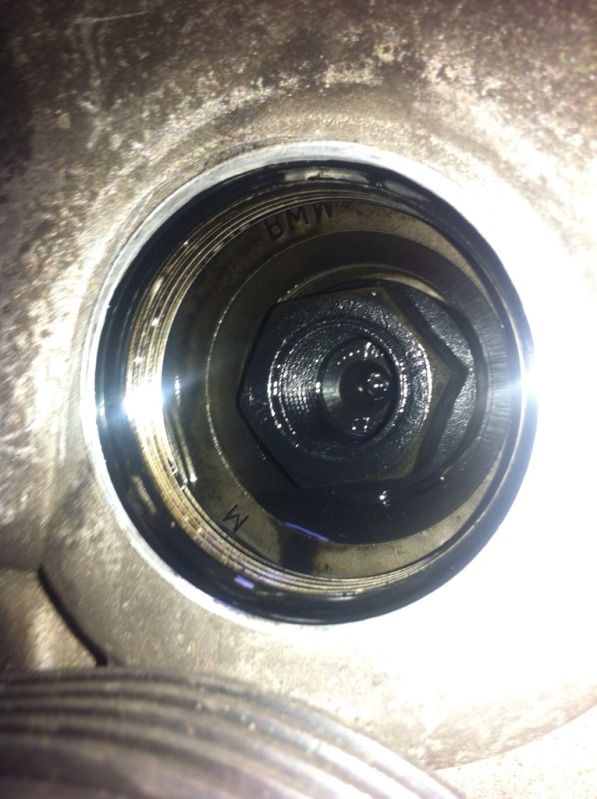 First job is to screw in the larger outer collar of the special tool 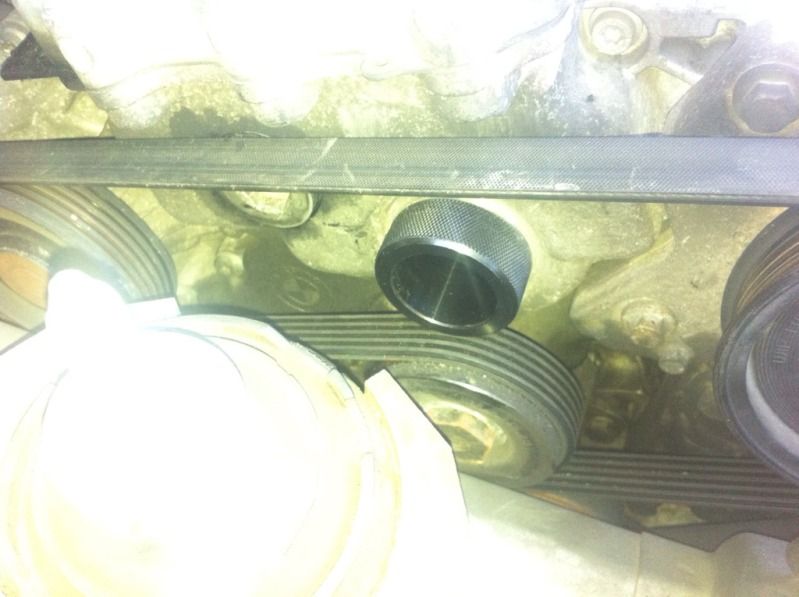 Then you can undo the nut (21mm iirc)  Next screw in the smaller part of the tool before undoing the 3 nuts which hold the pump onto the engine block. If you undo the nuts and start to try and remove the pump you'll find it very difficult to screw the middle part of the tool in. Once the middle part of the tool is screwed in, then you can remove the 3 nuts(13mm). One is underneath the pump and you'll need a longish extension bar to comfortably get to it. with the nuts removed its then simply a case of screwing the bolt into the middle part of the tool and this will push the pump off the sprocket. With the pump off the car i gave it an external clean up with some carb cleaner and a tooth brush. 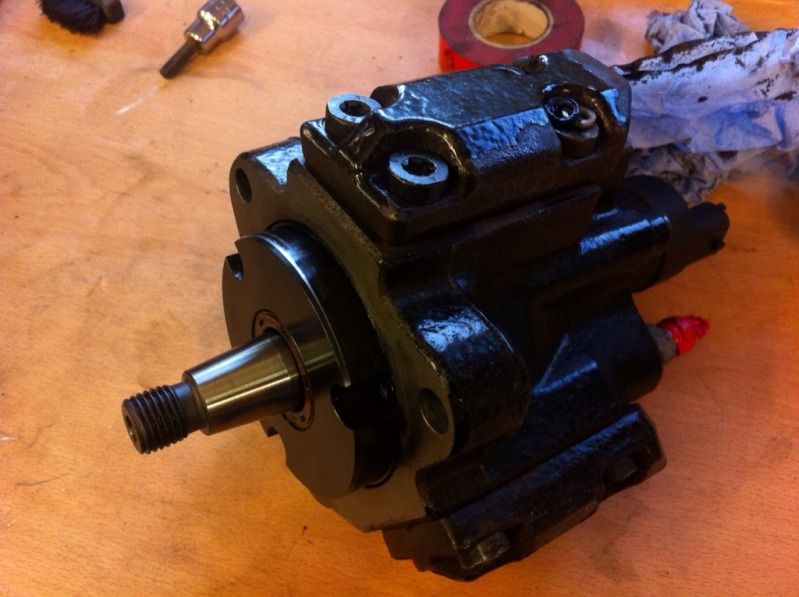 I had noticed where there appeared to be fuel leaking from so i removed the cover from that section of the pump. With the cover removed it was quite obvious that a couple of the little O rings were damaged 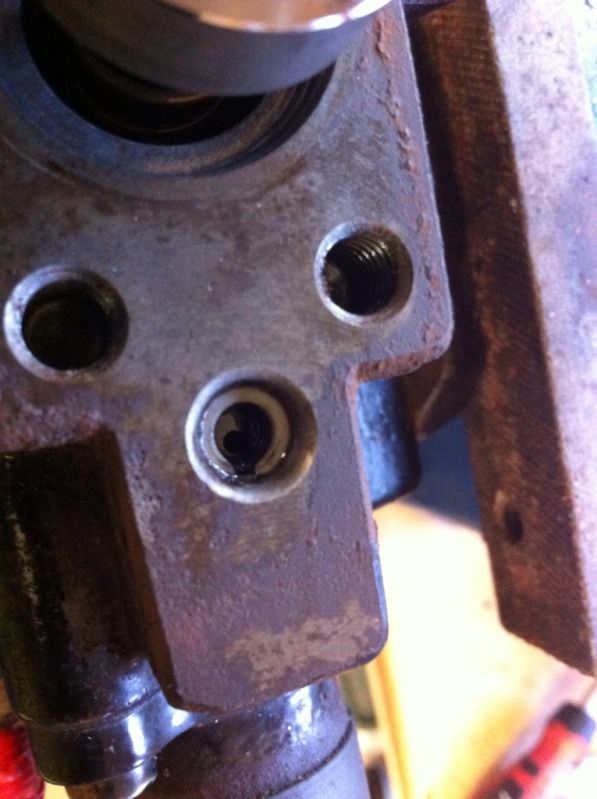 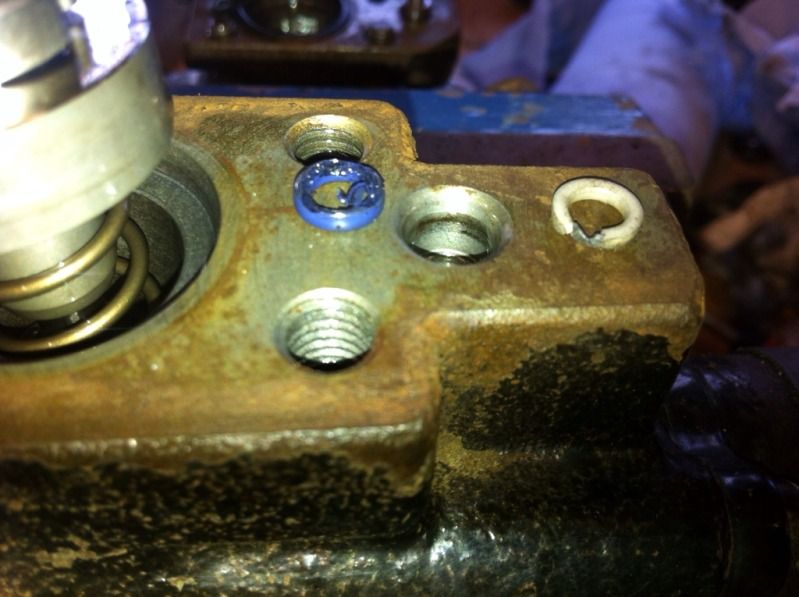 Tbh there's nothing particularly scary about taking the pump apart. I'd be tempted to do it in a tray so that you're unlikely to lose any bits accidently, and it makes cleaning everything easier. So tomorrow evenings job is to actually replace all the seals and get the pump back on the car. The seal kit can be got from GSF, it was £20 +vat. I had no luck going through dealers or bosch service agents, dealers didn't have the parts and the bosch service centres wanted to charge me for them to do the work and weren't prepared to sell me the seal kit on its own. My pump had the model code 0 445 010 011 which meant i needed the seal kit ending in 454. Hope that's of some use so far |
|
|
|
|
18th September 2013, 11:16
|
#10 |
|
Newbie
rover 75 saloon Join Date: Sep 2011
Location: rainham
Posts: 26
Thanks: 8
Thanked 1 Time in 1 Post
|
hi there
would you by any chance have the full number for the orings from gsf as iv looked and cant find them on there......this would help me so much . many thanks |
|
|
|
 |
|
|


 Linear Mode

