
|
|
|
|
|
|
||
|
|
||
 26th August 2011, 02:22
|
#1 |
|
Been round the block

75 Tourer Join Date: Apr 2009
Location: Cannock
Posts: 4,125
Thanks: 3
Thanked 189 Times in 121 Posts
|
After a mamoth undertaking by Sean (Radioguy) Roewe 750 parts arrived to test fit.
Roewe bumper Unpainted, 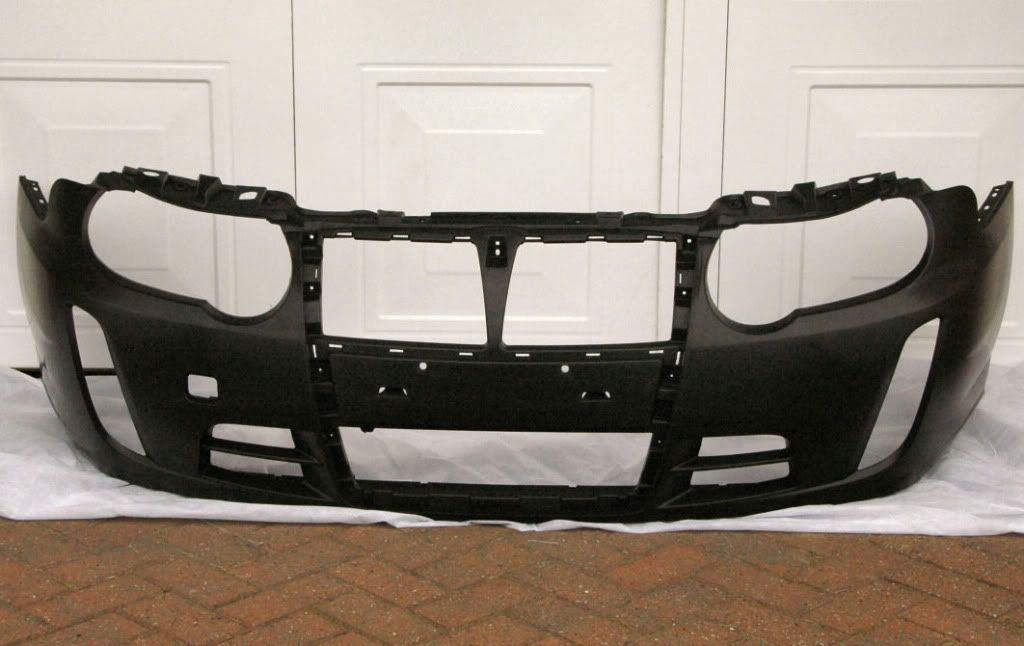 Air ducts push in from the front, secured by barbed plastic blades that are part of the air ducts. 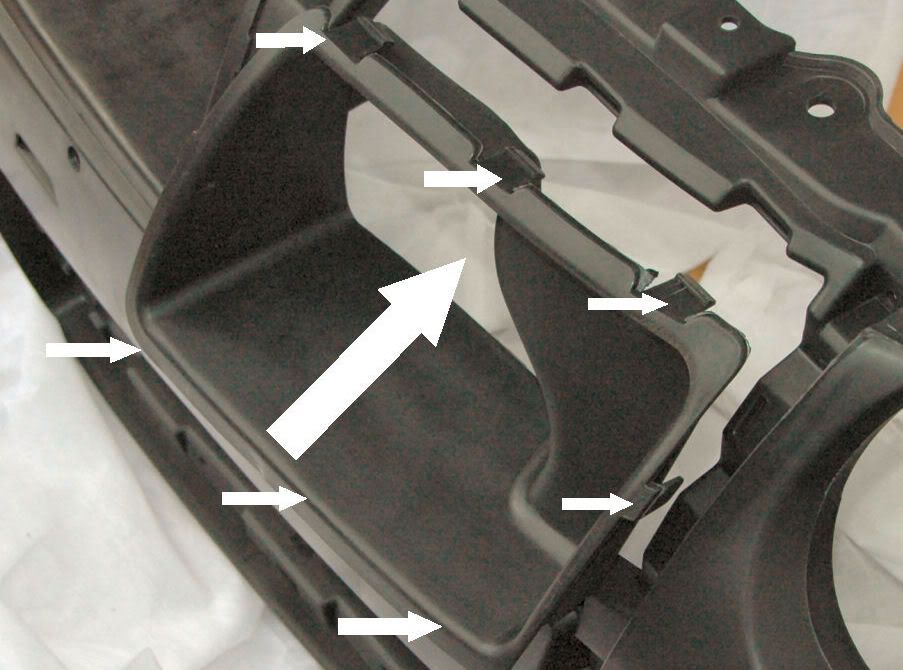 Combined fog/indicator light units (Note the projector type fogs) 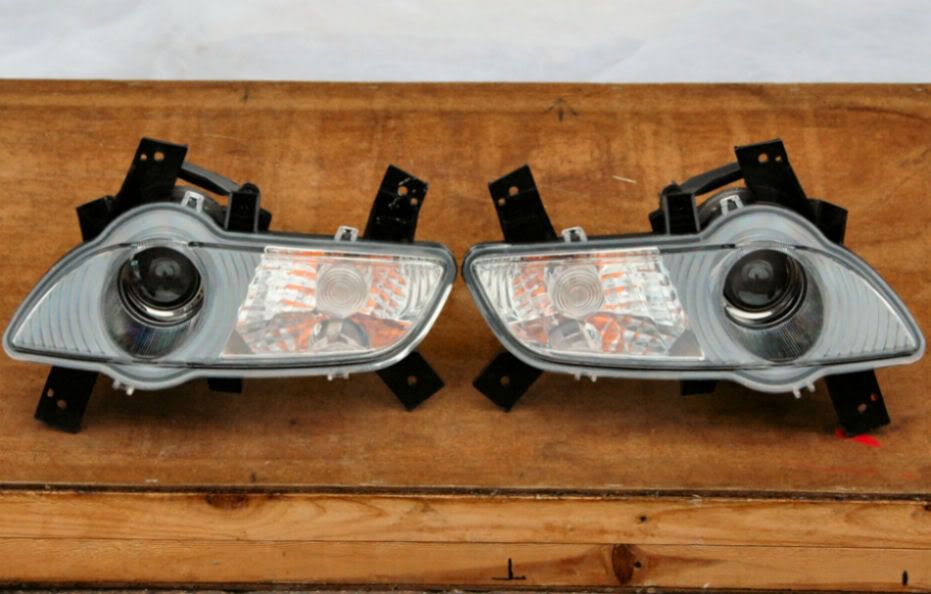 Can be either fixed to the mounts with captive screws 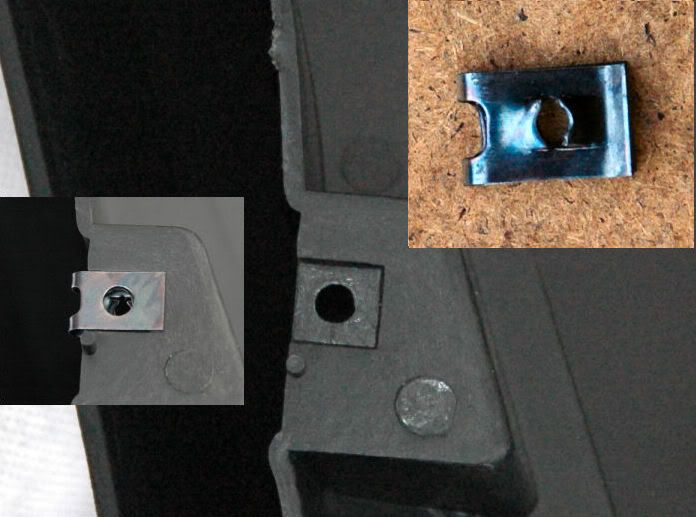 Or my prefered method, brass nuts & bolts, bit fiddly but hey ho. Note the indicator bulb holder is different to MkI & MkII, the plug socket is also different meaning MkI & MkII loom plug will not fit either. 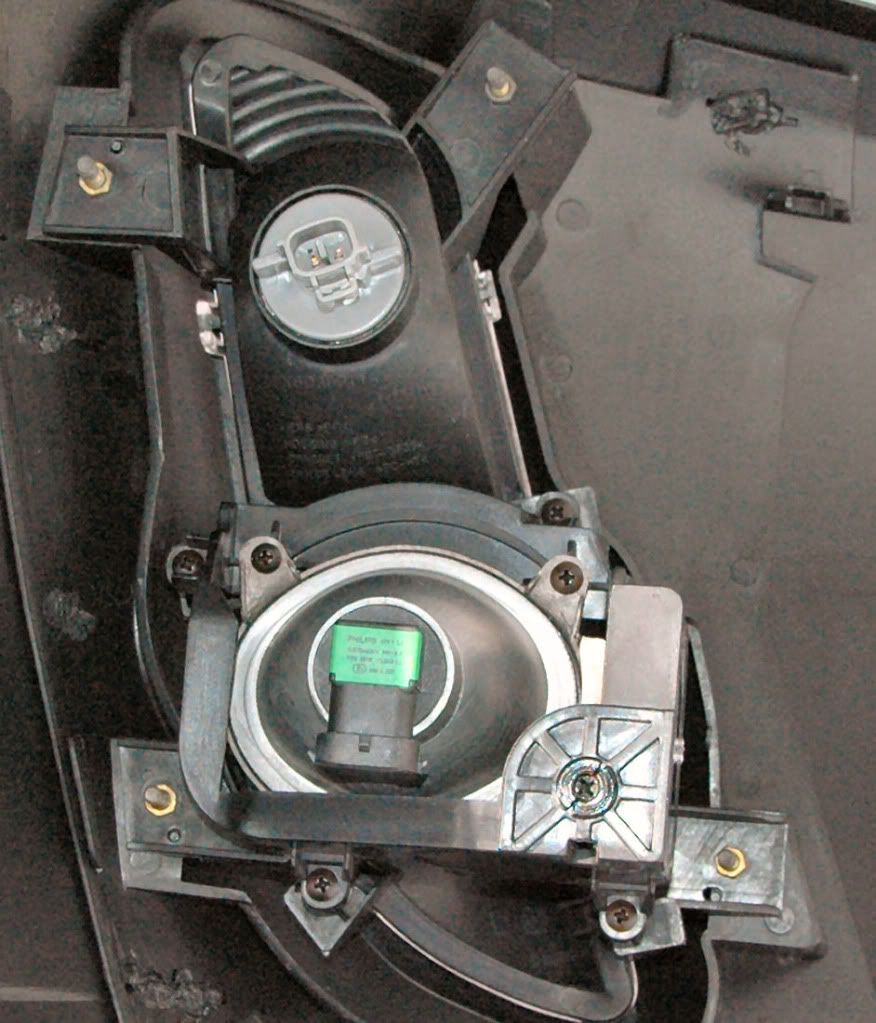 As you can see 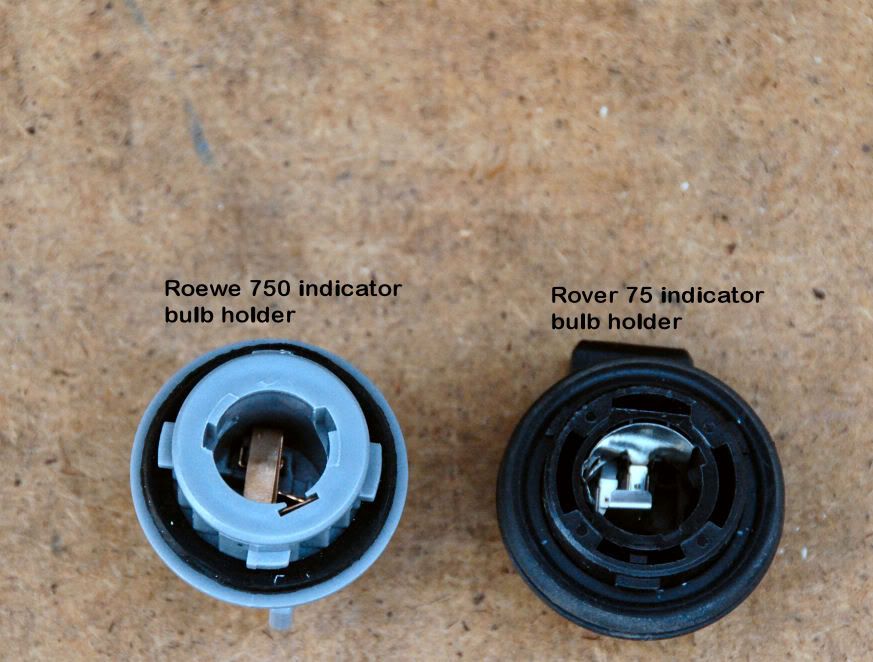 No problem to me tommy! hey presto, roewe indicator bulb holders 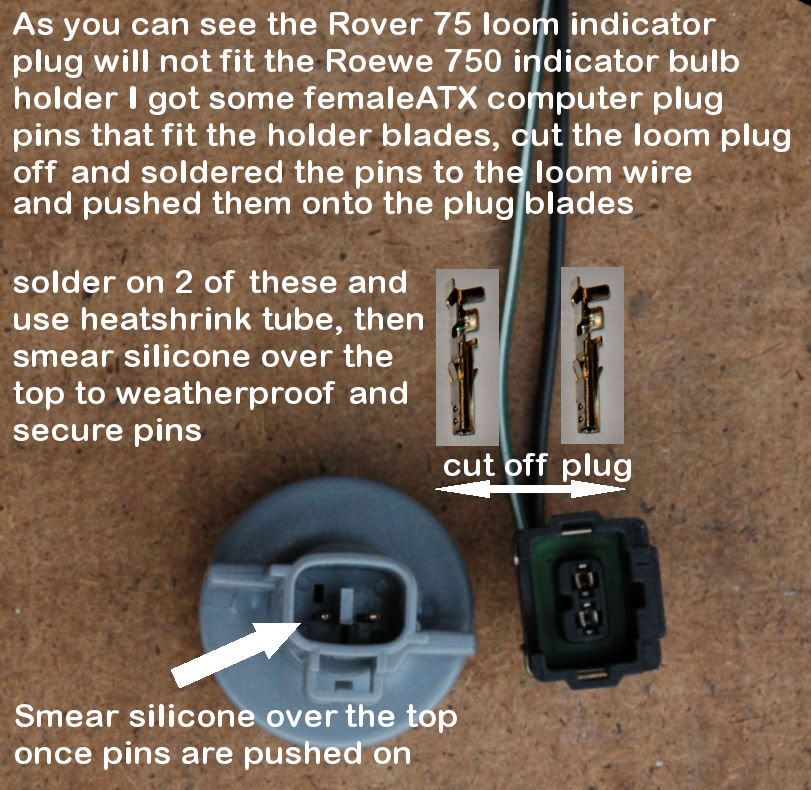 Lower side grilles. 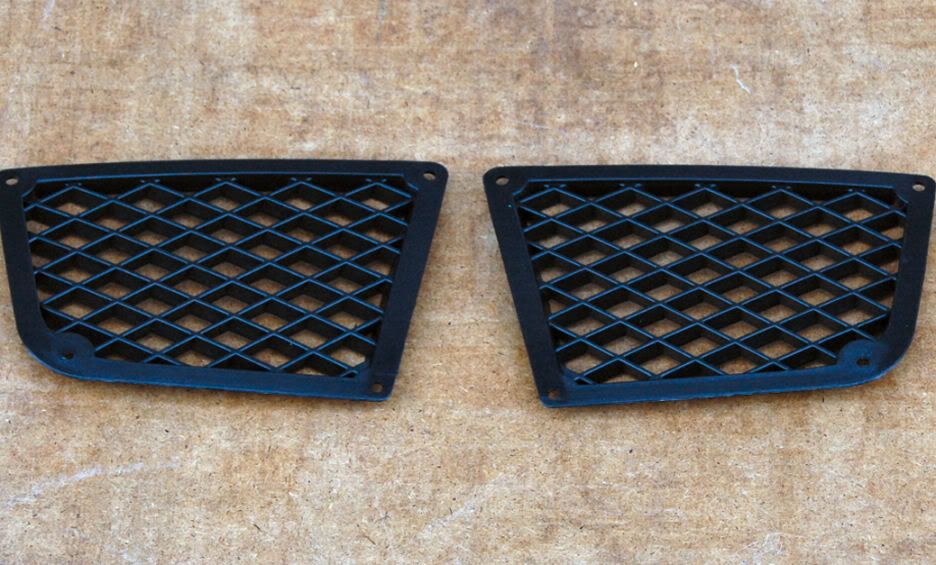 These are held in place by 4 plastic pins that protrude through the 4 holes in the grille. They can be held in place by either a hot iron, malting the plastic pin to the grille. I prefered a epoxy adhesive. 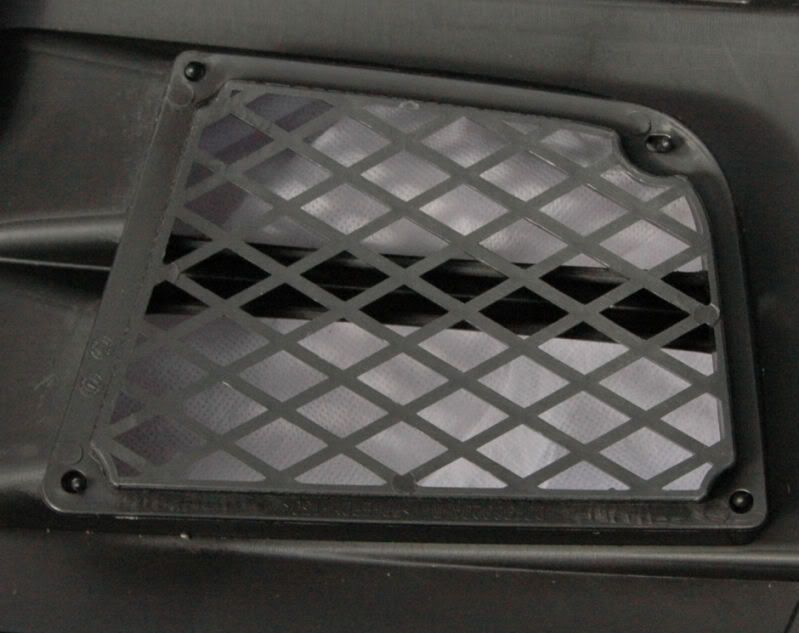 Main grille. 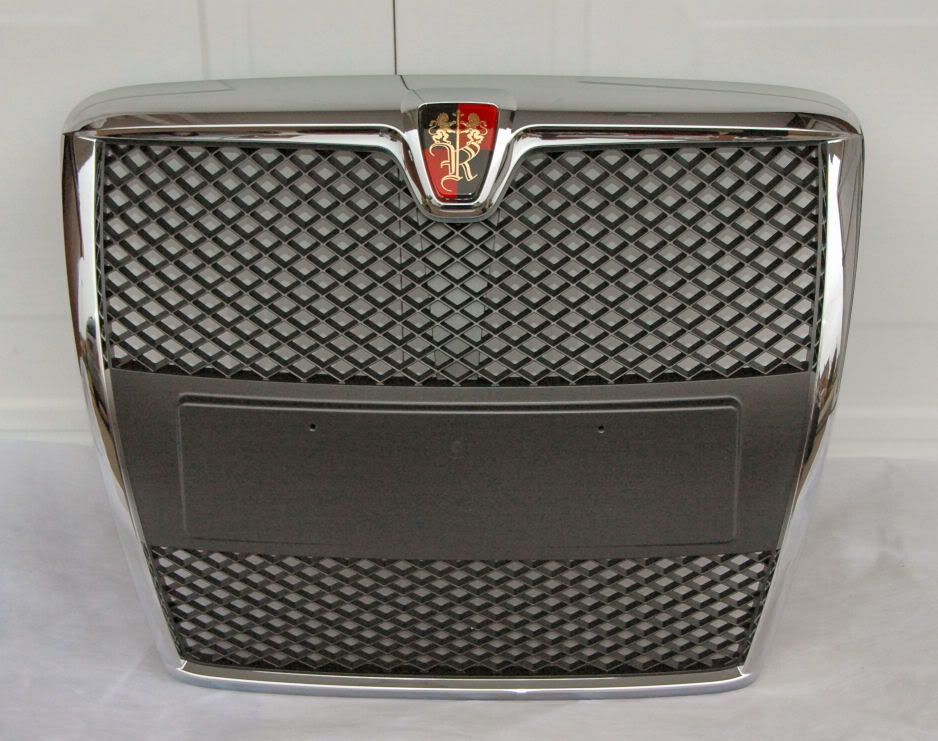 Secured to the bumper by 2 bolts at the top, and 13 suitable pan head screws. Start at the top working your way down the sides, pushing the grille towards the bumper ans you work your way down the grille, as the grille is a little less convex than the front of the bumper, but flexes ok. 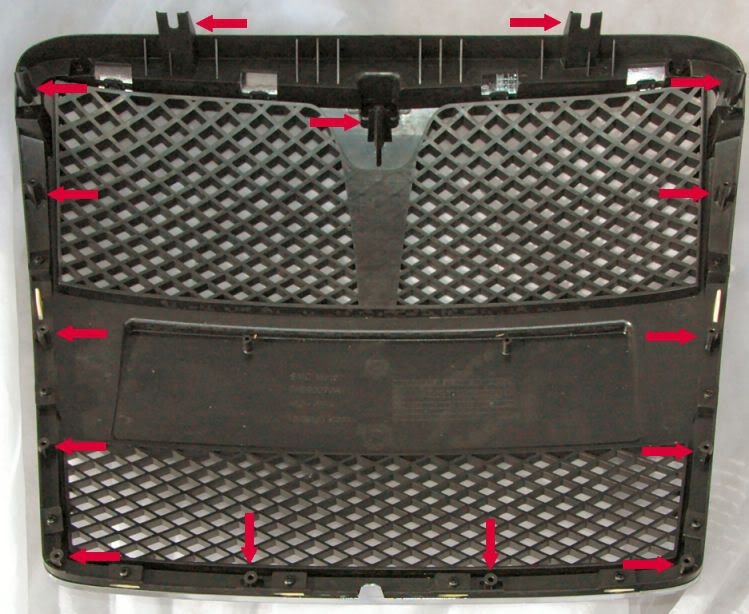 Assembled 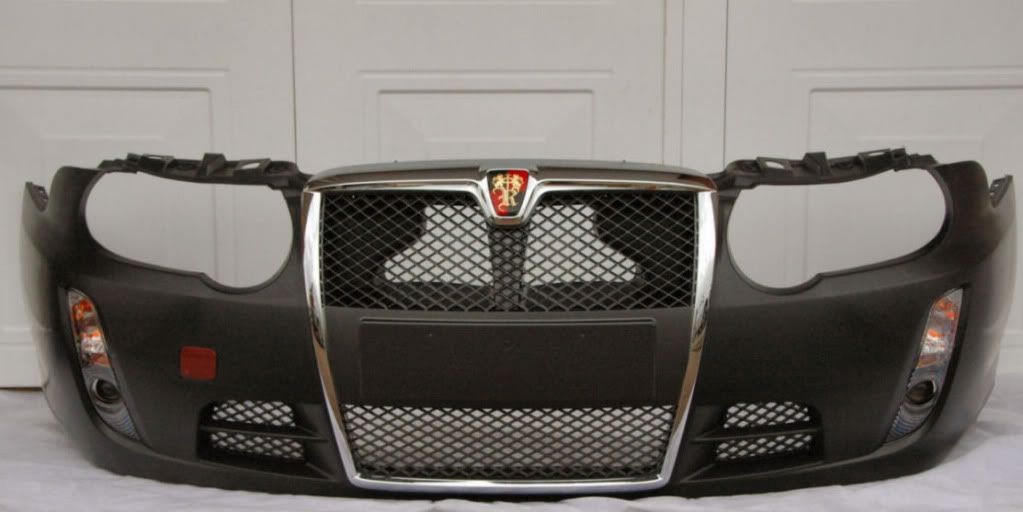 Bumper bolts direct to the slam panel.  Fitting is straight forward, the undertraty meets up with the bumper precisely. and the wheelarch liners meet up with the bumper nicely also. 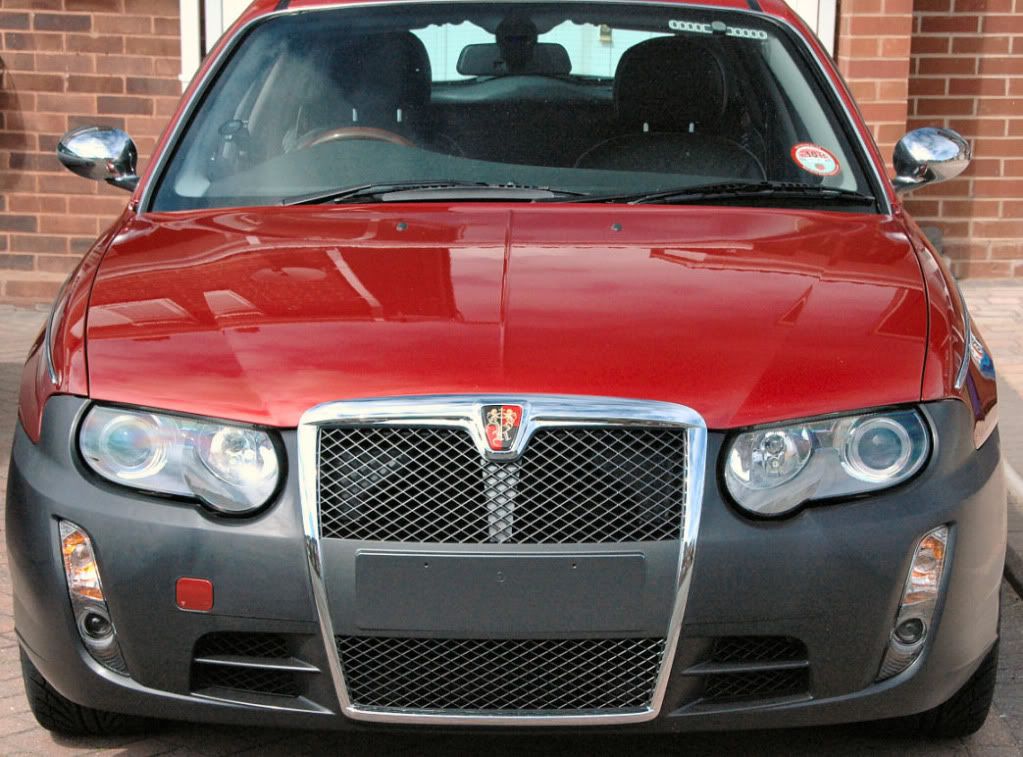 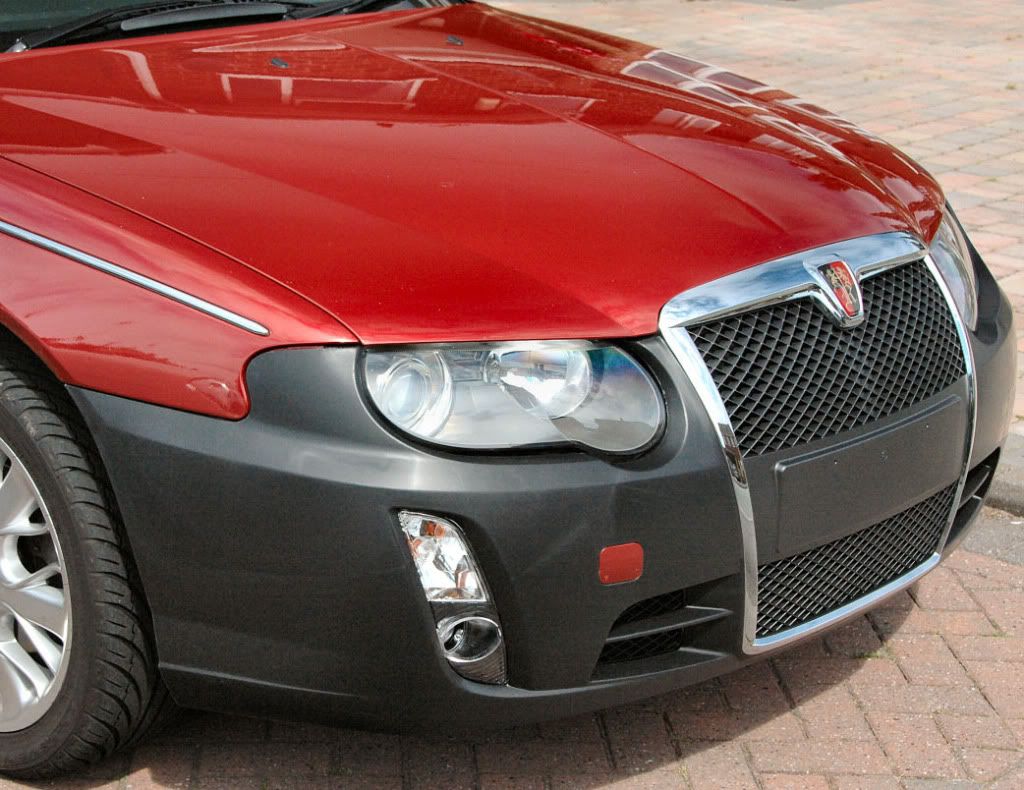 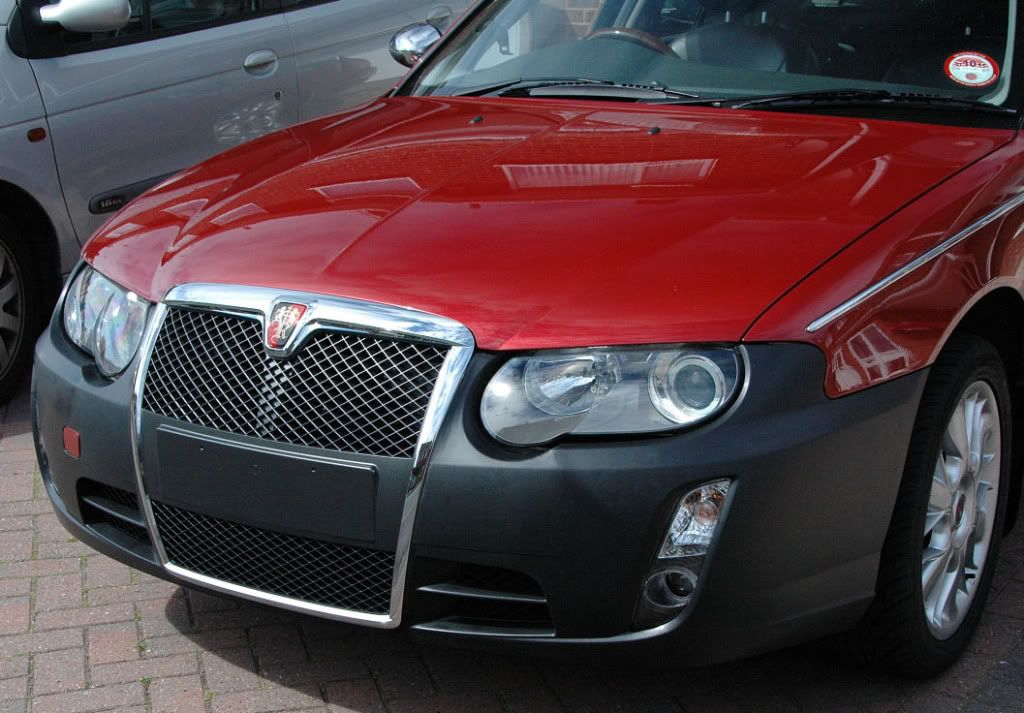 . .sprayed 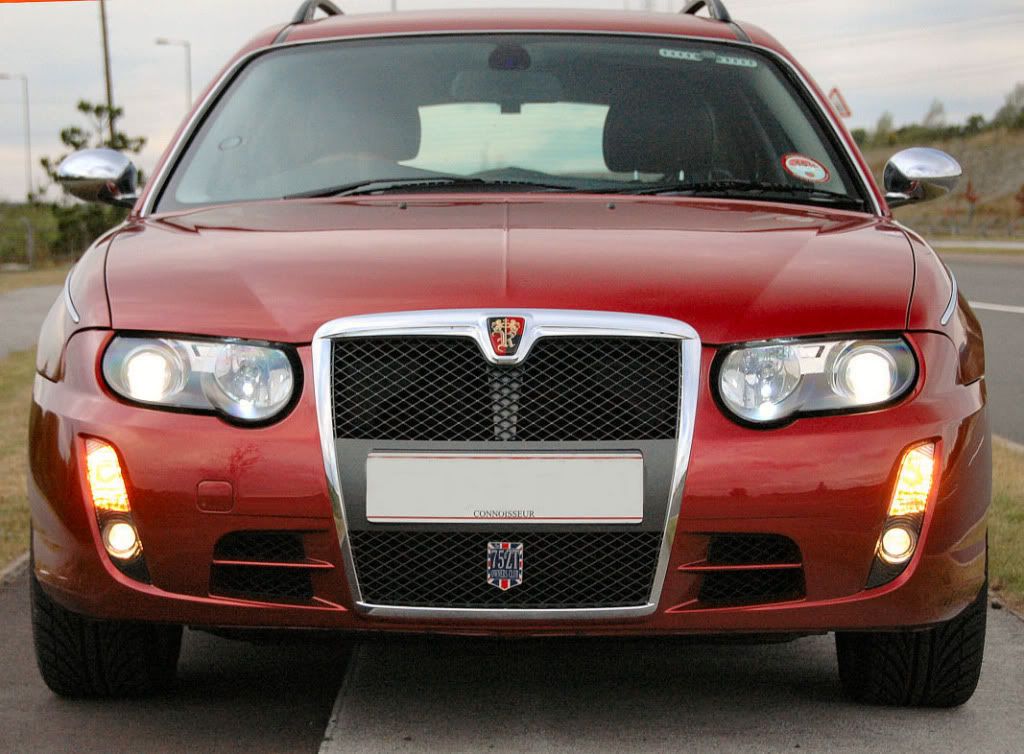 Paintwork by Cannock Resprays 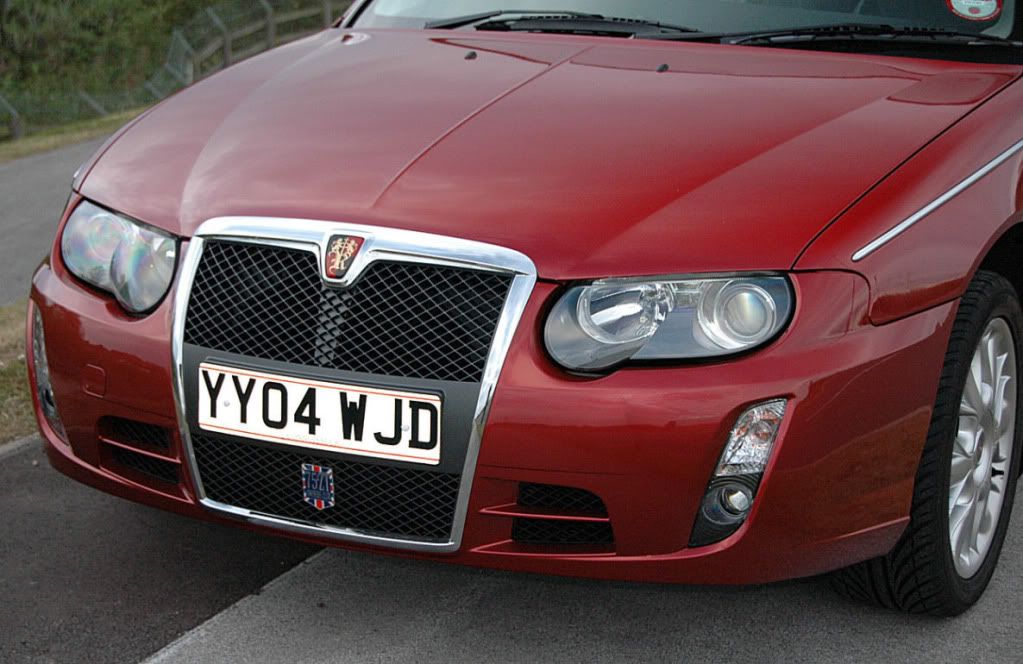 How is this for a shutline 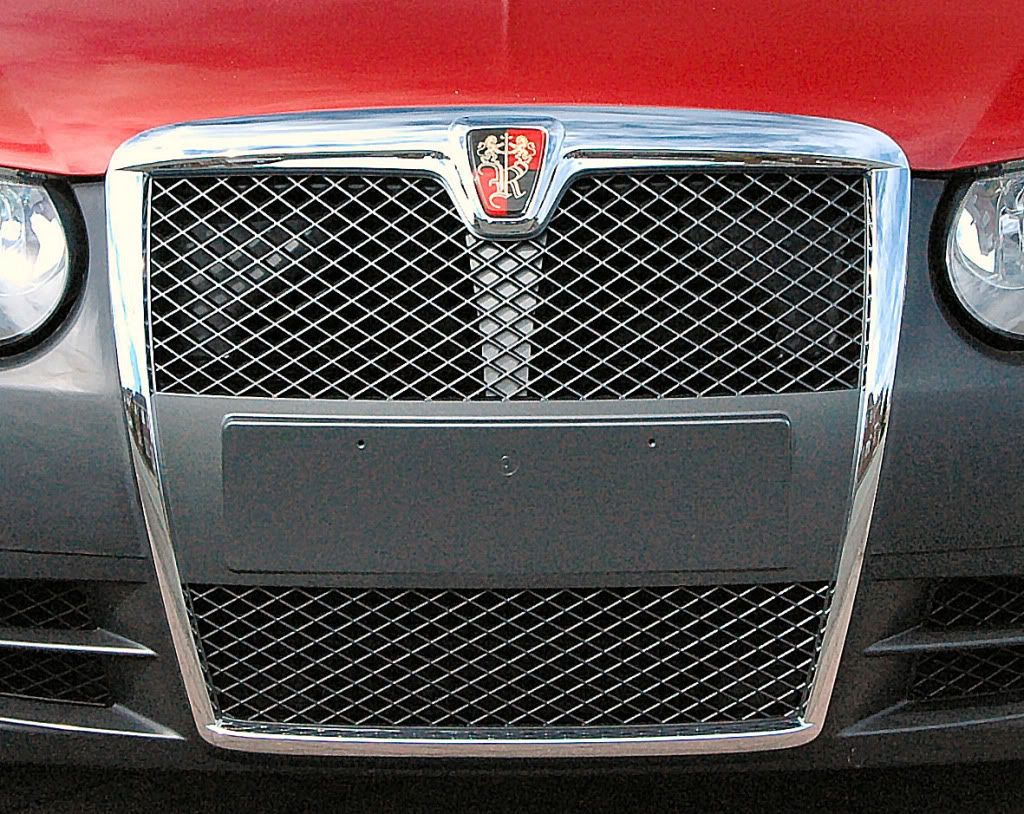 Sean (Radioguy) Has undertaken a mamoth, arduous, and expensive task sourcing all the parts, and a shipping method to the UK. Sean has the only one available at the moment up for sale on eBay, to give everyone a fair chance of owning the first one for ssle in the UK (or anywhere else as far as i know) Contact Sean for shipment ETA, all the hard work has been done,
__________________
If at first you don't succeed, hide the evidence Last edited by Devilish; 26th August 2011 at 02:29.. |

|

|
|
26th August 2011, 04:04
|
#2 |
|
Posted a thing or two
mgzt 160 1.8 lpg Join Date: Mar 2010
Location: newcastle upon tyne
Posts: 1,973
Thanks: 5
Thanked 72 Times in 64 Posts
|
I must say that looks very impresive
__________________
http://i1030.photobucket.com/albums/...0/Photo389.jpg |
|
|
|
|
26th August 2011, 04:42
|
#3 |
|
Posted a thing or two
Rover 75 Connoisseur CDT Saloon and MGF SE Join Date: Jun 2011
Location: Royal Tunbridge Wells
Posts: 1,184
Thanks: 0
Thanked 2 Times in 2 Posts
|
Looks good
 Apart from the Roewe badge on the grille Apart from the Roewe badge on the grille |
|
|
|
|
26th August 2011, 06:12
|
#4 |
|
NI/ROI RS

ZT-T 190 / 75 Diesel x3 / 6 door limo / 216 Cabby / Rover 25 van Join Date: May 2009
Location: Antrim
Posts: 8,103
Thanks: 299
Thanked 1,046 Times in 568 Posts
|
Quite frankly an awesome edition for any mk2 owner. I must admit, id be tempted to do it to the zt as it needs a front respray. Final kit costs will be what its all about.
Again well done to sean, he has done so much for the forum, we should ship him a 75 to canada!
__________________
Cheers, Colin Robson Rover Repair on Youtube DISCOUNTED MTEC BRAKES FOR ALL MG ROVER'S Braided hoses, more coating and pad options for 2024 |
|
|
|
|
26th August 2011, 06:29
|
#5 |
|
Passed Away
75 contemporary se cdti Join Date: Dec 2010
Location: Liverpool
Posts: 1,579
Thanks: 0
Thanked 0 Times in 0 Posts
|
Superb mod and i for one like the badge!
This is going on my wish list  Eric |
|
|
|
|
26th August 2011, 07:16
|
#6 |
|
This is my second home

Rover 75 CDTi Connoisseur SE & MG ZT Saloon 190 Join Date: Jun 2007
Location: Coven
Posts: 12,523
Thanks: 526
Thanked 1,877 Times in 885 Posts
|
great pics Steve with the usual how to built in, twas a great day yesterday and I can tell anyone who is a bit unsure about the Roewe badge that it looks superb in the flesh as does the whole bumper look absolutely awesome !
I have just fitted a premium bumper on mine but am now seriously considering fitting one of these instead, the top of the chrome grille is a lot thicker than the premium and as Steve mentioned you cant see the join !
__________________
www.midlandsnanomeets.co.uk Robs Car Gallery Coven near Wolverhampton WV9 2000 Cowley Built Rover 75 2.0 V6 Club SE/ Atlantic Blue/ Sandstone/Walnut (daily driver) 2003 Land Rover Freelander 1 TD4 HSE Helsinki Blue/Black Leather (swmbo daily driver) |
|
|
|
|
26th August 2011, 07:24
|
#7 |
|
This is my second home
Rover 75 Saloon Join Date: Feb 2011
Location: Stanley
Posts: 3,334
Thanks: 240
Thanked 303 Times in 172 Posts
|
Looks stunning - really good end result
 |
|
|
|
|
26th August 2011, 07:37
|
#8 | |
|
I really should get out more.......

75 V8 Connoisseur SE Saloon: 75 V8 Contemporary SE Saloon and others!!! Join Date: Feb 2009
Location: Warwick
Posts: 2,320
Thanks: 1
Thanked 180 Times in 77 Posts
|
Quote:
It does look from your photos that the gaps are larger. I wonder also if there are any insurance implications both of fitting a modified front end, and of using non-EU homologated lighting parts, including the foglights. Have you declared the mod to your insurers  . .
__________________
Best regards, Jeremy. Last edited by Jezzer 1; 26th August 2011 at 07:40.. |
|
|
|
|
|
26th August 2011, 07:58
|
#9 |
|
ZT, 75 & 260 Rescue
2002 MG ZT 260 (007), 2003 MG ZT-T 260 SE, 2004 75 CDTI Tourer Join Date: Feb 2008
Location: East Brent
Posts: 2,447
Thanks: 88
Thanked 50 Times in 29 Posts
|
Very impressive bit of work, Steve.
__________________
I counted them in and I counted them out (with apologies to Brian Hanrahan) - 005, 007, 019, 051, 103, 288, 354, 455, 577, 700 - the story continues. http://www9.mg-cars.org.uk/mgoc260/f...lies/smile.png |
|
|
|
|
26th August 2011, 08:29
|
#10 | |
|
NI/ROI RS
ZT-T 190 / 75 Diesel x3 / 6 door limo / 216 Cabby / Rover 25 van Join Date: May 2009
Location: Antrim
Posts: 8,103
Thanks: 299
Thanked 1,046 Times in 568 Posts
|
Quote:
Stick a rover 75 badge on it and who would know, its simply a chinese spec replacement oem premium grill bumper. Tell them that and its truthful and honest. Its like the mgb guys changing from rubber to chrome bumpers!
__________________
Cheers, Colin Robson Rover Repair on Youtube DISCOUNTED MTEC BRAKES FOR ALL MG ROVER'S Braided hoses, more coating and pad options for 2024 |
|
|
|
|
 |
|
|


 Linear Mode

