
|
|
|
|
|
|
||
|
|
||
|
|
 28th November 2014, 10:55
|
#1 |
|
Passed Away
Rover 75 CDT 03 auto Conn. SE Join Date: May 2009
Location: London
Posts: 2,885
Thanks: 104
Thanked 254 Times in 204 Posts
|
I have been asked to describe the Hydramount removal so here goes: THIS IS ON A DIESEL.
hopefully the one pic explains it all. 1. remove the engine undertray and one of the 15mm lower engine mount bolts. Loosen the other lower mount bolt so that it hangs free and will not prevent the engine being swung at the top (see later). 2. Remove the engine cover and then remove the six bolts and one nut marked 'A'. It will aid removal of the casting assembly if you just loosen the bolt marked 'C'. 3. now jack up the engine with wood between the sump to protect it. 4. Now remove the four bolts marked 'B'. If the casting starts to tilt as you undo these bolts then you must align the engine otherwise it will be extremely difficult to remove them. 5. You can now wriggle the casting with all its attachments off of the Hydramount. 6. Hopefully you will be able to unscrew the mount (anticlockwise) using a drift on the metal collar but, if it proves hard, try pouring some releasing fluid into the bottom cup (not used on the petrol models) and leave for five minutes. 7. Fit the new Hydramount as tightly as you can without stressing the rubber in any way and then refit the casting with the'B' bolts. Once fully tightened you can remove the engine jacking gear. 8. Refit the six bolts and one nut marked 'A' leaving the two 15mm bolts (highest in the picture) until everything else, including the Lower Engine Mount has been reconnected. 9. Finally, tighten the bolt marked 'C'. 10. Hopefully you will have a remarkably vibration free cabin. GET THE CORRECT TYPE FOR YOUR ENGINE. 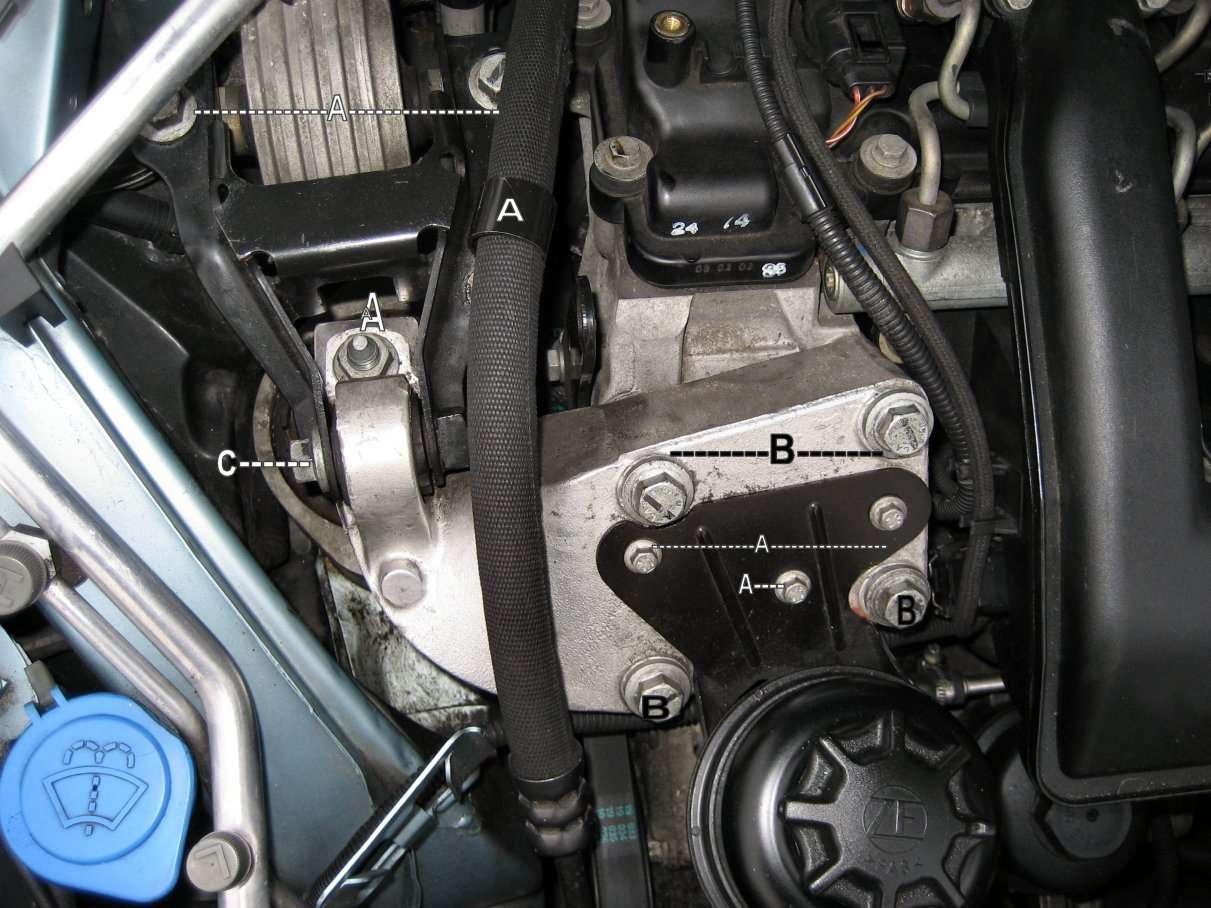 Last edited by wuzerk; 28th November 2014 at 15:03.. |

|

|
|
28th November 2014, 11:02
|
#2 |
|
Posted a thing or two
Rover 75 CDTi Classic saloon, MGB GT, Skoda Yeti Join Date: Aug 2008
Location: Ramsey, Cambs
Posts: 1,874
Thanks: 626
Thanked 635 Times in 430 Posts
|
Brilliant - many thanks for taking the trouble to do this - looks relatively straightforward. I will order the new hydramount from DMGRS in the coming days - there might be a slight delay before I get round to fitting it - I had hernia surgery just over a month ago, and am still slightly sore- I am supposed to take it easy for a few more weeks before tackling anything too strenuous. Anyway, I'll let you know how I get on (and how the switch to 15 inch wheels works out).
All the best Pete |
|
|
|
|
28th November 2014, 22:25
|
#3 |
|
Give to Learn

Freelander 2 Join Date: Aug 2010
Location: West Midlands
Posts: 18,717
Thanks: 1,155
Thanked 6,407 Times in 3,874 Posts
|
Hi Fred.
Excellent post and big thank you for sharing your knowledge with us cheers Arctic 
__________________
Arctic Givology Learn to Give Everything is Achievable  ad altiora tendo. Check out our Nano meet dates http://www.midlandsnanomeets.co.uk/ http://www.the75andztclub.co.uk/index.php?thepage=howto " You do the work , we supply the expertise " |
|
|
|
|
20th December 2014, 16:44
|
#4 |
|
Posted a thing or two
Rover 75 CDTi Classic saloon, MGB GT, Skoda Yeti Join Date: Aug 2008
Location: Ramsey, Cambs
Posts: 1,874
Thanks: 626
Thanked 635 Times in 430 Posts
|
Well, I did my hydramount this afternoon - this guide was very useful.
One issue on my car was that there was a black metal block welded onto the black bracket that goes over the top of the mount, that prevented access to the 18mm nut on top of the hydramount - what a bummer ! See picture below - this block had a yellow blob painted on it. I thought I could remove bolt C and get to remove the bracket to get at the nut, but no the bolt is too long to clear the inner wing when you try to withdraw it. So, I had to undo the fixings for the steel pipework that runs above the bracket (8mm bolts on the mounting on the inner wing, and brackets on the slam panel), to move the pipes slightly so that the bracket can be swung upwards after loosening bolt C, to allow access to the hydramount nut. Otherwise, a fairly straightforward job. I squirted some releasing fluid round the mount half an hour before I started, and it came undone with a few taps of a large screwdriver/hammer on metal cut outs. When putting the new mount back in the metal baseplate, a bit of washing up liquid round the rubber base helps it all go together smoothly. A quick test drive showed the car is a bit smoother and quieter and the clutch judder is slightly improved. I still have the irritating zizzing of the door lock buttons though - I suspect this is coming from the road, so perhaps wishbone or anti-roll bushes are to blame. Pete PS: I'll try to put photo in a follow-up post- I am having trouble uploading it (probably too big). Here is the photo: Pete Last edited by Dragrad; 14th April 2015 at 23:35.. Reason: Consecutive posts - Use the edit ;-) |
|
|
|
|
20th December 2014, 18:09
|
#5 | |
|
Passed Away
Rover 75 CDT 03 auto Conn. SE Join Date: May 2009
Location: London
Posts: 2,885
Thanks: 104
Thanked 254 Times in 204 Posts
|
Quote:
|
|
|
|
|
|
22nd December 2014, 16:03
|
#6 | |
|
This is my second home
CDTi Conniosseur SE HLNav Tourer and a Personal Line CDT Conniosseur SE Tourer..for the time being. Join Date: Jul 2010
Location: Cumbria
Posts: 3,639
Thanks: 340
Thanked 423 Times in 294 Posts
|
Quote:
|
|
|
|
|
|
22nd December 2014, 17:09
|
#7 |
|
Posted a thing or two
Rover 75 CDTi Classic saloon, MGB GT, Skoda Yeti Join Date: Aug 2008
Location: Ramsey, Cambs
Posts: 1,874
Thanks: 626
Thanked 635 Times in 430 Posts
|
Dear Jonathan,
I have thought about the crank pulley amongst other things, but since this is a relatively low mileage car (36,000), that stood unused for 5 years after being built in 2005, my current thinking is that the rubber components have aged/hardened due to lack of use and this is the reason for the slightly harsher engine noise/vibration than on my previous 2001 car. The old hydramount and lower engine mounting I have taken off the car seem hard/rigid compare to the slightly softer, more flexible feel of the new items, so this supports this theory. Replacing the engine mounts is a cheaper option as a first try compared to the crank pulley. Do you think the crank pulley could be at fault after such low mileage ? - what are the symptoms ? - has anyone on here found that changing the pulley makes the car smoother ?? From reading this forum, there could be other avenues to explore, such as cleaning out the inlet manifold (on the 'to do' lost) or changing the lower wishbone bushes - these can affect engine vibration/smoothness, apparently. One thing at a time ! Thanks for your comments, and I will be interested in any experience you or other members have on reducing engine harshness/vibration. It is not a serious problem on my car, I am really just 'fettling' it to try to get it back to 'as new' condition as possible. Cheers Pete |
|
|
|
|
25th April 2015, 20:57
|
#8 |
|
This is my second home
N/A Join Date: Feb 2010
Location: Suffolk
Posts: 6,867
Thanks: 0
Thanked 397 Times in 302 Posts
|
Thanks for the guide - halfway through the job and I just thought I'd say that having the big black metal block over the bolt isn't a major problem - but not having a deep 18mm socket is!
You need one, I need one  |
|
|
|
|
26th April 2015, 07:32
|
#9 | |
|
Passed Away
Rover 75 CDT 03 auto Conn. SE Join Date: May 2009
Location: London
Posts: 2,885
Thanks: 104
Thanked 254 Times in 204 Posts
|
Quote:
|
|
|
|
|
|
26th April 2015, 20:16
|
#10 | |
|
This is my second home
N/A Join Date: Feb 2010
Location: Suffolk
Posts: 6,867
Thanks: 0
Thanked 397 Times in 302 Posts
|
Quote:
In my case I had to use a 36" breaker bar to undo basically all of the bolts in this job - they were all horrifically tight (much tighter than the torque figures in RAVE). |
|
|
|
|
 |
|
|


 Hybrid Mode
