
|
|
|
|
|
|
||
|
|
||
 11th May 2019, 16:58
|
#11 | |
|
MG ZT Join Date: Jan 2011
Location: Newcastle Upon Tyne
Posts: 20,151
Thanks: 3,565
Thanked 10,837 Times in 5,718 Posts
|
Quote:
Then blade A will fit into case C Make sure you transfer the PCF7930AS chip from the old key back to part D, ensuring before the transponder gets lost because you are using a cheap casing, to place a blob of blu tac into the casing where the transponder sits. Then fit the remote board to case C, and clip rear case D to the case C part and ensure the remote pcb buttons both work, if not you will have to clean the moulding flash out of the casing to allow the buttons to work. And if you get stuck, you can order one of THESE and fit your electronics to the casing. Is that any clearer for you? Brian  |
|

|

|
|
12th May 2019, 10:53
|
#12 | |
|
Posted a thing or two
Rover 75 Saloon Join Date: Apr 2019
Location: Under the car
Posts: 1,840
Thanks: 210
Thanked 244 Times in 221 Posts
|
Quote:
These people supply keys for £100 each but they don't mention the VIN at all - https://remotekey.co.uk/rover/377-2/. I don't understand how they can cut the shaft without the VIN.  I also don't understand why anything needs re-programming when I've got the 2 original transponders and the 2 original circuit boards (which can be put in the 2 new keys). I also don't understand why anything needs re-programming when I've got the 2 original transponders and the 2 original circuit boards (which can be put in the 2 new keys). |
|
|
|
|
|
12th May 2019, 11:07
|
#13 | ||
|
Posted a thing or two
Rover 75 Saloon Join Date: Apr 2019
Location: Under the car
Posts: 1,840
Thanks: 210
Thanked 244 Times in 221 Posts
|
Quote:
Quote:
|
||
|
|
|
|
12th May 2019, 14:45
|
#14 |
|
Posted a thing or two
Rover 75 Saloon Join Date: Apr 2019
Location: Under the car
Posts: 1,840
Thanks: 210
Thanked 244 Times in 221 Posts
|
Well, Plan A doesn't work. I transferred the blade ok (pic) but the buttons on the cheap new case don't operate the microswitches properly. The lock button sort of works but the unlock button does nothing at all.
 The circuit board works fine on its own (not in a case) - i.e. both microswitches do exactly what they should. The circuit board works fine on its own (not in a case) - i.e. both microswitches do exactly what they should.Time for Plan B then.  Pic - original blade in cheap case. 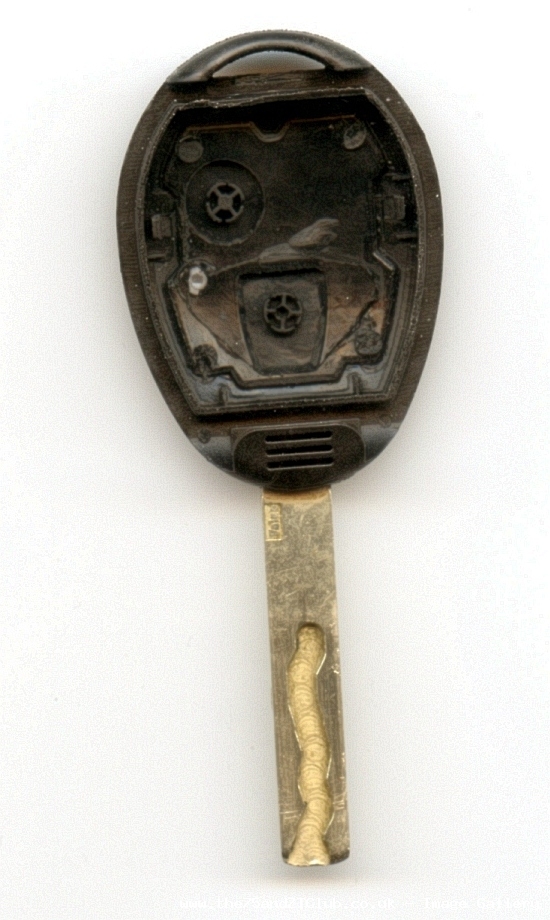 |
|
|
|
|
12th May 2019, 19:47
|
#15 | ||
|
MG ZT Join Date: Jan 2011
Location: Newcastle Upon Tyne
Posts: 20,151
Thanks: 3,565
Thanked 10,837 Times in 5,718 Posts
|
Quote:
Quote:
This should make the buttons on the remote work, the sticking out part on a genuine Valeo casing aligns with a small hole in the PCB, this is not so on a cheap casing. You are 90% there, don't give up now  Brian |
||
|
|
|
|
13th May 2019, 08:40
|
#16 | ||
|
Posted a thing or two
Rover 75 Saloon Join Date: Apr 2019
Location: Under the car
Posts: 1,840
Thanks: 210
Thanked 244 Times in 221 Posts
|
Quote:
Quote:
Here are the two cases side by side - cheapy new one on the left and the car's original Valeo on the right. (I've got two sets of each) For the button system to work, the PCB has to sit at exactly the right level in the button half and stay there when the back is clipped on. The sprigs (arrowed red) on the cheapy button half shouldn't be there at all because they throw the PCB away from the button plungers - this means the plungers don't reach the microswitches and the fob is rendered useless. So I shaved the sprigs off using a small and very sharp wood chisel.* This improved things slightly but it's still not right - the plungers still aren't close enough to the microswitches. The only way to make it work now is to increase the length of the plungers. If I use the heated bolt trick, surely it'll shorten them instead? I think they need shimming - gawd knows how though. If the shims are too fat it'll definitely break the microswitches  , too thin and the plungers still won't reach. , too thin and the plungers still won't reach. NB. * The cheapy case shown here is not the one I used the chisel on.  Last edited by Blink; 13th May 2019 at 08:44.. |
||
|
|
|
|
13th May 2019, 08:56
|
#17 |
|
Posted a thing or two
Rover 75 Saloon Join Date: Apr 2019
Location: Under the car
Posts: 1,840
Thanks: 210
Thanked 244 Times in 221 Posts
|
Brian - there's another thing with these cheapy fobs. The blades they come with have a stepped section at the fob end, where the black pin insert piece attaches. The original Valeo blades do not have a stepped section so they have to be filed down to fit the new black pin insert. Getting this right is extremely difficult without a micrometer and naturally I don't have one! If it's not done exactly right the blade can wiggle slightly (or a lot) when it's mounted in the fob.
|
|
|
|
|
13th May 2019, 09:19
|
#18 |
|
MG ZT Join Date: Jan 2011
Location: Newcastle Upon Tyne
Posts: 20,151
Thanks: 3,565
Thanked 10,837 Times in 5,718 Posts
|
Oh dear, I had some of these type of cases bought as an experiment, the stepped blade is to accommodate the casing being used with a LR Discovery II key blade.
I take it this particular key was sub £5 to buy from the bay of E ? I'd recommend another key from the link I provided, with a view to refurbishing your original key with a decent casing at a later stage. Brian |
|
|
|
|
13th May 2019, 10:00
|
#19 | |
|
Posted a thing or two
Rover 75 Saloon Join Date: Apr 2019
Location: Under the car
Posts: 1,840
Thanks: 210
Thanked 244 Times in 221 Posts
|
Quote:
and the other was £3.03 . I think they're both the same Chinese manufacturer. I've just ordered one from the link you provided - let's see how it pans out. Perhaps there won't be a Plan C. |
|
|
|
|
|
14th May 2019, 14:48
|
#20 | |
|
Posted a thing or two
Rover 75 Saloon Join Date: Apr 2019
Location: Under the car
Posts: 1,840
Thanks: 210
Thanked 244 Times in 221 Posts
|
Quote:
The link Brian gave in post 11 has worked for me - they cut a key just from a picture (I scanned my Valeo key blade and sent them the jpeg). They might be able to do the same with yours, regardless of your fob being different. |
|
|
|
|
 |
|
|


 Linear Mode

