
|
|
|
|
|
|
||
|
|
||
 27th December 2012, 11:32
|
#1 |
|
This is my second home
Rover less ! Join Date: Jun 2011
Location: Tarbolton
Posts: 3,442
Thanks: 393
Thanked 888 Times in 542 Posts
|
There's a lot of topics about key fobs at the moment on the forum, some with the quite expensive retractable ones which although are very neat they are not original.
So for those who want to keep them original here's a guide on how to do it for around £5. I purchased one from the bay and it is a "Valeo" as the original ones were. After opening up the key fob carefully remove the chip and the PC board with battery. Then remove the key blade from the fob. I managed to pull the old blade out of the plastic fob by simply using pliers. 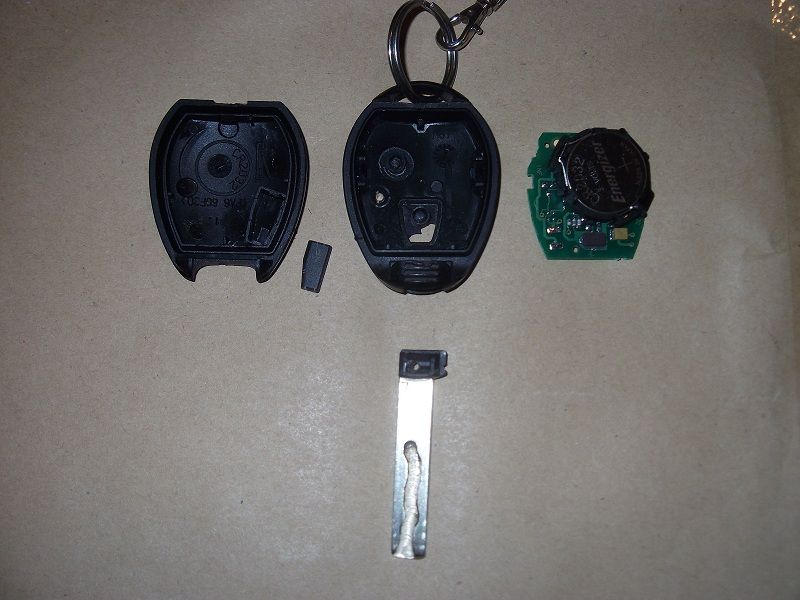 You will note there is a small piece of plastic on the end of the blade. This is separate from the main fob body and is held into the fob body via a small roll pin as shown below. 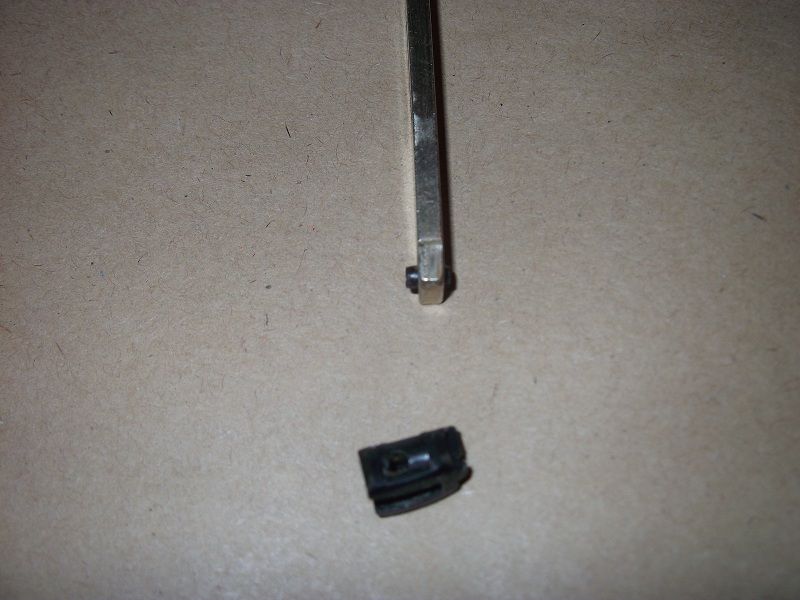 To remove the blank blade from the new key fob I heated the blade using a heat gun. A hair drier may also do the same job then pull the blank blade straight out of the new fob. You will note that with the blade removed from the new fob the hole is the same size as the blade and not like the original fob which had a larger hole to accept the blade and small piece of plastic with roll pin as shown in above photo. The new blade does not have any roll pin and is just moulded into the plastic casing. I removed this small plastic piece and the roll pin from the end of the original blade. Then carefully I drilled a small hole on one side of the new fob to allow the original blade to be located inside the new fob then press the roll pin into the new fob and through the hole in the blade as shown below marked inside circle. 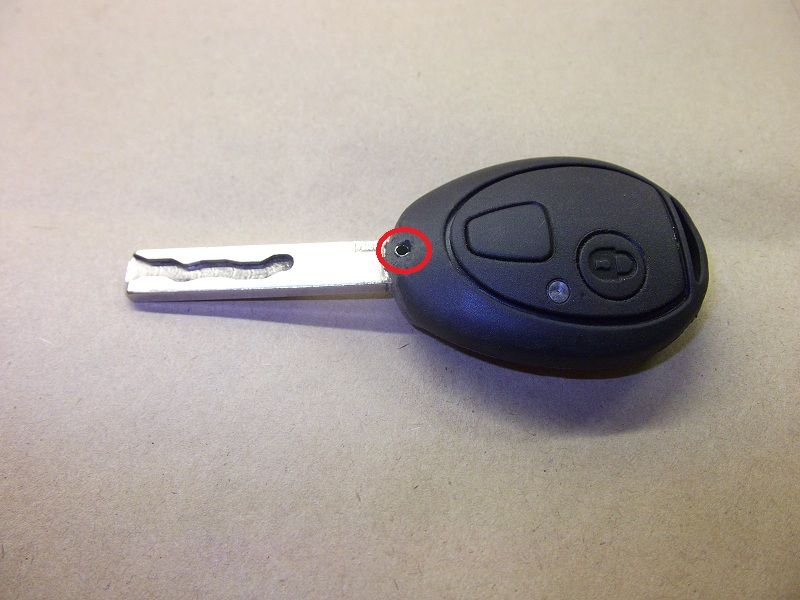 On re assembling I found there was a slight difference in the casings where the PC board was mounted as shown below marked out with red rings. 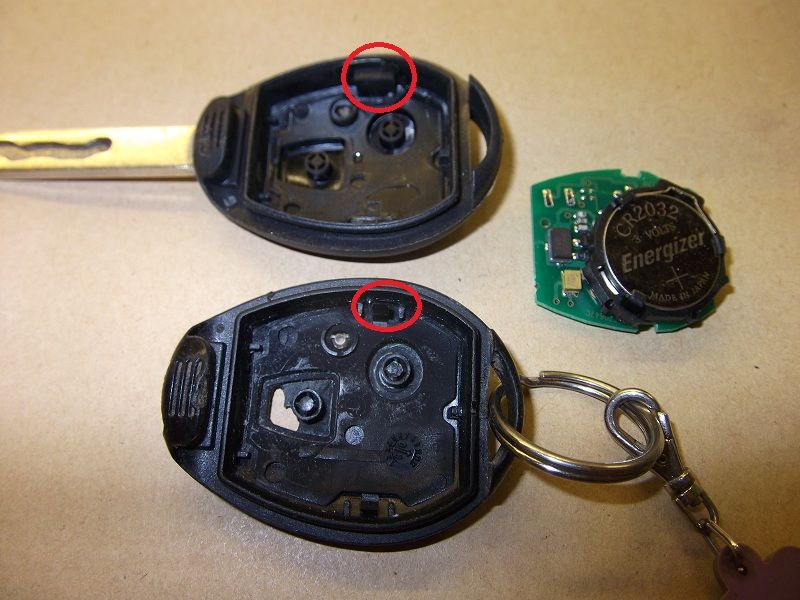 On the new casing (top of photo) the PC board locator is larger than the original one (botom of photo) I simply removed this larger piece using small pliers which then allowed me to re assemble the PC board into the fob. Job done and I am so pleased I have ordered another 2 new fobs as the other one for the diesel is also slightly worn and in due time I'm sure one on the V6 will require replacing. JYJ |

|

|
|
27th December 2012, 13:40
|
#3 |
|
RS South East

Ford fester... blah.... Join Date: Mar 2010
Location: Hastings
Posts: 2,900
Thanks: 29
Thanked 78 Times in 42 Posts
|
__________________
 the name's Bernard but you can call me nursie...... the name's Bernard but you can call me nursie......
|
|
|
|
|
27th December 2012, 15:21
|
#4 | ||
|
This is my second home
Rover less ! Join Date: Jun 2011
Location: Tarbolton
Posts: 3,442
Thanks: 393
Thanked 888 Times in 542 Posts
|
Quote:
Quote:
I don't know how to copy the link from e-Bay but mine was listed as item no 300772888926 if this helps. JYJ |
||
|
|
|
|
29th December 2012, 14:07
|
#5 |
|
Newbie
Rover 75 2.5 Sterling Join Date: Mar 2010
Location: Amsterdam NL
Posts: 23
Thanks: 0
Thanked 2 Times in 2 Posts
|
In your first picture a small rectangular piece is visible. I am doing my fob as well and wonder what it is for. It comes from the fob part on the left in the same picture and I found it in mine as well.
|
|
|
|
|
29th December 2012, 15:20
|
#6 |
|
Loves to post
None Join Date: Feb 2012
Location: Reading
Posts: 466
Thanks: 1
Thanked 15 Times in 15 Posts
|
I just bought new rubber buttons for £6.
|
|
|
|
|
29th December 2012, 18:31
|
#7 | |
|
This is my second home
Rover less ! Join Date: Jun 2011
Location: Tarbolton
Posts: 3,442
Thanks: 393
Thanked 888 Times in 542 Posts
|
Quote:
JYJ |
|
|
|
|
|
29th December 2012, 18:48
|
#8 |
|
Newbie
Rover 75 2.5 Sterling Join Date: Mar 2010
Location: Amsterdam NL
Posts: 23
Thanks: 0
Thanked 2 Times in 2 Posts
|
Ah, I see. Never thought of it. Thanks.
|
|
|
|
|
30th December 2012, 13:52
|
#10 | |
|
This is my second home
01 75 tourer cdt,1973 Rover 3500S,,1974 Rover 3500 Auto,1998 216 SE Coupe, 1968 Morris Minor 1000 Join Date: Jul 2010
Location: bangor/down
Posts: 4,839
Thanks: 62
Thanked 184 Times in 158 Posts
|
Quote:
__________________
Regards Neale [SIGPIC][/SIGPIC] 121st 75 Tourer to be made 15th 75 Tourer CDT Club SE to be made 36th 75 Tourer in Zircon Silver Metallic to be made Membership No 903 I was one of the 541 
|
|
|
|
|
 |
|
|


 Linear Mode

