
|
|
|
|
|
|
||
|
|
||
 21st March 2014, 01:02
|
#21 | |
|
Give to Learn

Freelander 2 Join Date: Aug 2010
Location: West Midlands
Posts: 18,717
Thanks: 1,155
Thanked 6,407 Times in 3,874 Posts
|
Quote:
What gasket seal did you use ? and if you notice I too went 2 yrs with out no leaks but only 3,700 miles so hopefully you using gasket seal you may last longer time will tell us. I still need to sort out my thermostat yet which looks like it will be after the nano meet now Arctic 
__________________
Arctic Givology Learn to Give Everything is Achievable  ad altiora tendo. Check out our Nano meet dates http://www.midlandsnanomeets.co.uk/ http://www.the75andztclub.co.uk/index.php?thepage=howto " You do the work , we supply the expertise " |
|

|

|
|
21st March 2014, 01:19
|
#22 |
|
Premium Trader
Rover 75 Join Date: Nov 2010
Location: Devon
Posts: 33,773
Thanks: 8,837
Thanked 14,831 Times in 8,030 Posts
|
I have changed a few KV6 thermostats, I think the key to stopping the leaks is to ensure the surfaces of the engine where the O rings seat are perfectly clean, I clean using scotchbrite before fitting the new parts.
__________________
Lest we forget..
|
|
|
|
|
31st March 2014, 00:13
|
#23 |
|
Give to Learn
Freelander 2 Join Date: Aug 2010
Location: West Midlands
Posts: 18,717
Thanks: 1,155
Thanked 6,407 Times in 3,874 Posts
|
I have had the misfortune recently to find that my thermostat is leaking into the V of the engine.
I have recently found a leak from the thermostat on my MG ZT 190 V6. I check the car once a week for all hose leaks etc, all fluids levels be it oil or water, so as per usual on 9th March Sunday I did all the relative checks and everything was fine. In the mean time I took delivery of a new coolant cap which I had purchased from a vender to see it's quality for the price that is another story, anyways on the 12th March coolant cap arrived the very next day 13th March i thought i will change the cap and see how it looks and works with regards to the original. Once i took the original cap of the header tank i could see that the level of coolant had drop from the max mark to a fraction below the minimum mark only checked three days ago all was well and have only driven the car 30 miles in those three days, so i take of the engine cover look into the V and there is the problem looking me right in the face coolant loss from the thermostat albeit only a little but never the less a leak.  1 1As you can see this is very fresh coolant as it is as red as blood, now my MG ZT 190 was fitted with a new thermostat on the 21/01/12 and as only covered approx 3,700 miles since it was fitted. Fig 2  2 2I was surprised to find this in the mean time i have not driven the car and ordered a new thermostat which arrived 18/3/14. Fig 3  3 3Well I finally got round to finding enough time to change the thermostat Saturday 29th March, first I decide I will take of the engine cover and check to see if the leak as got any worse, the answer was no Fig 4/5/6 below.  4 4 5 5 6 6So task begins I take off the under tray so I can remove the bottom coolant hose to drain the system and the first of the nightmare shows it's ugly head green A/C fluid on the under tray Fig 7  7 7As the car is on the ramps at this present time I look up directly where the A/C fluid was in relation to it on the under tray to be greeted with even more green fluid on the under side of the compressor Fig 8  8 8I then look closer only to find also that the oil cooler maybe leaking also but yet to prove this Fig 9  9 9Then I decide to shine a torch all over the under side of the engine and find even more leaks, around the gear box. Fig 10  10 10further up more leaks from the timing belt cover, now this happened just after I had the belts changed in 21/12/2012 the car was taken back and the camshaft oil seals where replaced, due to them leaking not long after the belt change, I kept an eye on it for a while but now it is back again Fig 11  11 11This engine was as dry as bone until the belt change in 2012 coincidence ? if so the camshaft leak is not that's for sure, rubbish seals I would say, there is also a leak along the back where the exhaust bolts to the engine I still have to find this source maybe the rear bank cam seals ? Fig 12/13  12 12 13 13There is also a leak around the oil filter or it is traveling to that point from some where else Fig 14  14. 14.I will post how I removed the thermostat and refitted over the next few days keep looking in Arctic
__________________
Arctic Givology Learn to Give Everything is Achievable ad altiora tendo. Check out our Nano meet dates http://www.midlandsnanomeets.co.uk/ http://www.the75andztclub.co.uk/index.php?thepage=howto " You do the work , we supply the expertise " |
|
|
|
|
31st March 2014, 08:22
|
#24 |
|
Doesn't do things by halves
Rover 75 2.5 Connoisseur Auto (1999) Dealer launch model. Join Date: Mar 2007
Location: Former Middlesex
Posts: 20,382
Thanks: 1,587
Thanked 3,749 Times in 3,181 Posts
|
Hello Steve,
The various oil deposits may well have got there by dripping or running from a point higher up. There may also have been spillages when the cambelts were changed. As you say, the seals at the end of the camshaft may be responsible since it's said that they're difficult to fit (perhaps the garage refitted the old ones). It's unlikely that your engine will have sprung several oil leaks since October which aren't connected with the cambelt work. I would clean off the oil as best you can and re-inspect first with the engine running at idle then after a short journey at low road speeds (to limit the spread of oil by airflow due to the car's movement). I agree though about the green deposits on the underside of the compressor. Was that removed by the garage when replacing the belts? Again, if you can, I would wipe off the stains then see if they return. In the meantime proceed with the cooling system repairs. One question Steve: with your skills, why on earth didn't you renew the cambelts yourself? Simon
__________________
"Whatever is rightly done, however humble, is noble." Sir Henry Royce. |
|
|
|
|
31st March 2014, 10:07
|
#25 | |
|
Give to Learn
Freelander 2 Join Date: Aug 2010
Location: West Midlands
Posts: 18,717
Thanks: 1,155
Thanked 6,407 Times in 3,874 Posts
|
Quote:
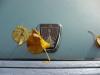
I thank you for your input always appreciated, spillages from when the cam belts were changed, were cleaned up at the time and later on by me. New cam seals were fitted at the time of the change of the belts as I was there watching, I did however have to take the car back because they were leaking after a very short time, and they were changed again, the oil was also present after round the oil filter after the belt fitting this was pointed out when I took the car back for the second set of cam seals to be fitted, the oil filter was again changed, the car as only travelled 3.700 miles since the belt change. Simon the reason I did not change the belts myself at the time were several, I had never done V 6 belts change before, I did not have the tools, and also I did not have the time as I bought the car to save which I knew would need belts, new clutch, tyres all round, a couple of doors and more, but it a been an on going project and looks like it still is  now. now.I think i will as you say clean up and then see if I can see where the point of the leaking is coming from, the A/C was filled at the same time as the cam belts were changed but by the time i took it back to have the seals changed it had leaked. I was told that the condenser pipe seals were leaking, but at the time of filling this was not pressure tested just vacated and re-filled and no dye was inserted to check for leaks. I then changed the condenser along with the fan had it all refilled at a different place by a machine which cost £50.00 and is supposed to be state of the art. At the last mot I had in January I asked them to check the A/C as I felt it was not blowing cold enough and they found it to be low on gas, they re-filled it and Saturday was the first time I have been under the car since the MOT. So once I have it up and running I will pop it back round to them so they can check it again. cheers Arctic PS do you think the compressor could be leaking from the gasket at the top right hand corner of the photo below, the gasket seems to be pressed out ?
__________________
Arctic Givology Learn to Give Everything is Achievable ad altiora tendo. Check out our Nano meet dates http://www.midlandsnanomeets.co.uk/ http://www.the75andztclub.co.uk/index.php?thepage=howto " You do the work , we supply the expertise " Last edited by Arctic; 28th August 2017 at 22:32.. |
|
|
|
|
|
31st March 2014, 11:49
|
#26 | |
|
Doesn't do things by halves
Rover 75 2.5 Connoisseur Auto (1999) Dealer launch model. Join Date: Mar 2007
Location: Former Middlesex
Posts: 20,382
Thanks: 1,587
Thanked 3,749 Times in 3,181 Posts
|
Quote:
Simon
__________________
"Whatever is rightly done, however humble, is noble." Sir Henry Royce. |
|
|
|
|
|
11th April 2014, 01:18
|
#27 |
|
Give to Learn
Freelander 2 Join Date: Aug 2010
Location: West Midlands
Posts: 18,717
Thanks: 1,155
Thanked 6,407 Times in 3,874 Posts
|
On the 13th March I discovered I had a leak from the thermostat on my MG ZT 190 I noticed this as the coolant in the header tank was low, so I checked in the V of the engine and sure enough I could see the red coolant not much but enough to have to remove and replace the thermostat.
Below is how I removed and fitted the thermostat I hope this helps some other members if they have to do the same job, remover the under tray before starting the task,the thermostat I removed had only been fitted for 2 years with limited mileage of about 3.700miles. First remove the engine cover two 8mm bolts Fig 1  1 1Remove the cover and put it in a safe place with the bolts Fig 2  2 2Using a torch and shinning it through the gap in the manifold I can see the leak Fig 3  3 3The next step is to remove the air filter box from the engine bay, loosen the hose clip on the throttle body inlet hose Fig 4  4 4Pull off the small air induct hose pipe Fig 5/6  5 5 6 6Next you can pull up the air box it may be stiff as it sits in the holes and is held in by the lugs under the box Fig 7/8  7 7 8 8You now need to release the Shannon tube from the air box Fig 9/10  9 9 10 10Air box removed put it safe with the engine cover in the boot of the car out of arms way Fig 11  11 11You may see a little oil in the air induct hose this is normal and can be cleaned out before re-fitting Fig 12  12 12There may also be a little oil in the throttle body again do not worry Fig 13  13 13You can now see the three hoses that are connected to the thermostat and the bleed screw Fig 14  14 14Later you will also need to remove the bottom hose that is the reason for removing the under tray before starting the task. Fig 15  15 15The next parts to remove are the breather hoses, the first one is the one connected to the vis motor & throttle body and the front Fig 16/17/18/19  16 16 17 17 18 18 19 19These hoses are removed by depressing the red locking collars Fig 20/21  20 20 21 21You will have to use a screw driver to depress the locking collar connected to the vis motor Fig 22/23  22 22 23 23The last locking collar on the top breather pipe is connected to the top of the throttle body and is black an again a screwdriver may be used Fig 24/25  24 24 25 25You can now pull back the engine bracket and feed the hose past it Fig 26/27  26 26 27 27With the hose removed again put it in the boot for safety Fig 28  28 28You can now remove the second breather hose Fig 29  29 29Start at the front cylinder head again depress the collar Fig 30/31  30 30 31 31Them move to the collar on the manifold Fig 32/33  32 32 33 33The last part of this hose to be removed is the T piece, this is held in by a white collar Fig 34  34 34This white collar needs to be pressed in at both ends and twisted to release the hose Fig 35  35 35Once remove inspect it and make sure it is in good order no cracks or splits and put it in the boot Fig 36  36 36Next step disconnect the vacuum hose from the idle control valve Fig 37  37 37Place this hose to one side for now Fig 38  38 38You can now unplug wiring plug from the throttle body Fig 39/40  39 39 40 40unclip the next plug underneath by depressing the metal spring clip Fig 41/42/43  41 41 42 42 43 43With the two wiring plugs removed set them out of the way Fig 44  44 44Next we turn our attention to the throttle cable Fig 45  45 45lift the throttle lever and remove the cable 46/47  46 46 47 47We now need to remove the throttle body it's self which is secured to the manifold by four torx 30mm bolts two above and two below Fig 48/49/50  48 48 49 49 50 50You will need to use a long reach socket and ratchet with 30mm torx start with left top bolt Fig 51  51 51Next bottom left Fig 52  52 52Bottom right Fig 53  53 53Last top right Fig 54  54 54Once removed inspect and clean up with a bit of WD 40 and in the boot with it Fig 55  55 55You can now put a container under the bottom radiator hose and remove it to let out the coolant Fig 56/57  56 56 57 57This hose with the bleed screw in it will be removed once the coolant as be drained off Fig 58  To Be Continued
__________________
Arctic Givology Learn to Give Everything is Achievable ad altiora tendo. Check out our Nano meet dates http://www.midlandsnanomeets.co.uk/ http://www.the75andztclub.co.uk/index.php?thepage=howto " You do the work , we supply the expertise " |
|
|
|
|
12th April 2014, 09:35
|
#28 |
|
Passed Away
ROVER 75 V6 2Ltr 2001 AUTO / EMERALD MOTORBILITY SCOOTER Join Date: Apr 2011
Location: Poole Quay
Posts: 3,180
Thanks: 2,051
Thanked 570 Times in 311 Posts
|
Had same leaking problem after 12 months. I am now fitting Metal Bodied one from Kaiser.
trimani |
|
|
|
|
12th April 2014, 19:06
|
#29 |
|
This is my second home
Previously owned- MG ZT V6 160 Y plate Lpg, MG ZT 190 2003 In Rare Celestial Factory Ordered Lpg MG Join Date: Mar 2010
Location: Calne
Posts: 4,531
Thanks: 8
Thanked 116 Times in 108 Posts
|
I bet this is where your compressor is leaking from-
http://www.the75andztclub.co.uk/foru...ght=compressor
__________________
Previously owned- MG ZT V6 160 Y plate Lpg, MG ZT 190 2003 In Rare Celestial Factory Ordered Lpg MG ZT 190 2004 lpg |
|
|
|
|
12th April 2014, 22:18
|
#30 | |
|
Give to Learn
Freelander 2 Join Date: Aug 2010
Location: West Midlands
Posts: 18,717
Thanks: 1,155
Thanked 6,407 Times in 3,874 Posts
|
Quote:
Thank you for the heads up I will be taking a closer look next week sometime, now that I have fitted the thermostat cheers Arctic
__________________
Arctic Givology Learn to Give Everything is Achievable ad altiora tendo. Check out our Nano meet dates http://www.midlandsnanomeets.co.uk/ http://www.the75andztclub.co.uk/index.php?thepage=howto " You do the work , we supply the expertise " |
|
|
|
|
 |
|
|


 Linear Mode

