
|
|
|
|
|
|
||
|
|
||
 2nd November 2014, 16:34
|
#1 |
|
Gets stuck in
ROVER 75 CDT CLUB SE 02 Join Date: Aug 2009
Location: Kent
Posts: 658
Thanks: 30
Thanked 141 Times in 87 Posts
|
First of all heads up to andel for this thread that was my guide.:-
https://www.the75andztclub.co.uk/for...d.php?t=143972 Tools trolley jack, axle stand, good selection of sockets, spanners. 1. Disconnect battery, remove undertray, engine cover, air intake bellows. Remove drivers side front wheel, leave car propped on axle stand just in front of jacking pad. peel back wheel arch liner to expose aux belt, safeguard ABS & Brake wear sensors. Place jack under sump to roadside centre left edge, protect sump from jack with block of wood,raise jack to take weight only at this point.You may need to adjust it's position for maximum effect.The engine will be movable back and forth also. 2. Remove ps pump hose clip  3. Remove p s fluid reservoir, leave hoses connected, check for leaks etc., move to side.  4. Remove engine mount bracket, remove 19mm iso mount nut underneath.Raise engine on jack, to give sufficient height to withdraw bracket front captive bolt  5. Remove bolts from alloy engine brace, raise ~ lower engine to suit on jack, wriggle free under power steering hose.Check for hoses trapping etc.  6. Jack engine to expose auxiliary belt tensioner, so that an open ended 24mm spanner will fit.  7. Remove three 8mm nuts from power steering pump pulley ,Push spanner toward windscreen with force, slide off ps pulley with aux belt still in groove, then release tension on tensioner.  8. Power steering pump body now exposed.  9. Again raise lower engine on jack, to facilitate the removal of p s pump through bolts 8mm & 10mm, watch for trapping of hoses and aircon pipe. From the top left downward in photo, remove 10 mm stud, 8mm through bolt, 10mm stud, 8mm through bolt, and the pump body will be free of the engine block, remove two further 10mm through bolts to the radiator side of the pump body, and the captive nut retaining bracket will separate, strip down further as necessary if needed.Check hoses for leaks etc. move to one side. 10. Alternator now is exposed, push down spring clip to alternator plug, and push off alt body with screwdriver in other hand.  11. Follow large black V+ Black cable from alternator to starter motor junction clamp, remove rubber cap undo 13mm nut and spring washer remove cable refit nut & washer for safekeeping until needed.  12. Remove 13mm bolt, top left alternator  13. Remove 10mm bolt bottom right alternator, Follow oil filter casting to engine block, feel left and you will discover a void.This is the access for the second alt bolt, use and extension bar with a 10 mm socket put a piece of blue tack in the socket so you can withdraw it, once free. Socket just visible for guidance to upper right of valeo label, on the alt body.  14. Drop the engine down enough to expose the third alternator bolt 13mm, remove through the wheel arch, it is just tucked behind the aircon drive belt in photo  Jack engine back up and install new alternator. lower again and secure bottom 13mm bolt first, then top 13mm bolt, lastly the 10mm fiddly one. while wheel arch exposed, check route of auxiliary belt, here's it route for whenever you need to use it, NOTE it does not look exactly like this, this is more to illustrate the position of the belt in relation to the pulleys etc When you have the belt in final position to re install , place the loose belt loop in the ps pump pulley, push forward on tensioner, and slide the ps pump pulley with belt in its groove over the three ps body bolts, replace the three 8mm nuts hand tight, release tension on tensioner, then nip the nuts up tight. 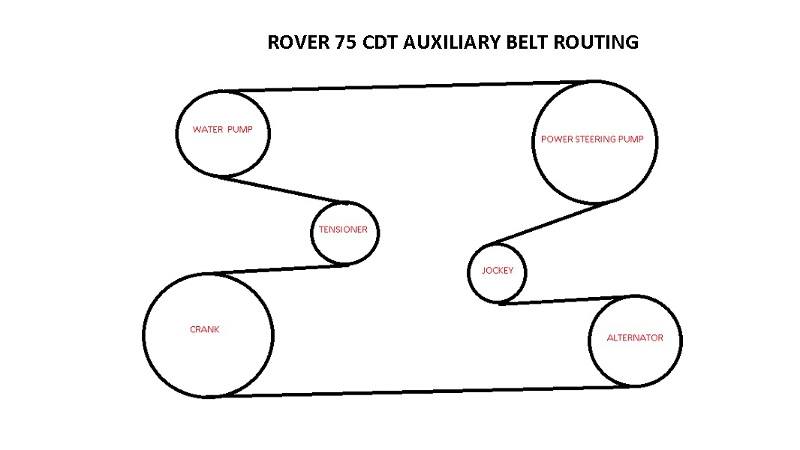 The usual refit is the reverse of etc... usual disclaimer neither I or the club will be responsible for any damage etc. A bit of jiggery pockery may be necessary on refit, more likely around the area of the alloy block engine mount, but nothing not doable. Hope this helps. Snagger.
__________________
How to remove CDT alternator from top & side :- http://www.the75andztclub.co.uk/foru...d.php?t=199608 Battery charge light problems on a diesel ? http://www.the75andztclub.co.uk/foru...3&postcount=64 Diesel charging FBH voltage supply diagram http://www.the75andztclub.co.uk/foru...ght=cdt+charge How to identify voltage regulator type diesel http://www.the75andztclub.co.uk/foru...56&postcount=3 Last edited by Snagger; 5th June 2017 at 08:03.. Reason: Improved removal technique descriptions to item 7, 8 |

|

|
|
2nd November 2014, 20:32
|
#2 |
|
Discount MG Rover Spares

Rover 75 CDTi, 2x MG ZS180 Join Date: Jun 2011
Location: Hythe, Southampton
Posts: 11,320
Thanks: 456
Thanked 3,377 Times in 2,027 Posts
|
Excellent guide - as doing it from underneath is a complete nightmare.
 Thanks for the guide.
__________________
 Your trusted MG Rover specialist! Tel: 02380 001133 / Email: [email protected] We now have a 'chat' function on our site for even quicker replies. Give it a try! Remember - discount code FORUM5 for 5% off  |
|
|
|
|
3rd November 2014, 03:47
|
#3 |
|
Give to Learn

Freelander 2 Join Date: Aug 2010
Location: West Midlands
Posts: 18,699
Thanks: 1,155
Thanked 6,407 Times in 3,874 Posts
|
Hi Found it easier from below no jacking up and down of the engine, but good write up
 gives members a choice gives members a choice  http://www.the75andztclub.co.uk/foru...d.php?t=143183
__________________
Arctic Givology Learn to Give Everything is Achievable  ad altiora tendo. Check out our Nano meet dates http://www.midlandsnanomeets.co.uk/ http://www.the75andztclub.co.uk/index.php?thepage=howto " You do the work , we supply the expertise " |
|
|
|
|
10th May 2015, 06:29
|
#4 |
|
Regular poster
Rover 75 CDT Auto Connoisseur SE Tourer Join Date: Aug 2014
Location: Upper Broughton
Posts: 31
Thanks: 1
Thanked 3 Times in 3 Posts
|
Once again, I'd like to give thanks for what a fantastically useful resource this forum is!
I bought my car in January, and it had a whining noise when running, I was sure it was either the PAS pump or the alternator. However, the appearance of "charge fault" on the IPK made my mind up, and four hours later I have a car that I can now hear the engine on, with a happy battery. I also changed the belts while I was doing it, the aircon belt was about on its last legs!  MainFrame |
|
|
|
|
10th May 2015, 06:41
|
#5 |
|
This is my second home
Rover 75 CDT-2001 Join Date: Jan 2009
Location: Wrexham, North Wales
Posts: 3,606
Thanks: 195
Thanked 606 Times in 501 Posts
|
I admire you guys who can take all those pictures while doing a job like that!
|
|
|
|
|
10th May 2015, 15:35
|
#6 | |
|
I really should get out more.......
Rover 75 CDT Club Tourer Join Date: Nov 2006
Location: Milky Way
Posts: 2,369
Thanks: 105
Thanked 513 Times in 382 Posts
|
Quote:
|
|
|
|
|
|
11th May 2015, 13:42
|
#7 |
|
Premium Trader

75 CDT Tourer,2.5 Launch Saloon, Omipro MG/Rover (T4) Join Date: Jul 2007
Location: Liversedge, West Yorkshire
Posts: 5,405
Thanks: 1,105
Thanked 1,340 Times in 661 Posts
|
That's the way I do it far quicker and easier than the other methods
Just like to add that it's best to slacken the power steering pump pulley bolts before removing the belt so you can remove then easily. If you need to hold the pulley the best method is to use an old belt as a strap wrench this avoids the possibility of damage to the pulley Russ
__________________
 Replacement Key Service http://https://the75andztclub.co.uk/...d.php?t=244732 Full T4 Testbook diagnostics available. Diesel ECU repair and replacement. Options enabled or disabled as required. Diesel X-Power 135 and 160bhp, Rover 1.8T 150 to 160 MG 160 V6 to 177 upgrades available P.M. for details. |
|
|
|
|
30th November 2016, 16:22
|
#8 |
|
Avid contributor
Rover Vitesse Coupe Join Date: May 2013
Location: Leicestershire
Posts: 195
Thanks: 31
Thanked 11 Times in 11 Posts
|
Many thanks for this guide, it was really helpful.
The only thing i would add is that for point 6, using a spanner to move the belt tensioner - and when you are putting the belt back on, I found it easier to do the following: Raise the engine to allow access to get the spanner seated on the bolt/nut, and then lower the engine a little so the spanner is held in place against the side member of the bodywork. It just helped to stop the spanner slipping off the bolt/nut when trying to release the tensioner.
__________________
[SIGPIC][/SIGPIC] Kind regards Simon Rover Vitesse Coupe - 1997 Rover 75 CDTi Connoisseur SE Auto Tourer - 2002 |
|
|
|
|
30th November 2016, 18:26
|
#9 |
|
Gets stuck in
ROVER 75 CDT CLUB SE 02 Join Date: Aug 2009
Location: Kent
Posts: 658
Thanks: 30
Thanked 141 Times in 87 Posts
|
Glad it was of some use Simon.
Nice idea as regards trapping the tensioner pulley bolt I welcome any additions that could improve speed up this technique. Big Russes idea of undoing the three P.S pulley bolts then sliding the pulley off with the belt saves the "struggle to ease the belt off the pulley syndrome", which can lead to belt damage if levers are used to try an lift / tease it off. I'll give it another year to see if there are any more additions, then I'll edit the how to, with the suggestions. Snagger.
__________________
How to remove CDT alternator from top & side :- http://www.the75andztclub.co.uk/foru...d.php?t=199608 Battery charge light problems on a diesel ? http://www.the75andztclub.co.uk/foru...3&postcount=64 Diesel charging FBH voltage supply diagram http://www.the75andztclub.co.uk/foru...ght=cdt+charge How to identify voltage regulator type diesel http://www.the75andztclub.co.uk/foru...56&postcount=3 |
|
|
|
|
30th November 2016, 19:24
|
#10 |
|
Avid contributor
Rover Vitesse Coupe Join Date: May 2013
Location: Leicestershire
Posts: 195
Thanks: 31
Thanked 11 Times in 11 Posts
|
It was very useful - plus, most importantly the battery light has now gone out when the car is started!!!
__________________
[SIGPIC][/SIGPIC] Kind regards Simon Rover Vitesse Coupe - 1997 Rover 75 CDTi Connoisseur SE Auto Tourer - 2002 |
|
|
|
 |
|
|


 Linear Mode

