
|
|
|
|
|
|
||
|
|
||
 16th July 2012, 00:17
|
#61 |
|
Give to Learn

Freelander 2 Join Date: Aug 2010
Location: West Midlands
Posts: 18,721
Thanks: 1,155
Thanked 6,407 Times in 3,874 Posts
|
At last we have had a couple of days with the sun out for more tha a couple of hours, yesterday i decide i would make sure the car was not leaking in from the windscreen scuttle around its clips so i took it off and sealed round each one with some 151 gutter sealant i also ran it anlong the ower part of the windscreen.
To remove the scuttle panel from the front windscreen first you need to remover the window wipers two nuts 15mm, then grip tight a wiggle and a shake and they are off. Window wipers removed and one scuttle clip Fig 1  1 1Next prise up each scuttle clip with a tool simular to this or use a thin bladed screw driver keep your spare thumb or finger over the clip so it does not fly of into the air never to be found  or stick some masking tape over the edge of the clip. Fig 2-3 or stick some masking tape over the edge of the clip. Fig 2-3 2 2 3 3Next remove the rubber seal along the scuttle Fig 4  4 4The next step is to remove the scrivets each side after removing the upper scuttle trays these just screw out Fig 5  5 5You are now ready to remove the scuttle panel first feed it up and out from the passnger side no need to be a bull in a china shop take it easy just a little bending and its free that end. Fig 6  6 6Now do the same the drivers side this time pay attention to lifting the scuttle panle free and over the window wiper bolt again take care. Fig 7  7 Once this as been acchived the panel is free to remove and be put safe Fig 8-9  8 8 9 9With the scuttle panel removed we can see the white plastic retaining grommets which the scuttle panel clips fit into to hold the panel in situ, note the perished gaskets under them very suspect in my opinion so all the more reason to seal them with the 151 sealant. Fig 10-12  10 10Note how dirty it is under the scuttle panel and holds water  11 11Also take note of the gasket under the white recess holder for the scuttle clips, close up you can see they are deterioration.  12 12I am now going to seal around the white retaining grommets and inside them, when i replace the scuttle panel and its clips it will seal around that area and seal the clip in place as i hope i do not need to remove it again if so it will just be that little bit harder no great shakes.Fig 13  13 13Seal round each and every one i also sealed along the lower part of the windscreen to make sure Fig 14-15  14 14 15 15With the scuttle panel now back in place i put a little more in the crevis of the scuttle clip so it just seeps out to be wiped off clean, this should now be sealed this may not need doing but i think i am being cautious just incase as i have had a member tell me they have a wet carpet but do not have a sunroof.Fig 16  16 16Another note is the front window screen scuttle rubber that sits up against the screen and scuttle panel this shrinks at either end, you can geta spare one from a scrap yard & cut a section out add that into the original one and the ends will then fit tight up to the wing panels.  1 1 2 2 3 3With this done my next step is to refit the carpet now its dry and the interior seats etc this i will do tomorrow 15th July 2012 Arctic.
__________________
Arctic Givology Learn to Give Everything is Achievable  ad altiora tendo. Check out our Nano meet dates http://www.midlandsnanomeets.co.uk/ http://www.the75andztclub.co.uk/index.php?thepage=howto " You do the work , we supply the expertise " Last edited by Arctic; 14th February 2019 at 10:25.. Reason: Photo editing |

|

|
|
16th July 2012, 01:02
|
#62 |
|
This is my second home
None * DROWNED Join Date: Aug 2007
Location: Cardigan
Posts: 33,339
Thanks: 1,257
Thanked 1,664 Times in 1,081 Posts
|
Yet another worthy inclusion into the How To's....
  With a link back to here  Your skills and contributions are immeasurable and much appreciated
__________________
Andrew Ich Dien Problem solving is... lateral thinking SEARCH FIRST ...ASK LATER... |

|
|
|
16th July 2012, 19:05
|
#63 | |
|
This is my second home
ZTT, Contemp Saloon, Duotone Tourer Join Date: May 2012
Location: Llandeilo
Posts: 4,192
Thanks: 290
Thanked 387 Times in 333 Posts
|
Quote:
Darn right! Arctic should soon have a car suitable for storage of the dryest kind of sea biscuits! Tremendous and helpful photo guides. |
|
|
|
|
|
16th July 2012, 19:13
|
#64 |
|
Posted a thing or two
Rover 75 V8 Plus Others Join Date: Jul 2011
Location: Swadlincote
Posts: 1,603
Thanks: 18
Thanked 163 Times in 81 Posts
|
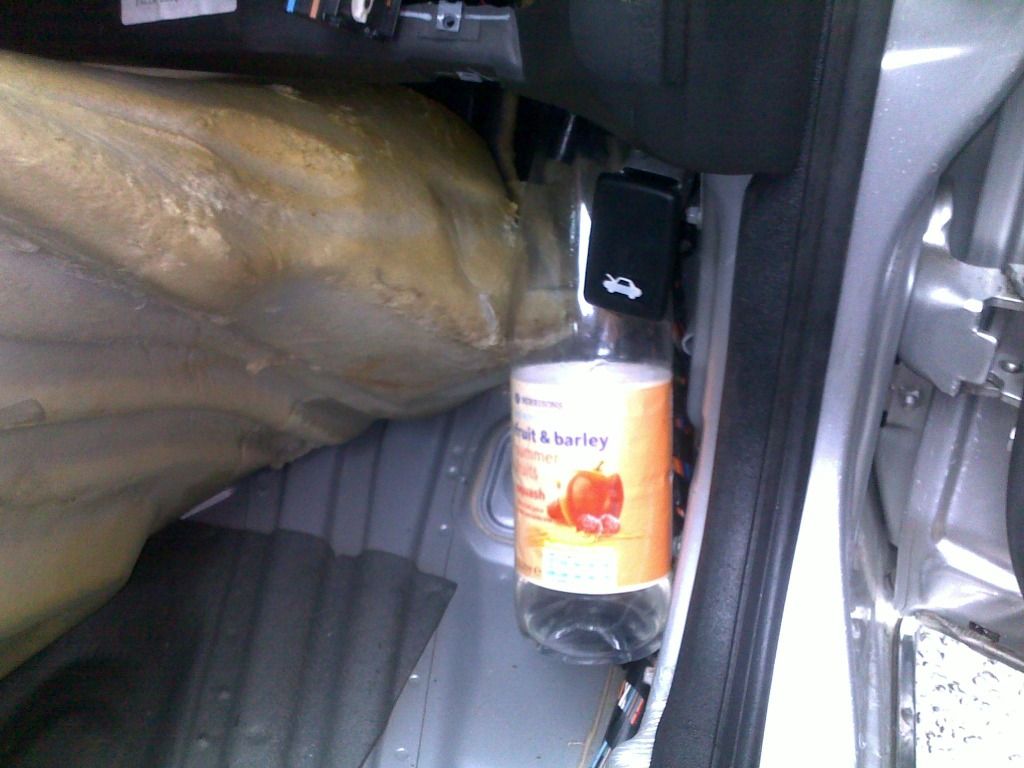
Well, a rainy day today and I had one of the sunroof drains off as I could not get the new 16mm connector attached to the sunroof drain (will try again tomorrow). Amazing, rained for about 5 hours, heavy at times, but mainly drizzle, car parked on the flat. I filled nearly 2 litres of water.... photo attached after second empty...
 |
|
|
|
|
16th July 2012, 19:20
|
#65 |
|
This is my second home
ZTT, Contemp Saloon, Duotone Tourer Join Date: May 2012
Location: Llandeilo
Posts: 4,192
Thanks: 290
Thanked 387 Times in 333 Posts
|
I idly wondered today whether there is a rubber safe silicone oil product that could wipe around the sunroof metal oriface (so to speak) and repell water from entering somewhat (the figs above of 2 litres on the flat are amazing but probably not unusual as things age). There must be a silicone plumbing lube of some sort that would help stem the floods coming down the tubes?
 |
|
|
|
|
16th July 2012, 20:57
|
#66 | |
|
Give to Learn
Freelander 2 Join Date: Aug 2010
Location: West Midlands
Posts: 18,721
Thanks: 1,155
Thanked 6,407 Times in 3,874 Posts
|
Quote:
good idea even though you did not want to test the sunroof drains like this just goes to shows then that i was wrong in mt assumption of the water collects over a long period of time if your bottle in anything to go by but as the foam on the carpet goes you can understand why i/we would not see the true effects as that two litres of water would be soaked up easy by the thickness of the foam, i should imagine under normal weather conditions and not blocked with muck the sunroof drain tubes would cope but add all the above together and you have a recipe for a disaster let us know if you collector anymore over night i would put a bigger bottle there as for the connectors did you get them from Halfords if so one side is a little larger in diameter this is the side the tube fits into the the other end into the outlet grommet dont forget the vaseline Arctic. 
__________________
Arctic Givology Learn to Give Everything is Achievable ad altiora tendo. Check out our Nano meet dates http://www.midlandsnanomeets.co.uk/ http://www.the75andztclub.co.uk/index.php?thepage=howto " You do the work , we supply the expertise " |
|
|
|
|
|
17th July 2012, 00:32
|
#67 |
|
Give to Learn
Freelander 2 Join Date: Aug 2010
Location: West Midlands
Posts: 18,721
Thanks: 1,155
Thanked 6,407 Times in 3,874 Posts
|
Sunday the 15th July and one of the sunny days we have had this month and i maged to refit the interior back into Suzie after the sunroof saga i decided to drill a few holes and treatthem before putting the carpet back in i know somewill feel this is a little to much and should not be done but i am in the thinking if it does leak again or it is leaking from somewher i have not relised i would prefer not to have 2" of water under the carpet waiting to do more damage i will also be treating it from under the car once we get the next dry day.
I drilled three small 4mm holes along the floor panel where the water holds the most treated with rust inhabitor then WD40 finaly copper grease spray. Fig 1  1 1Two more where the bings are under the seat which also is one of the lower points of collection Fig 2  2 2Treated and greased Fig 3  3 3Also in the rear footwell which fills up from the front due to the design of the floor pan Fig 4  4 4Carpet back in place nice and dry after 10 days Fig 5  5 5Console refitted and heating checked along with radio etc for working Fig 6  6 6Seats bolted back in and wiring pluged in checked for working shes looking nice again after having a very good clean as well Fig 7-8  7 7 8 8Took her for a drive and she smells lovely again no musty smell am hoping it is all solved now Monday 16th its poured down again all day i ahve not been out to check the car yet but will do some time today the 17th i will even lift the carpet at the front foot wells to see if nay sign but once i have fixed the pipe connectors it rained more or less every day while the carpet was out drying and no signs of water then so fingers crossed i note Dominic as had his carpet propped up and is in the process of fitting the connectors in the mean time he put the end of the sunroof tube in a plastic bottle and over a 5 hour period of rain some of it drizzle he collected two liters of water just goes to show how much water comes down the sunroof tubes good luck to those who have yet to do this mod i hope you catch it before its got to the stage that mine did Arctic.
__________________
Arctic Givology Learn to Give Everything is Achievable ad altiora tendo. Check out our Nano meet dates http://www.midlandsnanomeets.co.uk/ http://www.the75andztclub.co.uk/index.php?thepage=howto " You do the work , we supply the expertise " |
|
|
|
|
18th July 2012, 16:36
|
#68 |
|
Newbie
Rover75 CDT ConnSE, MGZT-T260SE Join Date: Dec 2009
Location: Watford
Posts: 26
Thanks: 0
Thanked 1 Time in 1 Post
|
Hi Arctic,
Well the V8 went for it's MOT yesterday and my trusted mechanic* Pete Wayte (CarServe, Chobham, Surrey 07886909695) took a look at the passenger drain. Lo and behold it was completely detached. As mentioned in my post last week, although I'm keen, I'm not brave enough to strip the complete interior so I'll entrust the work to Pete, who confirmed that a complete strip down and carpet removal is the only way to dry the carpets out once and for all (after you've fixed the drains of course!). So that's what he's doing. What'll take him a few hours would take me a weekend and that's if everything comes out without issue. Which in my case it invariably wouldn't! Thanks once again for the posts. They really are an invaluable guide for us less versed in these matters. Eugene. *Jules Anderson (of this forum) has also cast his expert eye over both my cars, and comes with an unreserved recommendation. The problem is that Jules is in North Wales and I'm in London, so each visit to his place has involved us making a holiday of it, (me and the wife, not me and Jules!). Not a bad thing, but not that easy to arrange (or afford), around work and domestic commitments. |
|
|
|
|
18th July 2012, 17:34
|
#69 | |
|
Give to Learn
Freelander 2 Join Date: Aug 2010
Location: West Midlands
Posts: 18,721
Thanks: 1,155
Thanked 6,407 Times in 3,874 Posts
|
Quote:
Mine was soaked and it had not come adrift i should imagine if the sunroof Drain tube as come adrift it will leak at a faster rate i hope you have pointed out to your man to use the barbed connectors as there is no chance of those coming adrift in the future, Once completed all that remains is to cut the end off the ducks bill i think i will know more tomorrow as i am taking the bumper off to change my lights so i will take a look behind the wheel arch cover and see if the connector as opened the ducks bil enogh for it to not be cut if not i think a little snip will be in order, hope your car drys out quick for you cheers Arctic.
__________________
Arctic Givology Learn to Give Everything is Achievable ad altiora tendo. Check out our Nano meet dates http://www.midlandsnanomeets.co.uk/ http://www.the75andztclub.co.uk/index.php?thepage=howto " You do the work , we supply the expertise " |
|
|
|
|
|
19th July 2012, 17:59
|
#70 |
|
Avid contributor
Rover 75 Tourer 2.5V6 Auto Con SE Join Date: Jun 2012
Location: Southend
Posts: 169
Thanks: 0
Thanked 0 Times in 0 Posts
|
I fitted one of the black connectors today, as supplied by Arctic. I'm not sure they are ideal to be honest. It's slightly too small for the sunroof end to push inside. I pinched the end and managed to squeeze it in but on inspection it meant that the pipe was very restrictive so I removed it. After a bit of work with a round file and plenty of vaselene I managed to fit the pipe reasonably well, although I would have preferred to get a bit more in. It's perfect for the other end, pushes into the pipe nice and securely.
I'll have a measure up of the connectors when I can find my vernier and have a hunt for something. Ideally a connector with 2 different sized ends would be best I think so the connector can go inside each pipe. Many thanks to Arctic for sending out the connectors so quickly in the first place though. |
|
|
|
 |
|
|


 Linear Mode

