Go Back   The 75 and ZT Owners Club Forums > The 75 and ZT Owners Club Forums > Technical Help Forum
Register FAQ Image Gallery Members List Calendar
Notices

Reply
 
Thread Tools Display Modes
Old 8th May 2013, 10:33   #11
Jakg
This is my second home
 
N/A

Join Date: Feb 2010
Location: Suffolk
Posts: 6,867
Thanks: 0
Thanked 397 Times in 302 Posts
Default

Quote:
Originally Posted by rich17865 View Post
I think I might have muddled up the pretensioner and airbag wires when I changed the interior, has anyone got an idea on how to identify the wires without the original plugs present?
Do you mean the wires themselves, or the polarity?

iirc the polarity doesn't matter (at least if it did you've have to be pretty stupid to use the same colours for both!)
Jakg is offline   Reply With Quote
Old 8th May 2013, 10:47   #12
stevestrat
This is my second home
 
ZT260 #243 (resting)

Join Date: May 2010
Location: Prestonpans
Posts: 22,488
Thanks: 650
Thanked 4,624 Times in 3,358 Posts
Default

Regarding the connectors, a couple of days ago I ordered identical ones from Hong Kong, you actually get 5 connectors (my thinking was airbag & pre-tensioner on both seats and a spare!) for £1.71 with free P&P as opposed to £2.49 for one in the link shown. I'm wary of buying from Hong Kong but if all is OK I'll post a link.
__________________
Steve


T4 Location Map

Last edited by stevestrat; 8th May 2013 at 15:19..
stevestrat is offline   Reply With Quote
Old 8th May 2013, 10:48   #13
MrDoodles
Banned
 
MrDoodles's Avatar
 
MG ZT+ V6 190

Join Date: Nov 2011
Location: Spalding
Posts: 13,245
Thanks: 369
Thanked 1,196 Times in 818 Posts
Default

Quote:
Originally Posted by hogweed View Post
how do you disable the airbag in case my ham-fistedness fires it when I'm messing about?
You need to disconnect the battery at least half an hour before you start work!
MrDoodles is offline   Reply With Quote
Old 9th May 2013, 07:13   #14
Robbberd
Loves to post
 
Robbberd's Avatar
 
MG ZT

Join Date: Feb 2012
Location: Wrexham
Posts: 407
Thanks: 64
Thanked 5 Times in 5 Posts
Default

Quote:
Originally Posted by steve811 View Post
I know that this for many of us is a relatively easy job, but I know some people have real issues with anything to do with electrics and especially airbags! I have looked and could not find a how to so thought others might like to see how I did it!

Firstly the airbag circuit is fairly simple, just a loop through a small squib (very small explosive device) which fires when needed to inflate the airbag. On start-up the car performs a simple tests putting a very small curremt (milliamps) through the ciruit to test for continuity. If the circuit is open or high resistance then it will fail and the light comes on. The connectors used are prone to poor connections and this is why so many people have airbag light indications.

Firstly, a word about safety! Although the charge in an airbag is small by explosive standards and is known as a squib, it can be set off by an electrical current, which includes static. Although I don't feel it is necessary to go to the lengths needed when working with raw explosives (conductive shoes, ant-static floors etc) it is advisable to disconnect the airbag when working, and it is also advisable to earth yourself to the body of the car to dissipate any static build-up.

The first thing you need to do is move the seat all the way back and undo the two bolts holding the seat rails to the body of the car. These are star or Torq bolts so you will need the right bit. Once you have done that, move the seat all the way forward and undo the rear bolts. Once the bolts are undone the seat is free to move, and you can tilt and manouver the seat until it is pivotted forward and resting agianst the dash or the steering wheel. Look under the seat and find a yellow connector with two wires going in and out:


You might find yours is atached to the bottom of the seat. The blue wires with the yellow sheath go to the airbag. Disconnect the connector and cut off the plug and socket. I replaced mine with better quality connectors from Ebay, these are meant to be fully waterproof, but they are better than what is standard.

Firstly I trimmed back and bared the wires from the airbag itself, and then crimped on the two pins for the female connector. Before crimping on I slid on the two yellow rubber bungs which are designed to waterproof the back of the connector. One thing I did find was that after crimping the pins I could not get the red plastic locking piece to fit. I figured out that at the back of the pins are two "ears", as can be seen below:


If these are not pushed down the locking tabs on the red plastic piece do not engage and the pins are not fully locked. Once the pins are crimped then they are inserted into the female plug as shown and the rubber bungs pushed down into the back of the holes:


The other (male) plug is similar, cut the two wires and fit rubber bungs then bare the wires and crimp on the two pins for the male side. The male does not use a locking tab, but the pins will lock in securely. You should end up with this:


You can see the red locking tab on the plug on the left. Once connected you should have this:


I have not had any problems since replacing mine, and the cost is pennies! This is the type of plug I used:

http://www.ebay.co.uk/itm/Kit-2-Pins...item27c9de1216

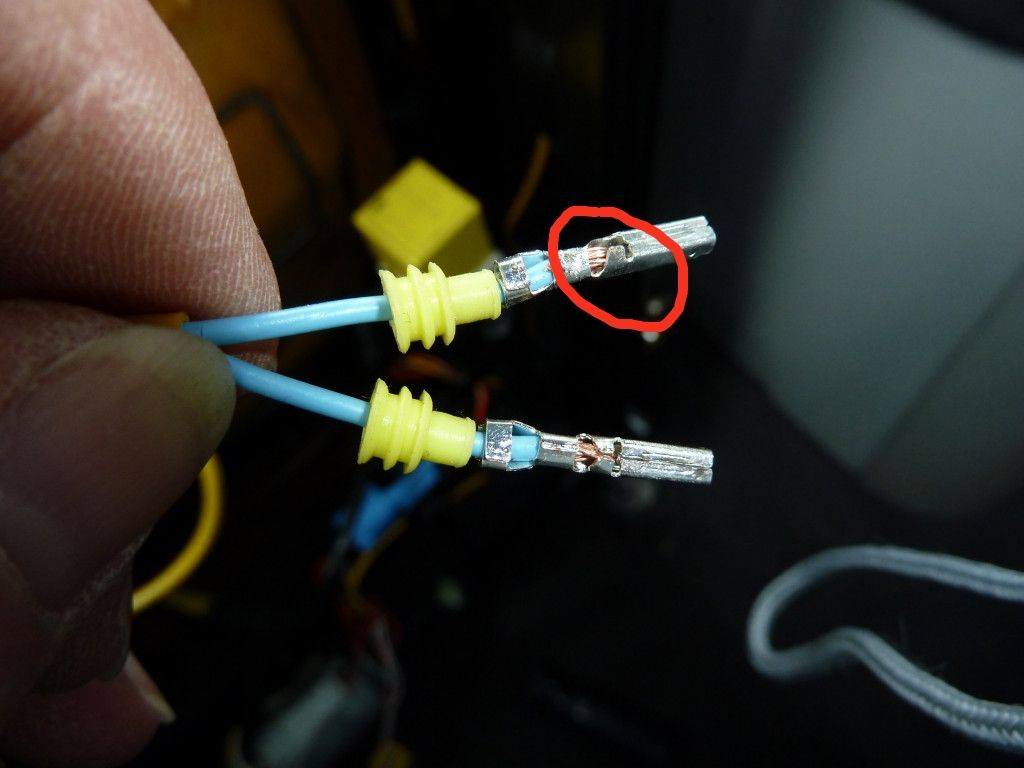
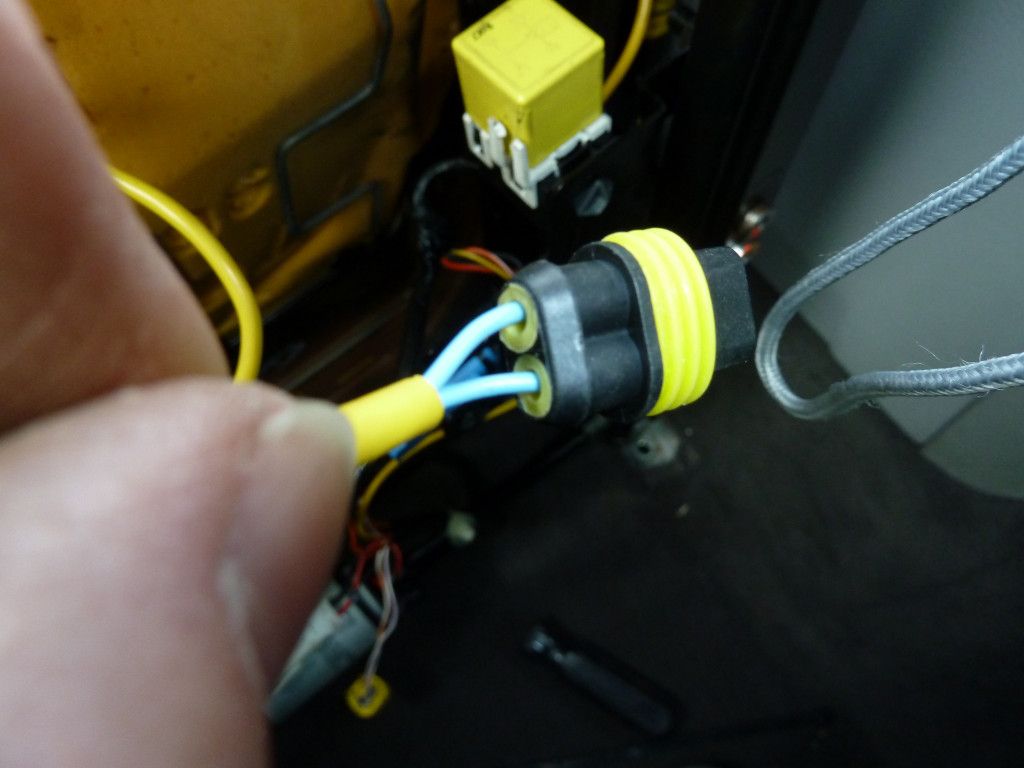
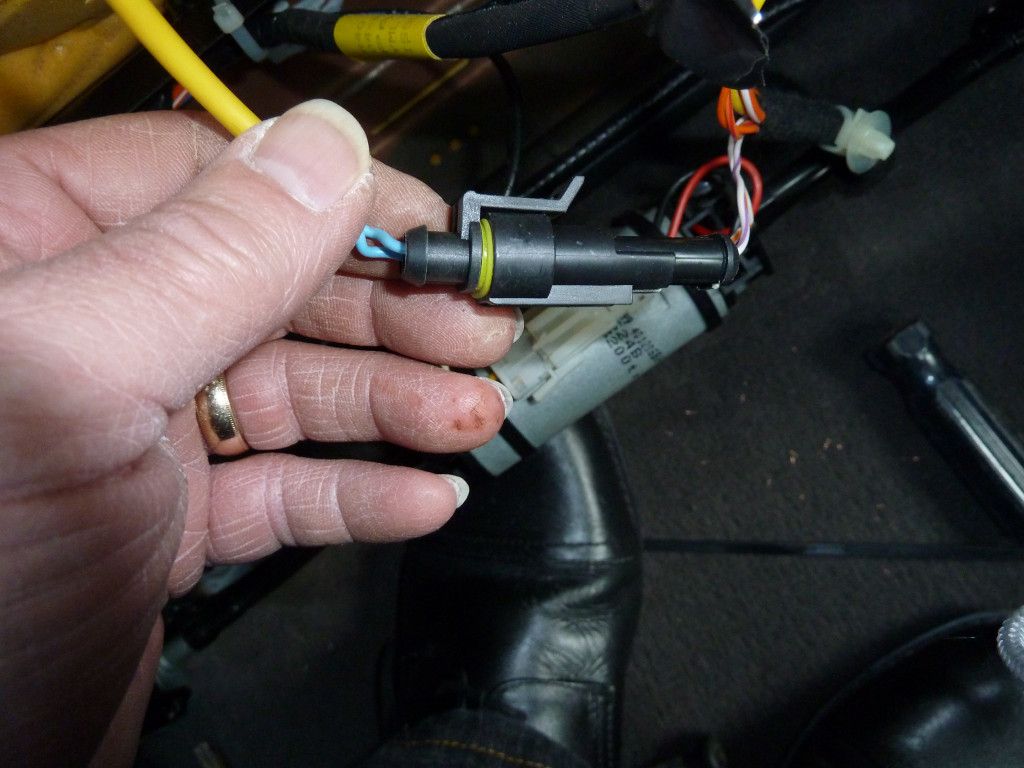
Excellent idea , going to give it a go...can i suggest , when crimping the connector , push the little yellow "bung" further up into the crimp, where it will be crimped to the wire. this makes it waterproof.

I have tried to show in one of the original pictures,please excuse my poor attempt with paint..

I have just done this mod , as had to replace the seats.

Attached Images
File Type: jpg 67c54fcb-d0fe-4e04-a418-5e4a33215743_zps75bb4241.jpg (47.2 KB, 434 views)

Last edited by Dragrad; 6th July 2013 at 23:54.. Reason: thumbnail enlarged
Robbberd is offline   Reply With Quote
Old 9th May 2013, 08:02   #15
Arctic
Give to Learn
 
Arctic's Avatar
 
Freelander 2

Join Date: Aug 2010
Location: West Midlands
Posts: 18,720
Thanks: 1,155
Thanked 6,407 Times in 3,874 Posts
Default

Excellent idea this if your belt and braces do not work fingers crossed mine are still ok but will get some just incase for the furture Arctic

Attached Images
File Type: jpg SDC14694.jpg (115.2 KB, 446 views)
File Type: jpg SDC14696.jpg (123.0 KB, 448 views)
__________________
Arctic
Givology Learn to Give
Everything is Achievable

ad altiora tendo.

Check out our Nano meet dates
http://www.midlandsnanomeets.co.uk/

http://www.the75andztclub.co.uk/index.php?thepage=howto

" You do the work , we supply the expertise "

Last edited by Dragrad; 6th July 2013 at 23:53.. Reason: thumbnails enlarged
Arctic is offline   Reply With Quote
Old 9th May 2013, 09:34   #16
stevestrat
This is my second home
 
ZT260 #243 (resting)

Join Date: May 2010
Location: Prestonpans
Posts: 22,488
Thanks: 650
Thanked 4,624 Times in 3,358 Posts
Default

Quote:
Originally Posted by stevestrat View Post
Regarding the connectors, a couple of days ago I ordered identical ones from Hong Kong, you actually get 5 connectors (my thinking was airbag & pre-tensioner on both seats and a spare!) for £1.71 with free P&P as opposed to £2.49 for one in the link shown. I'm wary of buying from Hong Kong but if all is OK I'll post a link.
The seller is making all the right noises, dispatch advice and a request for positive feedback when item arrives. This is the listing, as I said, 5 x connectors for only £1.71 with free P&P.
__________________
Steve


T4 Location Map
stevestrat is offline   Reply With Quote
Old 9th May 2013, 11:54   #17
steve811
Banned
 
Rover 75 Tourer CDT Connoisseur SE

Join Date: Dec 2010
Location: Newport
Posts: 1,906
Thanks: 107
Thanked 299 Times in 206 Posts
Default

Good point about the bungs. Perhaps the mods might like to consider move this to the How To?
steve811 is offline   Reply With Quote
Old 9th May 2013, 15:59   #18
Seanalf
Gets stuck in
 
Rover 75 CDTi Connie

Join Date: Apr 2013
Location: Llanhilleth
Posts: 584
Thanks: 193
Thanked 126 Times in 81 Posts
Default

Quote:
Originally Posted by stevestrat View Post
The seller is making all the right noises, dispatch advice and a request for positive feedback when item arrives. This is the listing, as I said, 5 x connectors for only £1.71 with free P&P.
I've just ordered some to, should be fun!
__________________
This is my Rover, there are many like it, but this one is mine

Born; Wednesday, 3rd October 2001 @ 16:00:16
The 34,336th 75 to run off the production line of 112,381
This was the 4,730th 75 CDT Connoisseur to be made out of 10,898
This was the 2,647th 75 in White Gold Metallic (code: GMN) to be made out of 12,251 White Gold Metallic 75s

To do
MK2 dials with IPK, FBH repair, headlining repair (again!) and some cosmetics.
Seanalf is offline   Reply With Quote
Old 2nd July 2013, 01:20   #19
Indiana_Jones
Avid contributor
 
Rover 600 SLDi

Join Date: Feb 2013
Posts: 120
Thanks: 0
Thanked 1 Time in 1 Post
Default

So just to confirm when working on the airbag connections, disconnect the battery and I should be ok in not setting the thing off?

I need to do this as my light has been one since I've had the car and I have a WOF coming up
Indiana_Jones is offline   Reply With Quote
Old 2nd July 2013, 07:16   #20
rich17865
This is my second home
 
rich17865's Avatar
 
Transit Connect

Join Date: Feb 2011
Location: Crewe
Posts: 9,532
Thanks: 868
Thanked 1,619 Times in 1,095 Posts
Default

Quote:
Originally Posted by Indiana_Jones View Post
So just to confirm when working on the airbag connections, disconnect the battery and I should be ok in not setting the thing off?

I need to do this as my light has been one since I've had the car and I have a WOF coming up
The advice is to disconnect the battery 30 minutes before starting work.
rich17865 is offline   Reply With Quote
Reply


Posting Rules
You may not post new threads
You may not post replies
You may not post attachments
You may not edit your posts

BB code is On
Smilies are On
[IMG] code is On
HTML code is Off

Forum Jump


All times are GMT. The time now is 23:05.


Powered by vBulletin® Version 3.8.11
Copyright ©2000 - 2024, vBulletin Solutions Inc.
Copyright © 2006-2023, The Rover 75 & MG ZT Owners Club Ltd