
|
|
|
|
|
|
||
|
|
||
 1st April 2010, 14:28
|
#1 |
|
This is my second home
ZT 260 SE Twilight and 10 other 75 ZT's :O Join Date: Jan 2007
Location: Conwy NORTH WALES
Posts: 11,094
Thanks: 512
Thanked 1,116 Times in 763 Posts
|
KENLOWE COOLING RADIATOR FAN CONVERSION KIT 75 ZT
After fitting many of these kits, I thought it time to write an updated HOW TO. As time goes by better ideas, improvements, suggestions & feedback from other owner's evolve.............and the result is I hope you'll agree the Ultimate non OEM modification to the Cooling System. The price is the same whether you buy the kit from us or Kenlowe.......bought from ourselves all the "Tailoring" to the duct cowling is already done, saving you approx 2 hours. In operation, the Fan is quieter than OEM & motor windings are more efficient so 35% less energy is used to power them. (more MPG) A big plus here is that because it's a true 2 SPEED motor (2 separate winding circuits), there is of course no big power wasting RESISTOR to go wrong. Additionally, the kit still employs the original Rover Fan Control Box so all the ECU control intelligence for when the Fan should rotate (and at what speed) is maintained. The wiring is different & simpler than Keith's original thread, so to is the way we now anchor the Fan ducting with many hours now trimmed off the job, it takes no longer to fit than the OEM design cooling fan ie approx 3 -5 hours depending on your competence! My Thanks still go to Keith for giving me the idea in the first place, and to other members who fed back further improvements Tools list: 8mm,10mm, 13mm sockets Pozidrive screw driver No2 Side snips Dremel not mandatory No 25 Torx key bit Crimper or Soldering iron or both Remove Fuse no 4 (80 amp) near battery Remove bumper (plenty of links to follow) Remove slam panel as a whole assembly. http://www.the75andztclub.co.uk/foru...ead.php?t=9653 leave headlamps, bonnet catches & crash beam in place   TO AVOID HAVING TO DEGAS AIRCON SYSTEM: Scribe a line with sharp Stanley knife & then nibble away cowling.   Top AC pipe entry.Cut out within red area Bottom pipe: Make a similar cut for the lower AC pipe.   Remove old Rover motor from cowling (No 25 Torx Qty 3 bolts) These will be rusted in on older cars and will have to be drilled/ground out. Remove complete motor assy Control box & cable loom through the front of the Seimens Cowling An Extra hard Cobalt drill bit is required due to the hardness of the bolts  Once Rover cowling is removed, mount Kenlowe centrally , with KENLOWE LABEL at TOP. Use Qty 6 good quality cable ties. (min 7.00mm width supplied) Make sure tie ends do not fowl the fan blades. Nuts & Bolts could be used Radially, on the outer edge of ducting if preferred. (pics at the end) Kenlowe's official fixing universal kit uses much smaller plastic ties so these are well up to the job !   Fit the connectors onto the 3 wires. Squeeze the tabs onto the copper strands to secure prior to soldering. (ideal method) If you cannot solder , crimp the terminals (bullet or spade type) 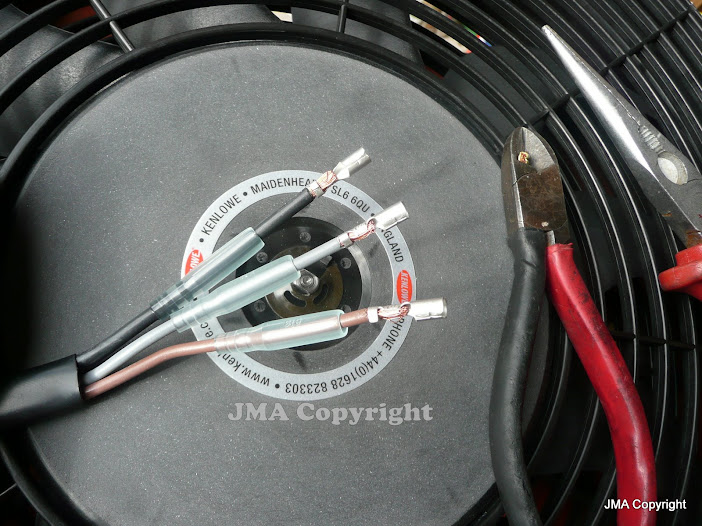  How the terminals should look after soldering.Either use both male & female terminals (if you want to unplug motor at later date) Or just use the female connectors as butt connections as shown which facilitates the soldering.  Colour code for 4 WIRE SYSTEM Diesel, Petrol 2.0 2.5 KV6 & V8 : RED - GREY BLACK - BLACK GREY- BROWN (PURPLE NOT USED. And as long as black goes to black it doesn't matter which way other 2 wires go, the polarity will be correct) COLOUR CODE for 1.8 Petrol K series 3 wire: BLACK - BLACK BROWN - RED GREY- PURPLE  Petrol 3 speed control box. NO PCB LEAVE ALL WIRING AS IT IS. Cut Purple wire half way down the loom & tape up. Test fan BEFORE refitting slam panel If NO motor rotation when Aircon selected, the large relay may have failed (new one supplied) If motor rotating permanently, again suspect same relay.  Diesel 3 speed control box. WITH PCB LEAVE ALL WIRING AS IT IS. Cut Purple wire off & tape up. Test fan BEFORE refitting slam panel If NO motor rotation when Aircon selected, the large relay may have failed (new one supplied) If motor rotating permanently, again suspect same relay. If removing the PCB to replace suspect relays, unplug Red & Grey wires, then GENTLY UNCLIP PCB & swing out to the side to access relays.    Kenlowe Fan fitting snugly into Siemens cowling At this stage we suggest you test the Fan (see testing procedure below  Don't shorten any cables if you require the control box to be repositioned near the battery. We recommend to relocate control box. Easy access if relays ever fail in future (or PCB in diesels) Recommend making a blanking plate out of Aluminium or Plastic to fit in the hole where control box was as 20% of the airflow will escape here.  Position of Waterproof connections (below expansion tank)  KV6 2.0 & 2.5 Petrol Variants If decision has been made to reposition the Control box, Extra holes can be added for a long Cable Tie to secure Control Box  KV6 Suggested fan loom routing for repositioned Control Box  KV6 Fan Control Box in it's new more accessible location  DIESEL VARIANT RE-POSTIONED CONTROL BOX An FBH is shown here (Webasto Fuel burning heater), even more room here if an FBH is not fitted. Your installation is complete. Feedback always welcome. If the Fan does not rotate or rotates permanently even when it should not, replace the large relay (supplied) in the control box  DIESEL VARIANT CAUTION IF FBH FITTED, MAKE SURE CABLE LOOM IS ROUTED AWAY FROM FBH EXHAUST. It is highly recommended to move the Fan Control Box. The wires are long enough to re position it next to the battery or fuse box. Easier access if a problem occurs with relays at a later date, avoiding the need to dismantle front end again !  ALTERNATIVE MOUNTING METHOD. Kenlowe Ducting integrated into Siemens Cowling A proper engineering approach using Nuts & Bolts  Qty 4 to 6 Bolts with 15mm spacers will suffice Testing procedure. (hint...carry this out BEFORE re-fitting slam panel) Replace Fuse 4 Start the engine (no real need for Diesel variant!) Press Demist this should activate SLOW cooling Fan. Test high speed from the Trinary here: http://www.the75andztclub.co.uk/foru...ad.php?t=35577 Good luck
__________________
[SIGPIC][/SIGPIC] Newbies do now!! 1. Plenum drains..all 3 or 4 year dependent 2. Cooling fan..All speeds functioning 3. Bonnet cable divider block Last edited by Jules; 11th November 2013 at 19:48.. |

|

|
|
17th July 2011, 00:30
|
#2 |
|
This is my second home
None * DROWNED Join Date: Aug 2007
Location: Cardigan
Posts: 33,339
Thanks: 1,257
Thanked 1,664 Times in 1,081 Posts
|
Post copied to How To forum. Thereby allowing this thread to be commented upon. As it is in the Technical Help forum, it would be appreciated that any posts would be constructive to the OP's post
 If there are any amendments to the OP's post I would be grateful for a head's up so that I can update to the How-to forum  This post has been re-opened to allow the OP to update. (Jules you have a PM)
__________________
Andrew Ich Dien Problem solving is... lateral thinking SEARCH FIRST ...ASK LATER... Last edited by Dragrad; 17th July 2011 at 01:23.. Reason: typo |
|
|
|
|
11th November 2013, 17:44
|
#3 |
|
Posted a thing or two
MG ZT cdti Join Date: Jun 2010
Location: Northants / Bucks border
Posts: 1,815
Thanks: 260
Thanked 204 Times in 182 Posts
|
shame this has lost all the photos ... would have been very useful to me right now
__________________
now with ZT Diesel power after killing the connie and the zt180 combusting |
|
|
|
|
11th November 2013, 18:58
|
#4 |
|
This is my second home
ZT 260 SE Twilight and 10 other 75 ZT's :O Join Date: Jan 2007
Location: Conwy NORTH WALES
Posts: 11,094
Thanks: 512
Thanked 1,116 Times in 763 Posts
|
Really annoying this
Google have changed the URL codes . I wonder how many of my 100's of photos have been affected ? It may take some time to get this sorted so please bear with me. very busy workshop to run at present and many back orders to deal with.
__________________
[SIGPIC][/SIGPIC] Newbies do now!! 1. Plenum drains..all 3 or 4 year dependent 2. Cooling fan..All speeds functioning 3. Bonnet cable divider block |
|
|
|
|
11th November 2013, 19:51
|
#5 |
|
This is my second home
ZT 260 SE Twilight and 10 other 75 ZT's :O Join Date: Jan 2007
Location: Conwy NORTH WALES
Posts: 11,094
Thanks: 512
Thanked 1,116 Times in 763 Posts
|
I've restored a few important photos for now.
__________________
[SIGPIC][/SIGPIC] Newbies do now!! 1. Plenum drains..all 3 or 4 year dependent 2. Cooling fan..All speeds functioning 3. Bonnet cable divider block |
|
|
|
|
11th November 2013, 20:00
|
#6 | |
|
Posted a thing or two
MG ZT cdti Join Date: Jun 2010
Location: Northants / Bucks border
Posts: 1,815
Thanks: 260
Thanked 204 Times in 182 Posts
|
Quote:
any chance of the kv6 wiring ones ???? and the repositioning ones thanks for your time again why I host my pics on my own domain server for my website 
__________________
now with ZT Diesel power after killing the connie and the zt180 combusting |
|
|
|
|
|
11th November 2013, 20:08
|
#7 |
|
This is my second home
ZT 260 SE Twilight and 10 other 75 ZT's :O Join Date: Jan 2007
Location: Conwy NORTH WALES
Posts: 11,094
Thanks: 512
Thanked 1,116 Times in 763 Posts
|
It's all in hand to be on my own domain.
But it's time I ain't got at the moment. KV6 water pump & belts job has to be out of here by the morning then I have a car to prepare for NEC classic car show.
__________________
[SIGPIC][/SIGPIC] Newbies do now!! 1. Plenum drains..all 3 or 4 year dependent 2. Cooling fan..All speeds functioning 3. Bonnet cable divider block |
|
|
|
|
11th November 2013, 20:14
|
#8 | |
|
This is my second home
ZT 260 SE Twilight and 10 other 75 ZT's :O Join Date: Jan 2007
Location: Conwy NORTH WALES
Posts: 11,094
Thanks: 512
Thanked 1,116 Times in 763 Posts
|
Quote:
Basically the Kenlowe requires it's black to earth. The Kenlowe brown and Kenlowe grey must have positive feeds from the fan control box relays DO NOT connect them to ground as the motor will burn out in 5 seconds flat. Are you converting from a 4 wire motor?
__________________
[SIGPIC][/SIGPIC] Newbies do now!! 1. Plenum drains..all 3 or 4 year dependent 2. Cooling fan..All speeds functioning 3. Bonnet cable divider block |
|
|
|
|
|
11th November 2013, 20:28
|
#9 | |
|
Posted a thing or two
MG ZT cdti Join Date: Jun 2010
Location: Northants / Bucks border
Posts: 1,815
Thanks: 260
Thanked 204 Times in 182 Posts
|
Quote:
__________________
now with ZT Diesel power after killing the connie and the zt180 combusting |
|
|
|
|
|
11th November 2013, 20:35
|
#10 |
|
Posted a thing or two
MG ZT cdti Join Date: Jun 2010
Location: Northants / Bucks border
Posts: 1,815
Thanks: 260
Thanked 204 Times in 182 Posts
|
oh and what is the point of re routing the control box ???
__________________
now with ZT Diesel power after killing the connie and the zt180 combusting |
|
|
|
 |
|
|


 Linear Mode

