
|
|
|
|
|
|
||
|
|
||
 23rd April 2018, 12:41
|
#11 |
|
This is my second home

MG ZT 2.0 CDTI+ in Typhoon, MG TF 135 in Typhoon & Rover 75 Connoisseur CDTI SE in Pearl Black Join Date: Oct 2012
Location: Norfolk
Posts: 7,534
Thanks: 2,718
Thanked 2,827 Times in 1,462 Posts
|
Right just got back onto this and have just run into constant problems, all pretty much due to how useless Rave seems to be with wiring colours and not knowing which plugs I need to look at.
First I thought I'd check out C0275-7 and c0275-6 wires at the back of the AC panel to see what they're doing when the heated rear screen is on and to see how many volts goes through C0275-7 to illuminate the rear heated screen switch. Well according to Rave, the wire colours are red and black and are pins 6 and 7, as per the diagram here: 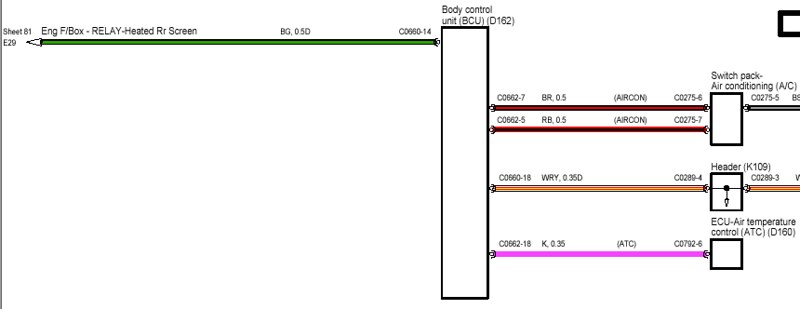 Well I have the black plug for the AC panel right in front of me and there's no red/black wires at all coming from this plug (no wire with any red on it at all in fact) and there's no pin number markings either so I can work out which pin is for what. So not very helpful at all. Here's the plug: 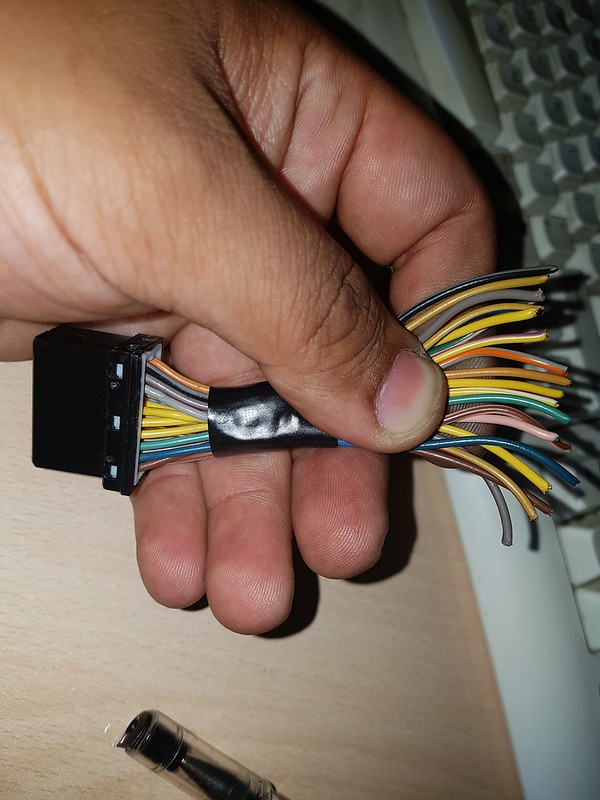 So instead I thought I'd unbolt the under bonnet fuse box to see if I can locate the wire for the rear heated screen there. According to rave, C05676-7 is the wire I need which goes to the relay on the underbonnet fuse box from the BCU. See here: 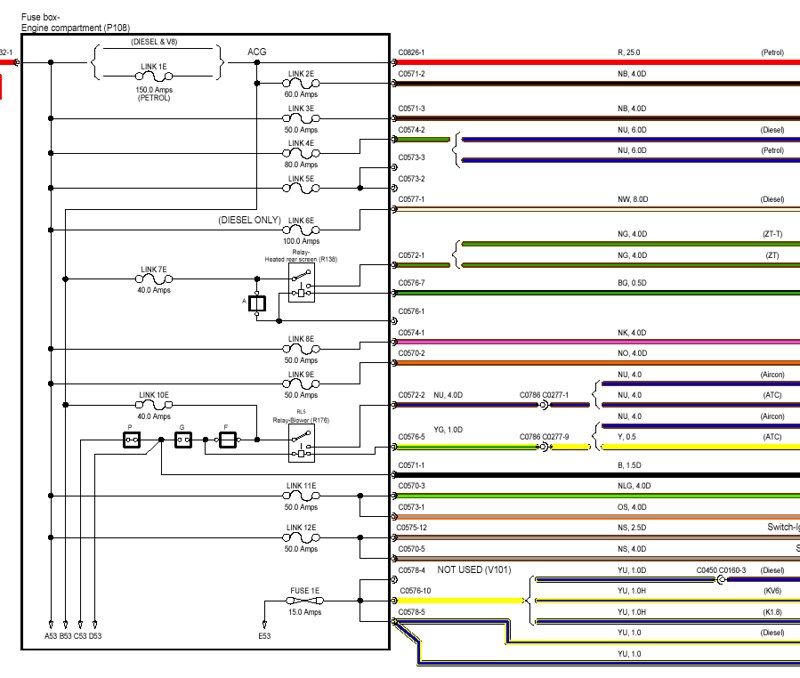 According to rave the wire is Green and Black but yet again the wire colours on the plugs under the fuse box are different and dont match up yet again. Also, theres 5 different plugs under the fuse box so I have no idea which one I should be looking at. And yet again there are no markings on the plugs to indicate pin numbers. 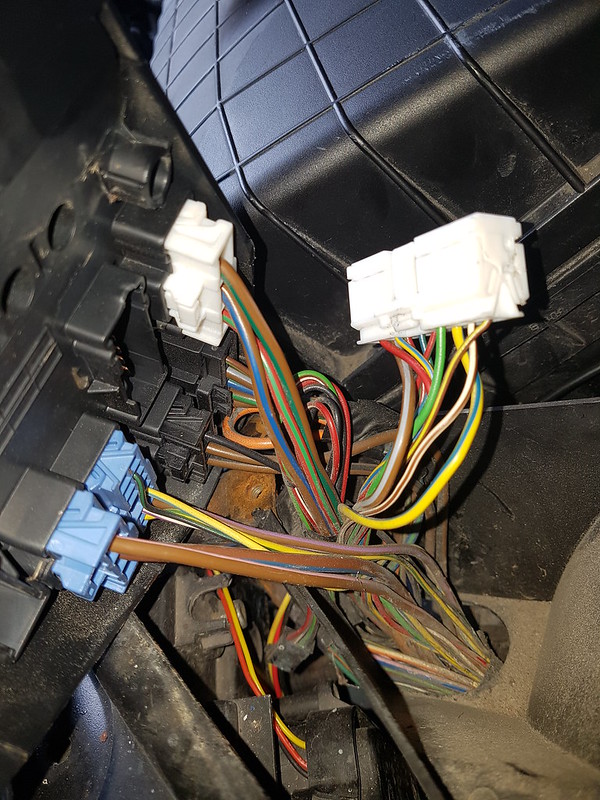 So does anyone have any idea which pin and what colour wire I should be looking for under the under bonnet fuse box? 
__________________
How to retrofit Cruise Control on a diesel with no OEM wiring in place: Link How to retrofit heated electric memory seats with no OEM wiring in place: Link How to operate FBH and ATC via text Link How to restore cloudy projector headlights Link
Last edited by Rick-sta; 23rd April 2018 at 12:51.. |

|

|
|
23rd April 2018, 13:38
|
#12 |
|
This is my second home
Rover 75 Saloon & Tourer Join Date: Sep 2012
Location: Lincoln
Posts: 14,928
Thanks: 1,630
Thanked 3,032 Times in 2,181 Posts
|
If you are talking having the front come on automatically, when the rear screen comes on automatically I would give this more consideration. I find the rear screen often comes on when it is not needed and I have to turn it off.
Are you able to give people the option, manually turn it on and it come on automatically? macafee2 |
|
|
|
|
23rd April 2018, 20:22
|
#13 |
|
I really should get out more.......
mg 190+ Join Date: Feb 2013
Location: Bedworth
Posts: 2,267
Thanks: 191
Thanked 368 Times in 248 Posts
|
You can turn the rear screen off auto mode .done mine due to having a front heated screen.
If you want the front to switch on at the same time as the rear .I would put the front screen on a timer as only needs to be on a few minutes. Or on a switch on its own. If both on at the same time the current they pull is shed loads. To say if my screens are on the revs on the car drop due to the load. Even if I have just side lights on when I turn the heated screens off the lights get brighter. Thanks Steve |
|
|
|
|
23rd April 2018, 20:38
|
#14 |
|
Gets stuck in
MG ZT,MG ZT-T Join Date: May 2008
Location: St. Helens
Posts: 961
Thanks: 211
Thanked 235 Times in 158 Posts
|
I think you are looking too deeply into this!
When I fitted mine I used a heated seat switch with the upper part of the seat blacked out with a permanent marker pen (looks like a windscreen) fed from an ignition supply.I then fed the output to two separate relays mounted on the battery box with the power coming straight of the battery through the relays (built in 20/25 amp fuse on each) then out to each separate circuit. Don`t worry about timers (you will switch off when everything is clear)I like to keep mine on for a mile or two anyway as screens can freeze again when you are on the move. Hope this makes sence. Neil |
|
|
|
|
24th April 2018, 09:54
|
#15 |
|
This is my second home
MG ZT 2.0 CDTI+ in Typhoon, MG TF 135 in Typhoon & Rover 75 Connoisseur CDTI SE in Pearl Black Join Date: Oct 2012
Location: Norfolk
Posts: 7,534
Thanks: 2,718
Thanked 2,827 Times in 1,462 Posts
|
guys thanks for the replies but I've already thought about all of this. I'm offering 2 options for the heated screen set ups, 1 is to run it off a spare heated seat switch so that the front screen can be switch on independently, however this option is no use to those who already have 5 switches in the switch panel, hence why my second option is to run the front and rear screens together by triggering the relays for the front screen via the rear heated screen button.
I've also already thought about the timing, I'm including a timed relay in the loom which limits the front screen to being on for only 5 minutes as thats all thats needed to defrost the screen completely, Yes the windscreen's heater elements are split into two halves, and yes they use a lot of power and I've already sourced all the parts (relays + wiring + fuses etc) which can handle it. The only part I'm stuck on is identifying a wire for the heated rear screen where I can take a feed from to trigger my relays. I don't really want to take it from the wiring at the back of the car by the screen, ideally best place would be to take to from the wiring for the heated screen which runs to the under bonnet fuse box but I can't identify which wire is for the heated screen. An even better option would be for the heater elements to come on when the front screen demist option is selected on the AC panel but I dont think this is possible to do. Thanks |
|
|
|
|
24th April 2018, 10:06
|
#16 | |||
|
Doesn't do things by halves

Rover 75 2.5 Connoisseur Auto (1999) Dealer launch model. Join Date: Mar 2007
Location: Former Middlesex
Posts: 20,375
Thanks: 1,587
Thanked 3,749 Times in 3,181 Posts
|
Quote:
Quote:
Quote:
Simon
__________________
"Whatever is rightly done, however humble, is noble." Sir Henry Royce. |
|||
|
|
|
|
24th April 2018, 11:55
|
#17 | |
|
This is my second home
none but not gone Join Date: Mar 2013
Location: March, Cambs
Posts: 16,437
Thanks: 894
Thanked 4,247 Times in 3,025 Posts
|
Quote:
Perhaps one of the really clever guys could put together a K-Bus module that looks for that signal and turns a relay on for you... we use the k-bus for the temp sensors you can buy, you may only need to monitor a different address??
__________________
 [SIGPIC][/SIGPIC]
.All praise Bananaswan
. [SIGPIC][/SIGPIC]
.All praise Bananaswan
.
|
|
|
|
|
 |
|
|


 Linear Mode

