
|
|
|
|
|
|
||
|
|
||
|
|||||||
|
|
 |
|
|
Thread Tools | Display Modes |
 20th October 2015, 15:36
|
#1 |
|
This is my second home

MG ZT 2.0 CDTI+ in Typhoon, MG TF 135 in Typhoon & Rover 75 Connoisseur CDTI SE in Pearl Black Join Date: Oct 2012
Location: Norfolk
Posts: 7,534
Thanks: 2,718
Thanked 2,827 Times in 1,462 Posts
|
A few members have recently asked me how to retrofit cruise control on a diesel with no original wiring in place. So thought I'd make a simplified how to guide on here.
When retrofitting mine, I used the following How to Guides: http://the75andztclub.co.uk/forum/sh...d.php?t=176283 (this ones a great guide in more detail) http://www.mgf.ultimatemg.com/ztt/cruise_control/ https://www.the75andztclub.co.uk/for...d.php?t=175820 Parts you'll need: Cruise control Interface/ECU Cruise Control Interface/ECU mounting bracket: Cruise Control Master Dash Switch: Cruise Control Steering Wheel Controls: You will also need the following connectors from a donor car: From left to right: master dash switch plug C0749; Steering Wheel Column Plug (for steering wheel controls) C0082; Cruise control Interface plug C0895; ECU plug (in plenum) C0331 You will also need the white plug which goes into the IPK You don't necessarily need plugs 2,4 and the IPK plug listed above, all you need is 4 of the pins with a bit of wire attached which fit into these plugs (1 for the ECU, 1 for the IPK and 2 for the steering wheel controls). Only the pins will be needed as you'll need to slot them into plugs 2 and 4 and the IPK plug already fitted in your car. I'd recommend giving yourself up to 2 days to do this retrofit. It took myself just over a day in April to do mine, as you'll have to remove your stereo, heater controls, glove box, IPK, plenum guards to access the ECU and also unbolt the under bonnet and in car fuse boxes. Quite a bit of soldering is also required for the wiring. I'd recommend soldering the wires together as you really don't want a joint coming apart after all the work you would have put in fitting it. How to fit: First step - disconnect the battery. Now my technical knowledge isn't all that great when it comes to wiring, I'm more of a "take this wire and put it here" type person when it comes to instructions for these kind of jobs.  Therefore i spent a good few hours earlier in the year reading through all the guides, wiring diagrams and information on retrofitting cruise control and came up with the following simplified wiring diagram which made the job a lot easier for me. Hopefully it will be helpful for others too. Therefore i spent a good few hours earlier in the year reading through all the guides, wiring diagrams and information on retrofitting cruise control and came up with the following simplified wiring diagram which made the job a lot easier for me. Hopefully it will be helpful for others too. 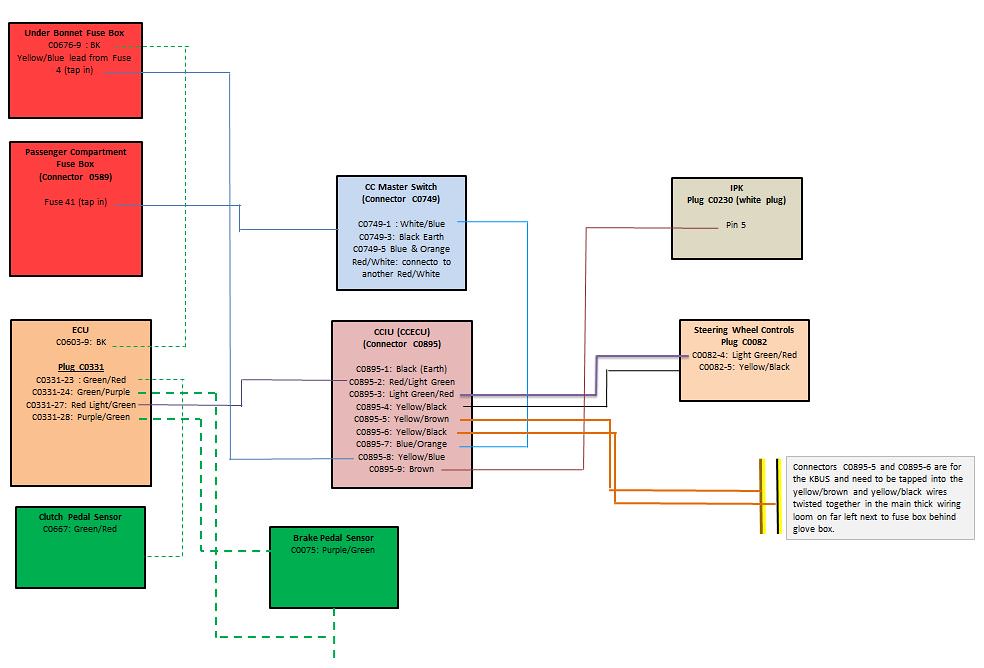 The solid lines above are the wires which you'll need to fit yourself, the green dotted lines are wires which should already be in place (i.e. the wiring from the car's ECU to the brake and clutch pedal switches (or just to the brake pedal switch for auto's). Brake and clutch pedal switches should already be in place in all cars. After reading up on this, apparently the two switches are used for other functions other than the cruise control. Both the switches were already in place in my ZT and were both functioning so i didn't need to touch them  A good starting point is the Cruise Control ECU plug and the Cruise Control Master Switch plug, as all the wiring you'll need to fit will be going to and from these two plugs. Here's the list of wires on the Cruise Control Interface/ECU and master switch plugs and where they need to be wired to, hopefully the instructions below should help you follow the wiring diagram above: 1. Cruise Control ECU Plug C0895 with 9 wires (which sits behind glove box) Pin-1: Black (Earth) - wire to any earth point Pin-2: Red/Light Green - goes to the car ECU in plenum (Pin 27 on plug C0331 which is the second plug that can be removed from the ECU (the ecu plugs can only be removed in one order, so it will be the second plug you remove which you'll need to wire to). (The ECU plug is Plug 4 in picture above) Pin-3: Light Green/Red - goes to the Steering Wheel Controls White Plug C0082 - Pin 4 (Plug 2 in picture above) Pin-4: Yellow/Black - Steering Wheel Controls White Plug C0082 - Pin 5 (Plug 2 in picture above) Pin-5: Yellow/Brown & Pin-6: Yellow/Black - to be wired to KBUS. this can be done by tapping into the yellow/brown and yellow/black wires twisted together in the main thick wiring loom on far left next to fuse box behind glove box. Can be a little tricky to find but they are there. Pin-7:Blue/Orange - wire to Blue/Orange wire on CC master Switch plug for the centre consol Pin 5. Pin-8: Yellow/Blue- Needs to be wired to fuse 4 in the under bonnet fuse box. Remove the 3 mounting bolts/screws from the fuse box in the engine bay and take off the thick black lead which goes to the battery. Lift up the box and underneath there is a blue plug with 12 pins. Piggy back onto the Yellow/blue lead coming from this blue plug, which is fed from Fuse 4. Pin-9: Brown - goes to Pin 5 on the white plug in the back of the IPK (IPK is easy to remove and doesn't require the dash to be taken out). There are two philips screws above the IPK, remove those and the IPK will come out. 2. Cruse Control Centre Consol Master Switch Plug with 4 wires: Pin-1 : White/Blue - This needs to be wired to fuse slot 41 on the fuse box behind the glove box, which will be a empty slot. You'll have to unbolt the fuse box and wire into the fuse box from behind. I found fuse slot 41 hard to get to due to too many wires being in the way, so wired mine to fuse slot 26 which was empty. A 10amp fuse will be needed. Ah easier way to do this is to use a fuse tap which you can plug into any ignition live fuse slot. Pin-3: Black Earth - wire to any earth point. Pin 4: Red/White - connect to another Red/White wire coming from any other centre consol switches. This wire is for the orange back lighting on the switch when you turn your lights on. Pin-5: Blue & Orange - To wire to Pin 7 on the CC ECU plug, see Pin 7 above. Once you've covered the above, that 'll be everything wired up and ready to go. All that'll be left to do will be to have the cruise control's resume function activated using a T4 (if you haven't done so already). The cruise control will work without it being fully activated by a T4, from memory I think only the resume option won't work and the cruise control light on the IPK turns on immediately after pressing the master switch on the dash rather than when the cruise control is actually being used. I'd advise testing the cruise control before putting everything back together. Mine worked straight away on first test If it doesn't work, check all of your wiring and also check the brake/clutch pedal switches, if the switches are not in place properly the cruise control will not work. Additional hole for master switch on centre consol: You'll require an additional hole in your centre consol switch panel fascia for the cruse control's master switch. If like myself you cannot find a switch panel with the correct number of holes which matches the rest of your dash, you can cut an additonal hole in your existing switch panel using a gremel tool. If you look at the back of the switch panel trim, you'll see that there are oval shapes marked out for the switches. DONT CUT ALONG THESE LINES!!! If you cut along those lines the hole will be bigger than the size you need, so you'll end up with a gap all the way round your switch. When cutting two additional holes into my switch panel, I cut about 2-3mm's inside of the oval marked out using a dremel, and then slowly filed back the cut out until it was the correct size. It requires a bit of patience and filing back small amounts until it fits nicely around the button without it causing the button to jam. Here's the end result after doing mine 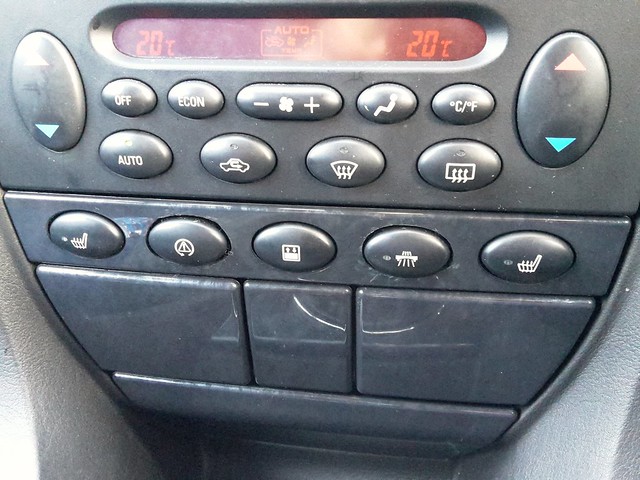 Hopefully this guide is useful for those who are thinking of retrofitting cruise control to their diesel. It's well worth it, I use mine all the time on long journeys and absolutely love it Here's some pictures from when I was fitting mine: 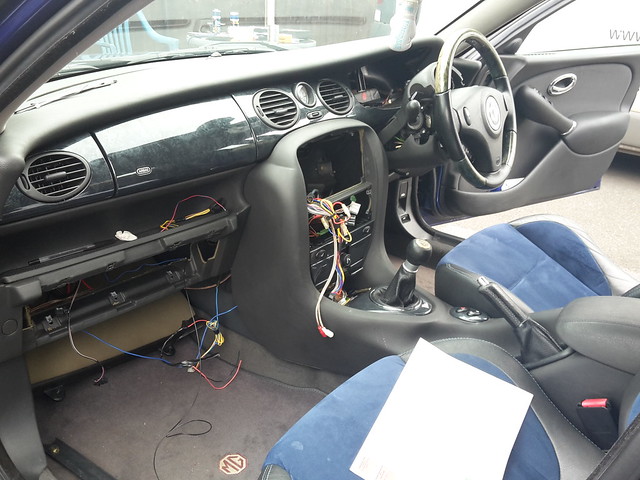 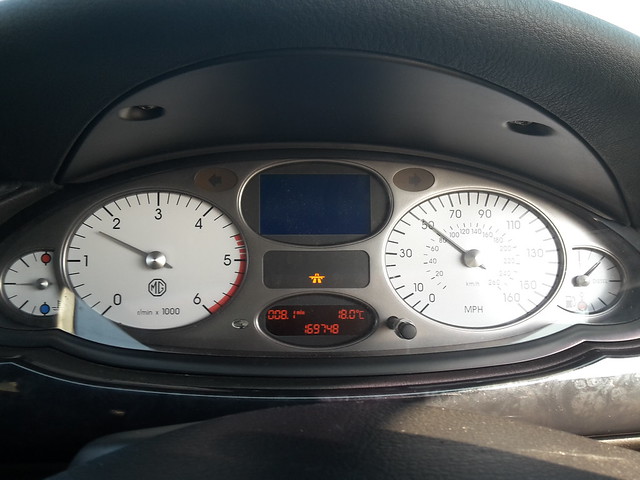  Good luck and feel free to ask any questions if anything is unclear Big thanks to peter "Union Wheels" for his detailed How To which I followed to fit mine  Usual Disclaimer applies: You are responsible for any work or modifications carried out on your car and you undertake any such work at your own risk. The 75 and ZT Owners Club nor the original author of this How-To can be held liable for anything that may happen as a result of you following this How-To.
__________________
How to retrofit Cruise Control on a diesel with no OEM wiring in place: Link How to retrofit heated electric memory seats with no OEM wiring in place: Link How to operate FBH and ATC via text Link How to restore cloudy projector headlights Link
Last edited by Rick-sta; 14th April 2020 at 12:21.. |

|

|
|
20th October 2015, 15:46
|
#2 |
|
This is my second home
MG ZT CDTi Auto / ZT-T Trophy Blue Join Date: Nov 2013
Location: York
Posts: 3,981
Thanks: 3,329
Thanked 1,644 Times in 1,238 Posts
|
Highly recommend using this tutorial, I followed this when i did my cruise control. Believe me, if i did it then anyone can. Thanks for this Rick.
Last edited by LotusLC; 20th October 2015 at 18:04.. |
|
|
|
|
20th October 2015, 15:54
|
#3 | |
|
This is my second home
MG ZT 2.0 CDTI+ in Typhoon, MG TF 135 in Typhoon & Rover 75 Connoisseur CDTI SE in Pearl Black Join Date: Oct 2012
Location: Norfolk
Posts: 7,534
Thanks: 2,718
Thanked 2,827 Times in 1,462 Posts
|
Quote:
and you're welcome |
|
|
|
|
|
20th October 2015, 15:58
|
#4 |
|
This is my second home
N/A Join Date: Feb 2010
Location: Suffolk
Posts: 6,867
Thanks: 0
Thanked 397 Times in 302 Posts
|
The centre console button isn't actually required - I use mine every journey and remembering to turn it on was a pain so I just joined the wires together so it's always on, and removed the button / replaced the trim.
|
|
|
|
|
20th October 2015, 17:50
|
#5 | |
|
This is my second home
MG ZT 2.0 CDTI+ in Typhoon, MG TF 135 in Typhoon & Rover 75 Connoisseur CDTI SE in Pearl Black Join Date: Oct 2012
Location: Norfolk
Posts: 7,534
Thanks: 2,718
Thanked 2,827 Times in 1,462 Posts
|
Quote:
 This guides for an OEM retrofit but ofcourse you can bypass the master switch if you want to. I'd prefer to keep it as an extra safety feaure This guides for an OEM retrofit but ofcourse you can bypass the master switch if you want to. I'd prefer to keep it as an extra safety feaure |
|
|
|
|
|
29th November 2015, 23:49
|
#6 |
|
This is my second home
None * DROWNED Join Date: Aug 2007
Location: Cardigan
Posts: 33,339
Thanks: 1,257
Thanked 1,664 Times in 1,081 Posts
|
Now included in the How To's here
and saved for posterity If you are retrofitting to a Tourer there is a good chance that not only the loom is in place but also the ECU has the capability to be programmed prior to fitting. As I found, thanks to marinabrian 
__________________
Andrew Ich Dien Problem solving is... lateral thinking SEARCH FIRST ...ASK LATER...  Last edited by Dragrad; 30th November 2015 at 00:33.. Reason: Addition |
|
|
|
|
29th November 2015, 23:59
|
#7 | |
|
This is my second home
MG ZT 2.0 CDTI+ in Typhoon, MG TF 135 in Typhoon & Rover 75 Connoisseur CDTI SE in Pearl Black Join Date: Oct 2012
Location: Norfolk
Posts: 7,534
Thanks: 2,718
Thanked 2,827 Times in 1,462 Posts
|
Quote:
|
|
|
|
|
|
30th November 2015, 00:27
|
#8 | ||
|
This is my second home
None * DROWNED Join Date: Aug 2007
Location: Cardigan
Posts: 33,339
Thanks: 1,257
Thanked 1,664 Times in 1,081 Posts
|
Quote:
Quote:
TBH I like to control my car as much as I can, before it controls me  
__________________
Andrew Ich Dien Problem solving is... lateral thinking SEARCH FIRST ...ASK LATER... |
||
|
|
|
|
30th May 2016, 08:29
|
#9 |
|
Posted a thing or two
ZT-T + CTDI Join Date: Oct 2014
Location: Gone walkabout
Posts: 1,185
Thanks: 179
Thanked 361 Times in 289 Posts
|
I picked up a C/C set up from the breakers yesterday. Alas my ZTT doesn't have the C/C wiring in the loom
 , so I was all set to stick the kit on ebay. , so I was all set to stick the kit on ebay. Finding this thread has caused a major rethink I will be having a go at it in a few months time. |
|
|
|
|
30th May 2016, 15:59
|
#10 |
|
This is my second home
MG ZT 2.0 CDTI+ in Typhoon, MG TF 135 in Typhoon & Rover 75 Connoisseur CDTI SE in Pearl Black Join Date: Oct 2012
Location: Norfolk
Posts: 7,534
Thanks: 2,718
Thanked 2,827 Times in 1,462 Posts
|
It's not a bad job to do, just give yourself 2 days
|
|
|
|
|
|
|


 Linear Mode

