
|
|
|
|
|
|
||
|
|
||
 13th September 2016, 19:41
|
#1 |
|
This is my second home

MG ZT 2.0 CDTI+ in Typhoon, MG TF 135 in Typhoon & Rover 75 Connoisseur CDTI SE in Pearl Black Join Date: Oct 2012
Location: Norfolk
Posts: 7,534
Thanks: 2,718
Thanked 2,827 Times in 1,462 Posts
|
Hi all,
Had been asked quite a few times for a how to on retrofitting electric heated memory seats to a 75 or ZT which doesn't have the original loom in place already. I performed this retrofit on my ZT back in 2014 and has worked perfectly fine ever since. The guide below requires you to make your own loom, which is pretty easy and simple to do, and much much easier and quicker than trying to remove the original OEM loom from a donor car and trying to fit it to your own. I've removed an original loom from my old doner car last year and it required the whole dash to be removed, a lot of tape and cable ties to be cut before the wiring could be removed, and it look a long time to pick out the wires I needed. The guide below is just the way I did it and it worked for me, it may not be the best way to do it or the way you would do it, but for those that don't know where to start, this will be be a good starting point and you can feel free to do parts differently as you wish  . By wiring up the seats this way, the power to the seats is permanent live, meaning you can move the seats without having the key turned in the ignition. The heated seat function only works with the key turned in the ignition. . By wiring up the seats this way, the power to the seats is permanent live, meaning you can move the seats without having the key turned in the ignition. The heated seat function only works with the key turned in the ignition. At the time I used electrical connector blocks to wire up the seats, however if you can, I would recommend soldering the wires and using heat shrink sleeves over the joints. If you choose to use electrical connectors like myself, then ensure you use the correct rated blocks and properly insulate the joints using electrical tape. What you'll need: Driver and Passenger seat large black 8 pin plugs (car side) with about 6 inches of wiring on each. Heated seat plugs with about 6 inches of wiring (car side) 30amp rated wiring http://www.ebay.co.uk/itm/1mm-1-5mm-...gBtK2D7Gerf5xg 5amp rated wiring http://www.ebay.co.uk/itm/AUTOMOTIVE...29Dx4YNkFV4qcQ Female Spade Crimp Connectors x2 http://www.ebay.co.uk/itm/Insulated-...z0wGxMA4V4CMWw Crimp Ring Connectors x2 http://www.ebay.co.uk/itm/Red-Blue-Y...hbeNJ3V413nt5w Inline fuse holders x 5 http://www.ebay.co.uk/itm/5-x-Standa...UAAOSw0QFXC10X Electrical connector Blocks/ or soldering iron if soldering http://www.ebay.co.uk/itm/3-6-15-30-...XI_Ohqnic6ygYQ Wire Strippers Screw Drivers Socket Set + Extension Bar T50 Torx bit Electrical tape Cable ties Time: this took me 1 day to retrofit from start to finish. Driver's seat plug: 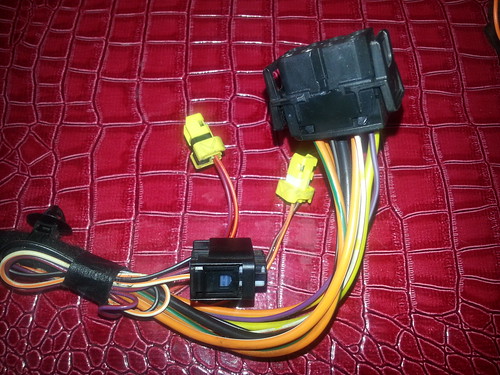 Passenger Seat Plug: 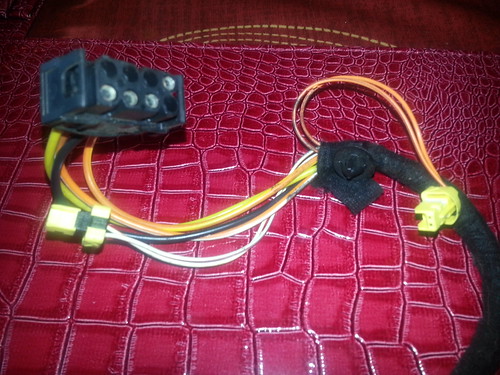 Heated Seat Switch Plugs:  My Wiring Diagram: This is a wiring diagram I made for myself a couple years back to help me with my retrofit. I'll explain all the parts of the diagram below, personally found it much easier to understand and follow the wiring using this: 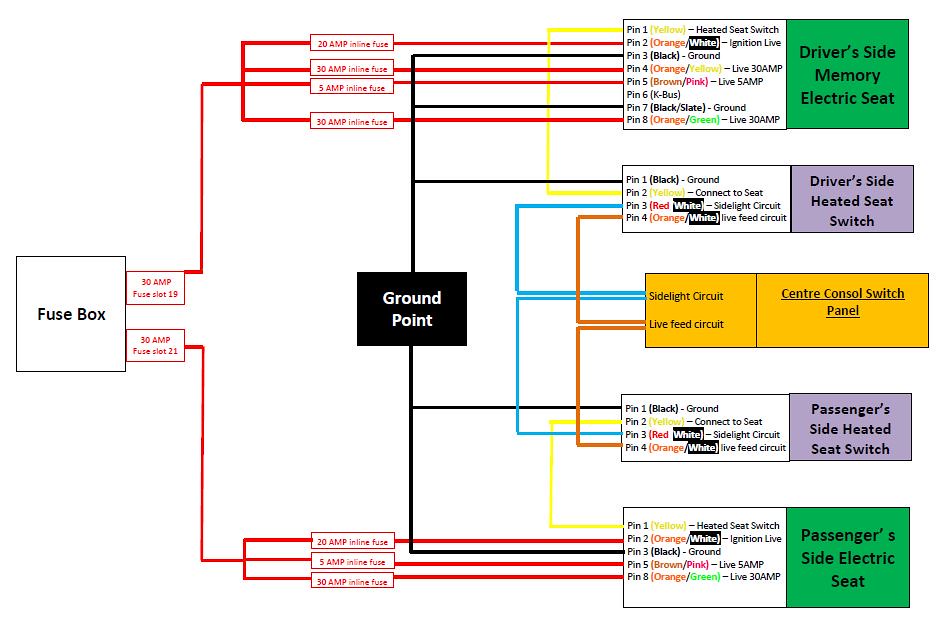 Note: I made the wiring diagram above based on another how to I'd used, however when it came to wiring up my seats, I noticed that Pin 8 on both the driver's side and passenger side plugs were actually empty, therefore I'd advise checking if your 8 pin seat plugs have a wire in pin 8 or not. If you don't have a wire in pin 8, then ignore pin 8 on the wiring diagram above. If you do have a wire in Pin 8, I believe this is will need to be connected to a 30amp live. What the wires on each plug are for: Drivers Seat: The Driver's side plug has the following pins: Pin 1 - (thin Yellow Wire): Wire for heated seat switch (goes to pin 2 of the heated seat switch) Pin 2 - (thin Orange/White): Power wire for Heated Seat (Ignition Live) Pin 3 - (Black): Earth Pin 4 - (Orange/White) : Live 30 amp Pin 5 - (Brown/Pink wire): Live 5 amp Pin 6 - K-Bus wire for memory function, simply wire to a K-Bus wire behind the dash. (can ignore if you wish) Pin 7 - (Black/Slate): Earth Pin 8 - Empty Passenger Seat: The passenger side plug has the following pins: Pin 1 - (thin Yellow Wire): Wire for heated seat switch (goes to pin 2 of the heated seat switch) Pin 2 - (thin Orange/White): Power wire for Heated Seat (Ignition Live) Pin 3 - (Black): Earth Pin 4 - Empty Pin 5 - (Brown/Pink wire): 5 amp Live Power Pin 6 - Empty Pin 7 - Empty Pin 8 - Empty Heated Seats: The heated seats switches for the dash have the following wires: Pin 1: Thick (1.5mm) Black = Earth Pin 2: Thick (0.75mm) Yellow = Connect to yellow from the seat plugs (Pin 1 on seat plugs) Pin 3: Thin (0.5mm) red/white = this is for the illumination of the switch when the lights are switched on, simply wire to another red/white sidelight circuit wire behind the centre consol. Pin 4: Thin (0.5mm) orange/white = ignition live feed, this is simply for the green light which illumates when the heated seat switch is turned on, simply wire this to a ignition live cable behind the centre consol. Remember to Disconnect the battery before starting. Removing Front Seats: First step would be to remove your current front seats, both seats are held in place with 4 bolts on the runners. This is pretty straight forward to do: 1. move seat as far back as possible. 2. Remove torx bolt at front of each runner 3. move seat as far forward as possible 4. Remove torx bolt at rear of each runner 5. Tilt seat forward or back and unclip electrical connectors under seat ( good practice to disconnect battery before disconnecting connectors as one is the airbag for each seat) 6. remove headrest 7. carefully remove from car Power for seats: Before starting, ensure you have disconnected the car battery. I started off my wiring by getting the power sorted to the seats. The power is taken from fuse slots 49 and 51 from the fusebox behind the glove box , which based on my owners manual is where the fuses for the OEM electric seats are. This is based on the later fuse box which takes the smaller mini fuses. If you have an earlier model with the older fuse box which takes the larger fuses, I believe the electric seats fuse slots are still slots 19 and 21 according to the older owners manual. You will require 2 30 amp fuses for the fuse box. Now there are three ways you can wire your power wires to the fuse box: 1. Unbolt the fuse box and use female spade connectors to slot into the two blank slots (49 and 51) from behind the fuse box. 2. use piggy back fuse holders to take the power from the front of the fuse box (30 amp rated piggy back fuse holders will be required). 3. Take a power from the tow bar electrics plug. Option 1: I personally used option 1, and unbolted the fuse box and wired to the fuse box from behind using two female spade connectors. This is quite fiddly, but looks a bit neater when done. If you choose to do it this way, ensure the femal spade connectors you use are the correct size to hold the pin on your fuses. I have explained how to wire to the fuse box using option 1 below. Option 2: Option 2 is a lot easier, however I am not sure if you can purchase 30amp rated piggy back fuse holders, the highest rated ones I've been able to find are 20amp. Maybe someone would be able to confirm if it is possible to obtain 30amp rated ones, which is what will be needed. I would suggest using two seperate piggy back fuse holders, one for the drivers seat and one for the passenger seat. Option 3: I haven't used this option myself, but another option is to use the tow socket wiring which I believe is found to the left of the fuse box within the large bunch of wires. There is an orange and grey thick wire going into a black plug as shown in the pic below. This is the 50amp live for the towing socket. If you never intend on fitting a tow bar in the future, you could cut off the black plug and wire directly to the orange and grey wire (use a inline fuse holder here with a 30amp fuse), however if you have a tow bar or you think you may fit one in the future, you could piggyback off this wire using a scotch lock or a connector block, but I would advise to use options 1 or 2 incase you put too much load onto the orange and grey wire if using it for electric seats and your tow bar.  If you choose to use this option you will need to split your power cable into two cables, one for the passenger seat and one for the drivers seat. Using Option 1: The rest of this how to will be based on using option 1. Begin by unbolting and removing the glove box (how to remove glove box: https://www.the75andztclub.co.uk/for...t=sunroof+leak) and then unbolt the fuse box which is held in place with two 8mm bolts on opposite corners (socket set and an extension bar came in handy here). Once removed, carefully turn the fuse box around, and you should be able to see that no wires go into fuse slots 49 and 51. Now you will need two lengths of your 30amp rated power cable, one will need to be long enough to reach from the fuse box to the passenger seat and the other needs to be long enough to reach the drivers seats. Once you have your two lengths, crimp a female spade connector to your power cables (on the end which will be connected to the fuse box) and insulate with electrical tape (or solder if you wish to and then insulate). Now you will need to slot the two spade connectors into slots 49 and 51 of the fuse box from behind, and then plug in a 30amp fuse into slots 49 and 51 from the front. Below is a photo of this done on mine, the two thick red wires are the ones I slotted into the back of the fuse box. Once done, you now have your power feeds for the driver and passenger seats.  In order to run the power wires from the fuse box to under the driver and passenger seats, you will need to remove the plastic floor trims along the front driver's and passenger's doors, remove the plastic side trims in the foot wells on the outer sides (i.e. left side in the passenger foot well and right side on the drivers footwell where the boot and bonnet releases are), and lift up some of the carpet along the edges. You'll also need to remove the stereo and heater control panel in the centre consol at this point in order to pass the driver's seats power wire from the passenger side of the car to the drivers side. I'd suggest ordering new plastic trim fastners prior to doing this as it's common for the trim fastners to snap when removing the plastic floor trims, replacement ones are available on ebay: http://www.ebay.co.uk/itm/ROVER-SILL...-/190864489736 One you've removed the necessary trims, you'll need to run your passenger power cable down the left side of the passenger footwell and under the carpet to under the passenger seat, and run the driver's side power cable across behind the dash past the centre consol, down the far right of the driver's footwell, down behind the boot and bonnet release and then under the carpet to under the driver's seat. 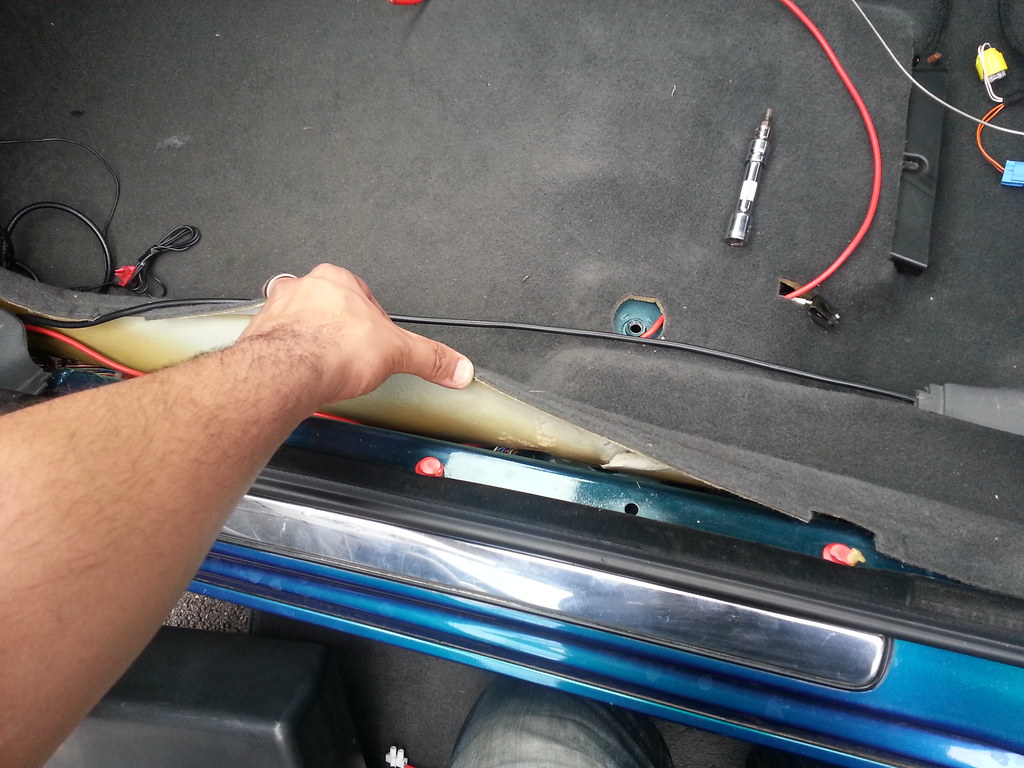 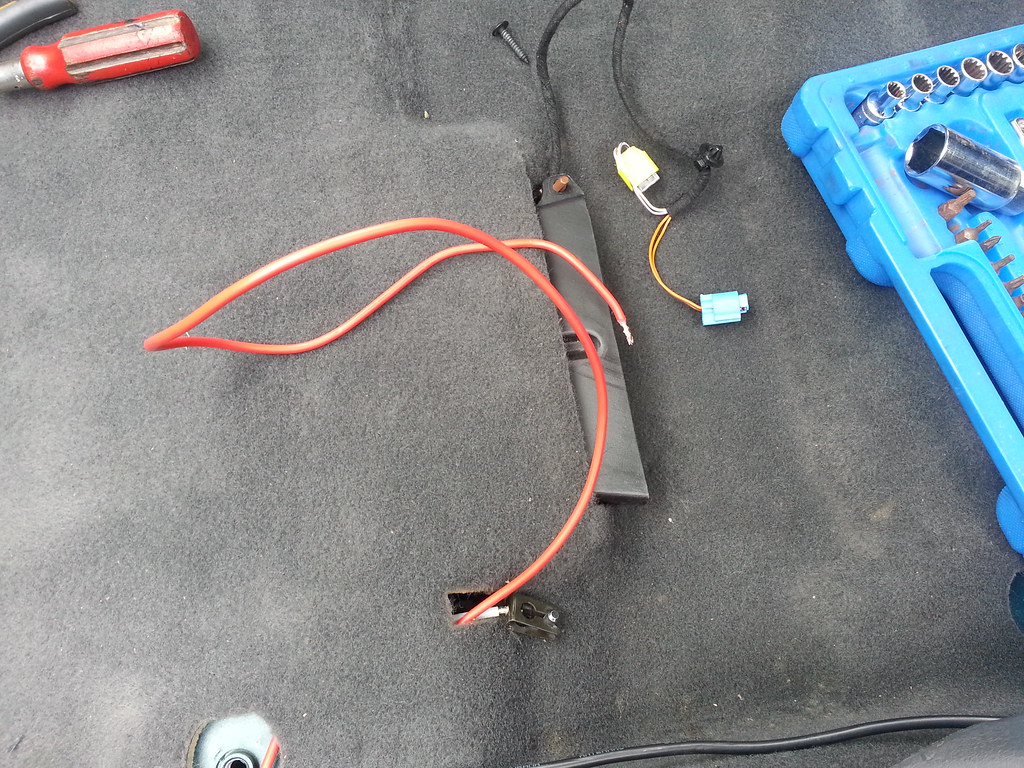 Now you have power to the driver and passenger seats. Wiring up the Driver's Seat: Power: Starting with the power cable you will need to split this into 3 live feeds for pins 2, 4 and 5 using a connector block (or by soldering). Here is where your inline fuse holders will come into play. Wire a inline fuse holder to all 3 live feeds, and fit one with a 30amp fuse, one with a 20amp fuse and one with a 5 amp fuse. Wire the 20 amp feed to the Orange/White wire coming from Pin 2 of the driver's seat plug, the 30 amp feed to the Orange/Yellow wire coming from pin 4, and the 5amp feed to the Brown/Pink wire coming from Pin 5. Use my wiring diagram above to help you here. 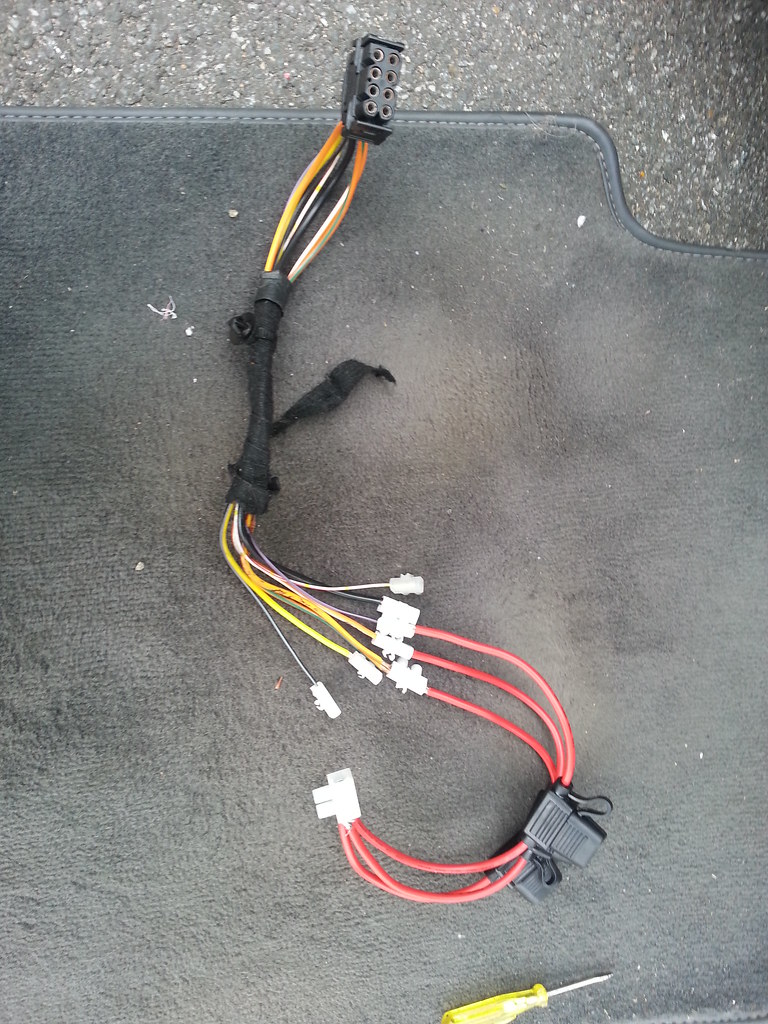 Earth: Pins 3 (Black wire) and 7 (Black/Slate) are the earth wires for the driver's seat electrics. Simply wire both of these to a suitable earth point in the car using a crimp ring connector, the closest one I found was in the drivers footwell under the carpet near the bonnet and boot release as shown below. 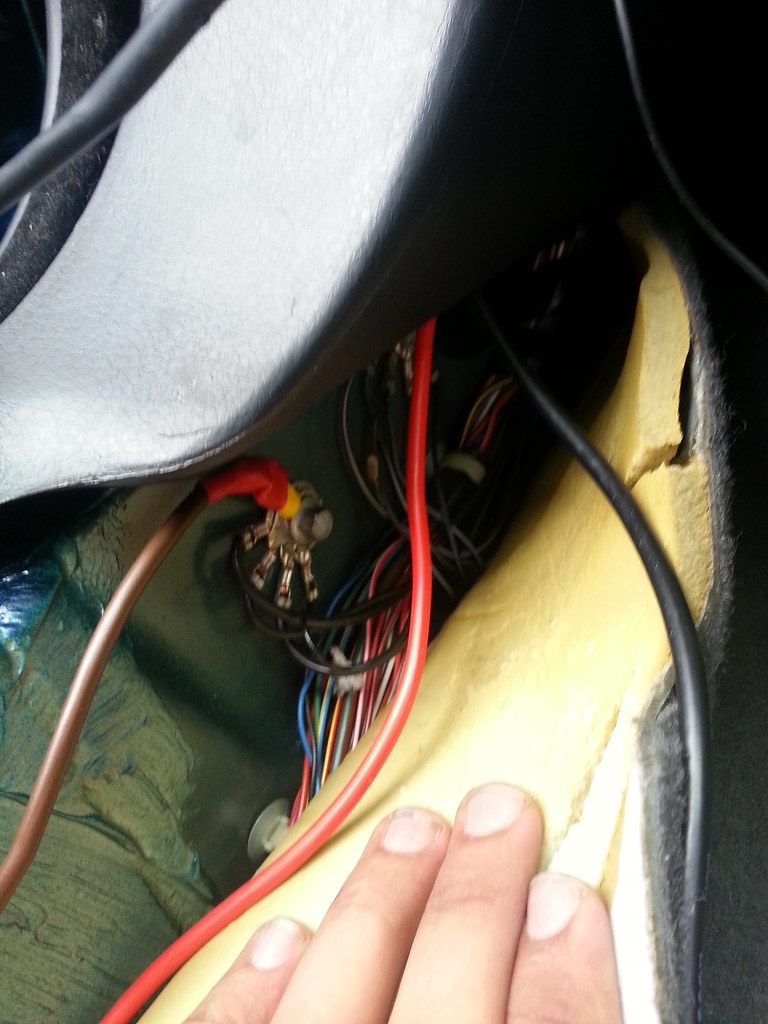 Pin 1: The Yellow wire coming from Pin 1 of the seat plug is for the heated seat switch. Using your 5amp wire, connect this to Pin 2 of the driver's heated seat switch plug. You can feed the wire via the same route to the centre consol that was used for the power wire explained above. 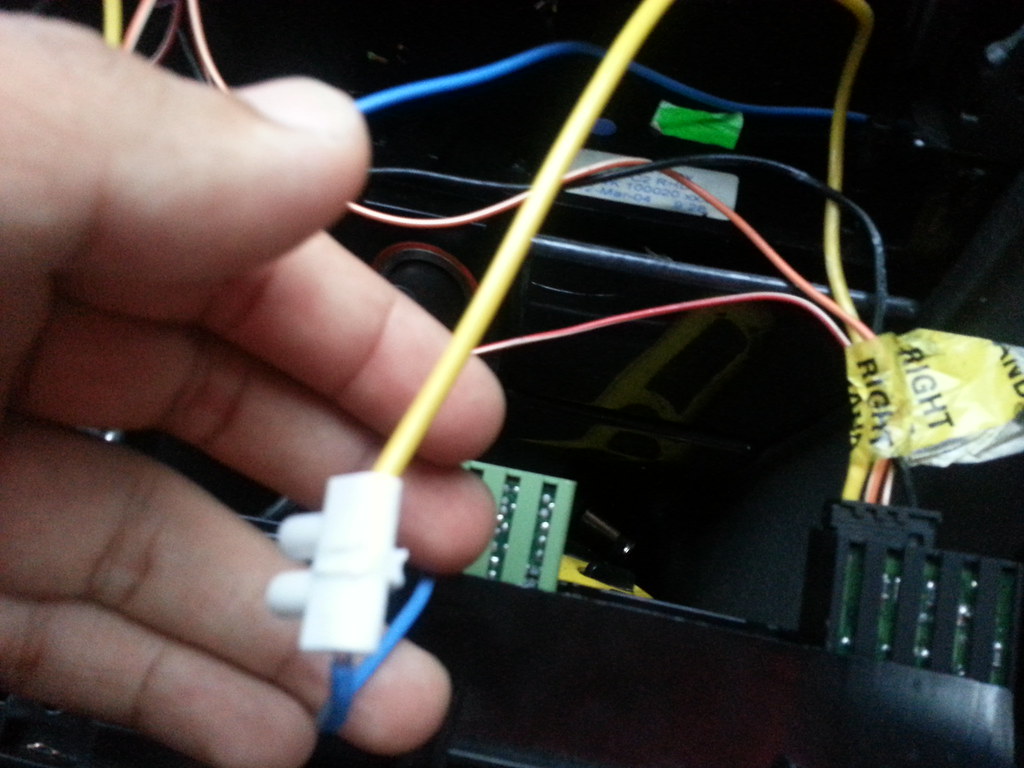 Pin 6: (K-Bus) This step is optional and only relevant if you have memory seats and if you wish to have the memory function working. If you wish to wire this up, you will need to find the k-bus for the radio behind the centre console (red, white and yellow wire) connect into it. Your driver's side loom will look like this:  Wiring up the Passenger's Seat: This one is a little easier than the Drivers seat as there are less wires and no K-Bus wire. The steps are the same as for the drivers seat wiring above. Power: For the passenger seat, you will need to split your live power feed into two and wire in your inline fuse holders. One fuse holder will require a 20amp fuse and the other will require a 5 amp fuse. As above, the 20amp live feed is to be wired to pin 2 (orange/white) wire of the electric seat plug, and the 5amp feed is to be wired to pin 5 (Brown/Pink) wire of the plug. Earth: There is only one earth for the passenger seat which is pin 3 (Black wire). As above for the driver's seat, wire this to a suitable earth point in the car using a crimp ring connector. the closest one I found for the passenger seat was under the carpet on the left side of the passenger footwell. Pin 1: As above for the driver seat, the Yellow wire coming from Pin 1 of the seat plug is for the heated seat switch. Using your 5amp wire, connect this to Pin 2 of the Passenger's heated seat switch plug. Your passenger side loom will look like this: 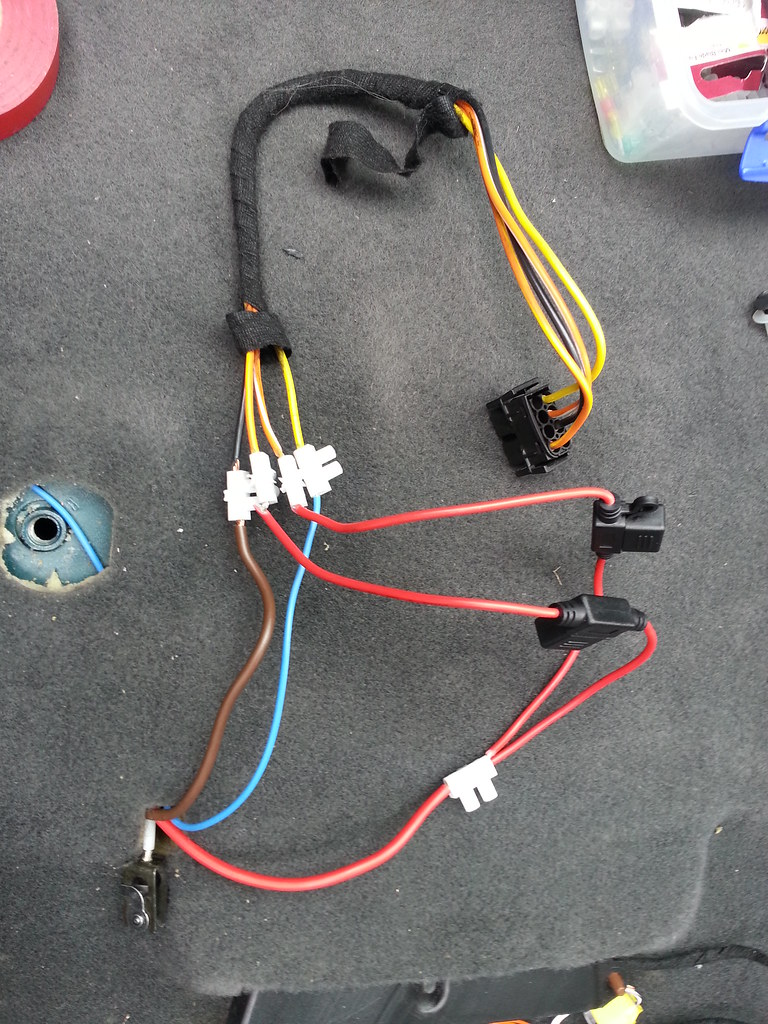 Wiring up the Heated Seat Switches: The heated seat switch plugs which fit in the centre consol each have the same 4 wires: Pin 1 (Black) 1.5mm wire: this is the earth for the switch, simply wire to a suitable earth or if you have a spare unused switch plug behind the centre consol (such as the traction control plug), tap into the earth wire on that plug as it is unused. Pin 2 (Yellow) 0.75mm wire: This is already done, as this is the wire which connects to pin 1 of the 8 pin electric seat plugs as dealt with above. Pin 3 (Red/White) 0.5mm wire: This wire is for the illumination of the heated seat switch when you switch your lights on at night. Simply tap into another red and white wire behind the centre consol by soldering or using an electrical connector block. Pin 4 (Orange/White) 0.5mm wire: this is for the green light which illuminates when the heated seat switch is on, this will need to be wired to another 12v switched feed (only live when the ignition is on). I wired this to an ignition live red/white wire behind the centre consol for the traction control switch which is not used. If you have the earlier ciggy lighter which is ignition live, you could tap into this or use the power feed for your seats as explained here: https://www.the75andztclub.co.uk/for...42&postcount=5 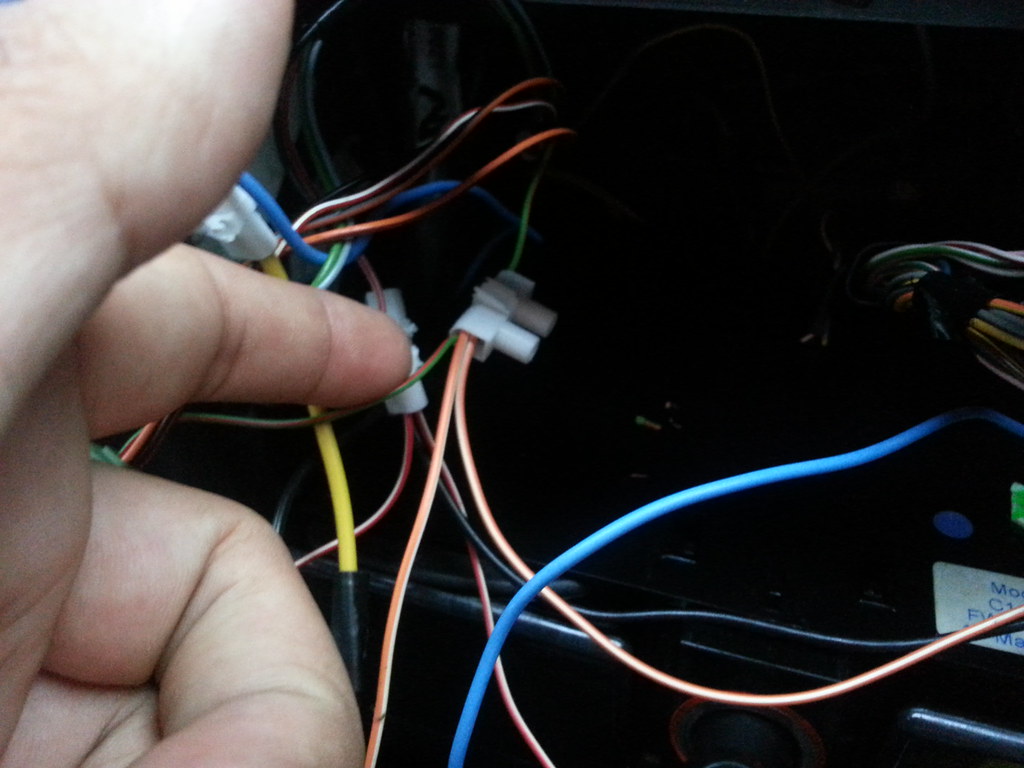 And that's it: Now plug in your electric seats and heated seat switches, reconnect the battery and test all the functions to ensure they work. Remember to have the key turned in the ignition to test the heated seats. I'd advise testing before putting all your interior back together just incase something doesn't work, meaning you'll have to check the wiring. I made my wiring under the seats long enough so that I could test them before fitting them in the car... 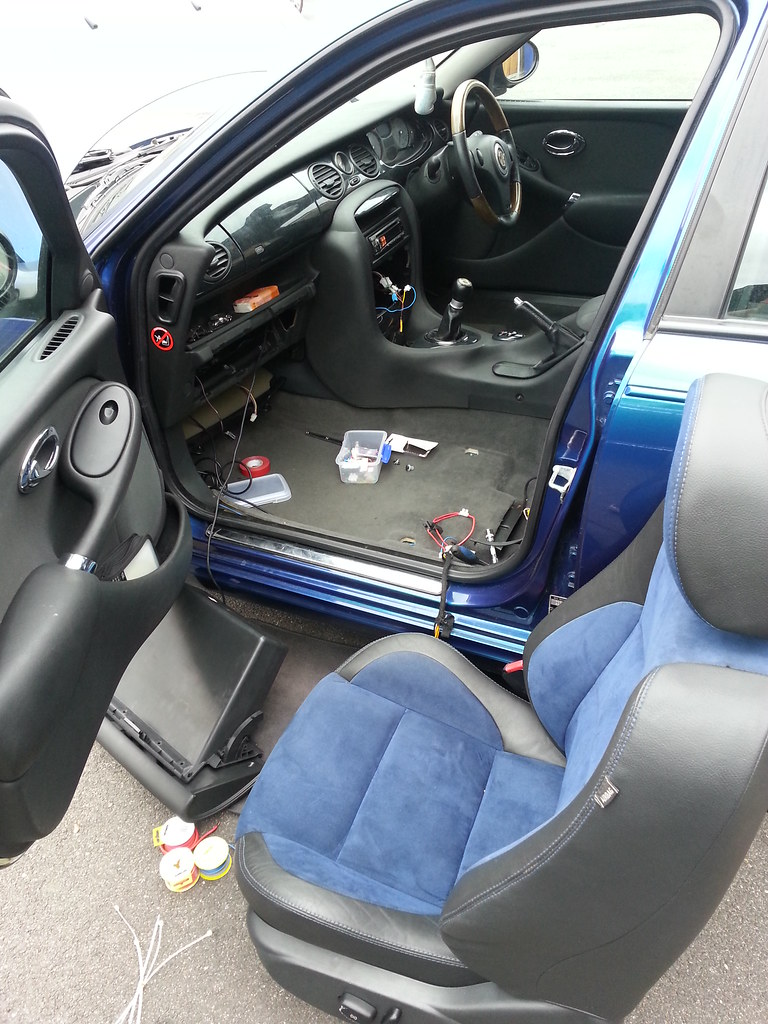 Other useful guides: https://www.the75andztclub.co.uk/for...ad.php?t=15926 https://www.the75andztclub.co.uk/forum/showpost.php?p=1020242&postcount=5 Hope this helps anyone looking to fit electric seats to a 75 or ZT which doesn't have the eelctric seats loom in place. Usual Disclaimer applies: You are responsible for any work or modifications carried out on your car and you undertake any such work at your own risk. The 75 and ZT Owners Club nor the original author of this How-To can be held liable for anything that may happen as a result of you following this How-To.
__________________
How to retrofit Cruise Control on a diesel with no OEM wiring in place: Link How to retrofit heated electric memory seats with no OEM wiring in place: Link How to operate FBH and ATC via text Link How to restore cloudy projector headlights Link
Last edited by Rick-sta; 12th November 2017 at 13:11.. |

|

|
|
13th September 2016, 19:55
|
#2 |
|
I really should get out more.......
None at the moment. Join Date: Mar 2014
Location: Hartlepool
Posts: 2,067
Thanks: 939
Thanked 384 Times in 294 Posts
|
Thanks ever so much mate, this will really help

__________________
Best Regards, Lee. DONE: HAD A CRAZY IDEA THAT I HAD TO GET RID OF MY MG ZTT DUE TO NOT HAVING A DRIVE AND HAVING TO PARK ON A BUSY STREET WITH A VIEW TO GETTING ANOTHER ONE AT A LATER DATE WHEN I HAVE A DRIVE. ENDED UP REALISING IT REALLY ISN'T PRACTICAL NOT HAVING A CAR TO GET AROUND AND I NOW OWN A VW EOS 3.2 V6 INDIVIDUAL (1 OF 20 REMAINING IN THE UK WITH THAT ENGINE AND TRIM COMBO) EVEN THOUGH I STILL LIVE ON A BUSY ROAD WITHOUT A DRIVE  
|
|
|
|
|
13th September 2016, 23:22
|
#3 | |
|
This is my second home
MG ZT 2.0 CDTI+ in Typhoon, MG TF 135 in Typhoon & Rover 75 Connoisseur CDTI SE in Pearl Black Join Date: Oct 2012
Location: Norfolk
Posts: 7,534
Thanks: 2,718
Thanked 2,827 Times in 1,462 Posts
|
Quote:
|
|
|
|
|
|
13th September 2016, 23:29
|
#4 | |
|
I really should get out more.......
None at the moment. Join Date: Mar 2014
Location: Hartlepool
Posts: 2,067
Thanks: 939
Thanked 384 Times in 294 Posts
|
Quote:
__________________
Best Regards, Lee. DONE: HAD A CRAZY IDEA THAT I HAD TO GET RID OF MY MG ZTT DUE TO NOT HAVING A DRIVE AND HAVING TO PARK ON A BUSY STREET WITH A VIEW TO GETTING ANOTHER ONE AT A LATER DATE WHEN I HAVE A DRIVE. ENDED UP REALISING IT REALLY ISN'T PRACTICAL NOT HAVING A CAR TO GET AROUND AND I NOW OWN A VW EOS 3.2 V6 INDIVIDUAL (1 OF 20 REMAINING IN THE UK WITH THAT ENGINE AND TRIM COMBO) EVEN THOUGH I STILL LIVE ON A BUSY ROAD WITHOUT A DRIVE
|
|
|
|
|
|
13th September 2016, 23:40
|
#5 |
|
This is my second home
MG ZT 2.0 CDTI+ in Typhoon, MG TF 135 in Typhoon & Rover 75 Connoisseur CDTI SE in Pearl Black Join Date: Oct 2012
Location: Norfolk
Posts: 7,534
Thanks: 2,718
Thanked 2,827 Times in 1,462 Posts
|
no problem mate, best of luck and let me know if you have any more questions
|
|
|
|
|
13th September 2016, 23:41
|
#6 |
|
This is my second home
None * DROWNED Join Date: Aug 2007
Location: Cardigan
Posts: 33,339
Thanks: 1,257
Thanked 1,664 Times in 1,081 Posts
|
__________________
Andrew Ich Dien Problem solving is... lateral thinking SEARCH FIRST ...ASK LATER...  |
|
|
|
|
13th September 2016, 23:50
|
#7 |
|
This is my second home
MG ZT 2.0 CDTI+ in Typhoon, MG TF 135 in Typhoon & Rover 75 Connoisseur CDTI SE in Pearl Black Join Date: Oct 2012
Location: Norfolk
Posts: 7,534
Thanks: 2,718
Thanked 2,827 Times in 1,462 Posts
|
|
|
|
|
|
14th September 2016, 00:47
|
#8 | |
|
This is my second home
None * DROWNED Join Date: Aug 2007
Location: Cardigan
Posts: 33,339
Thanks: 1,257
Thanked 1,664 Times in 1,081 Posts
|
Quote:
 If you have any additions etc, please let me know so that I can amend.... 
__________________
Andrew Ich Dien Problem solving is... lateral thinking SEARCH FIRST ...ASK LATER... |
|
|
|
|
|
14th September 2016, 08:21
|
#9 | |
|
This is my second home
MG ZT 2.0 CDTI+ in Typhoon, MG TF 135 in Typhoon & Rover 75 Connoisseur CDTI SE in Pearl Black Join Date: Oct 2012
Location: Norfolk
Posts: 7,534
Thanks: 2,718
Thanked 2,827 Times in 1,462 Posts
|
Quote:
|
|
|
|
|
|
15th September 2016, 18:39
|
#10 |
|
I really should get out more.......
None at the moment. Join Date: Mar 2014
Location: Hartlepool
Posts: 2,067
Thanks: 939
Thanked 384 Times in 294 Posts
|
Alright mate,
Just want to say thanks again for this how to, seats were delivered this morning and by this afternoon they were working as intended I had a slight hiccup because at first they wouldn't work and I thought the worst but it was the spade connectors in the back of the fuse box being not big enough to contact with the fuses (as mentioned to make sure of in the how to so I knew where to start my fault finding )...luckily I had a couple of spare piggy back fuse holders so I switched to option 2 (I messaged the eBay seller I got them off and they confirmed that they were OK for 30a).One question though...is the drivers seat supposed to have permanent power to operate the seat (I can move it even without the key in the ignition...the motors won't be drawing power though if not in use so my battery won't go flat?) The heated switch is ignition live so the seats won't be on permanent.
__________________
Best Regards, Lee. DONE: HAD A CRAZY IDEA THAT I HAD TO GET RID OF MY MG ZTT DUE TO NOT HAVING A DRIVE AND HAVING TO PARK ON A BUSY STREET WITH A VIEW TO GETTING ANOTHER ONE AT A LATER DATE WHEN I HAVE A DRIVE. ENDED UP REALISING IT REALLY ISN'T PRACTICAL NOT HAVING A CAR TO GET AROUND AND I NOW OWN A VW EOS 3.2 V6 INDIVIDUAL (1 OF 20 REMAINING IN THE UK WITH THAT ENGINE AND TRIM COMBO) EVEN THOUGH I STILL LIVE ON A BUSY ROAD WITHOUT A DRIVE
|
|
|
|
 |
|
|


 Linear Mode

